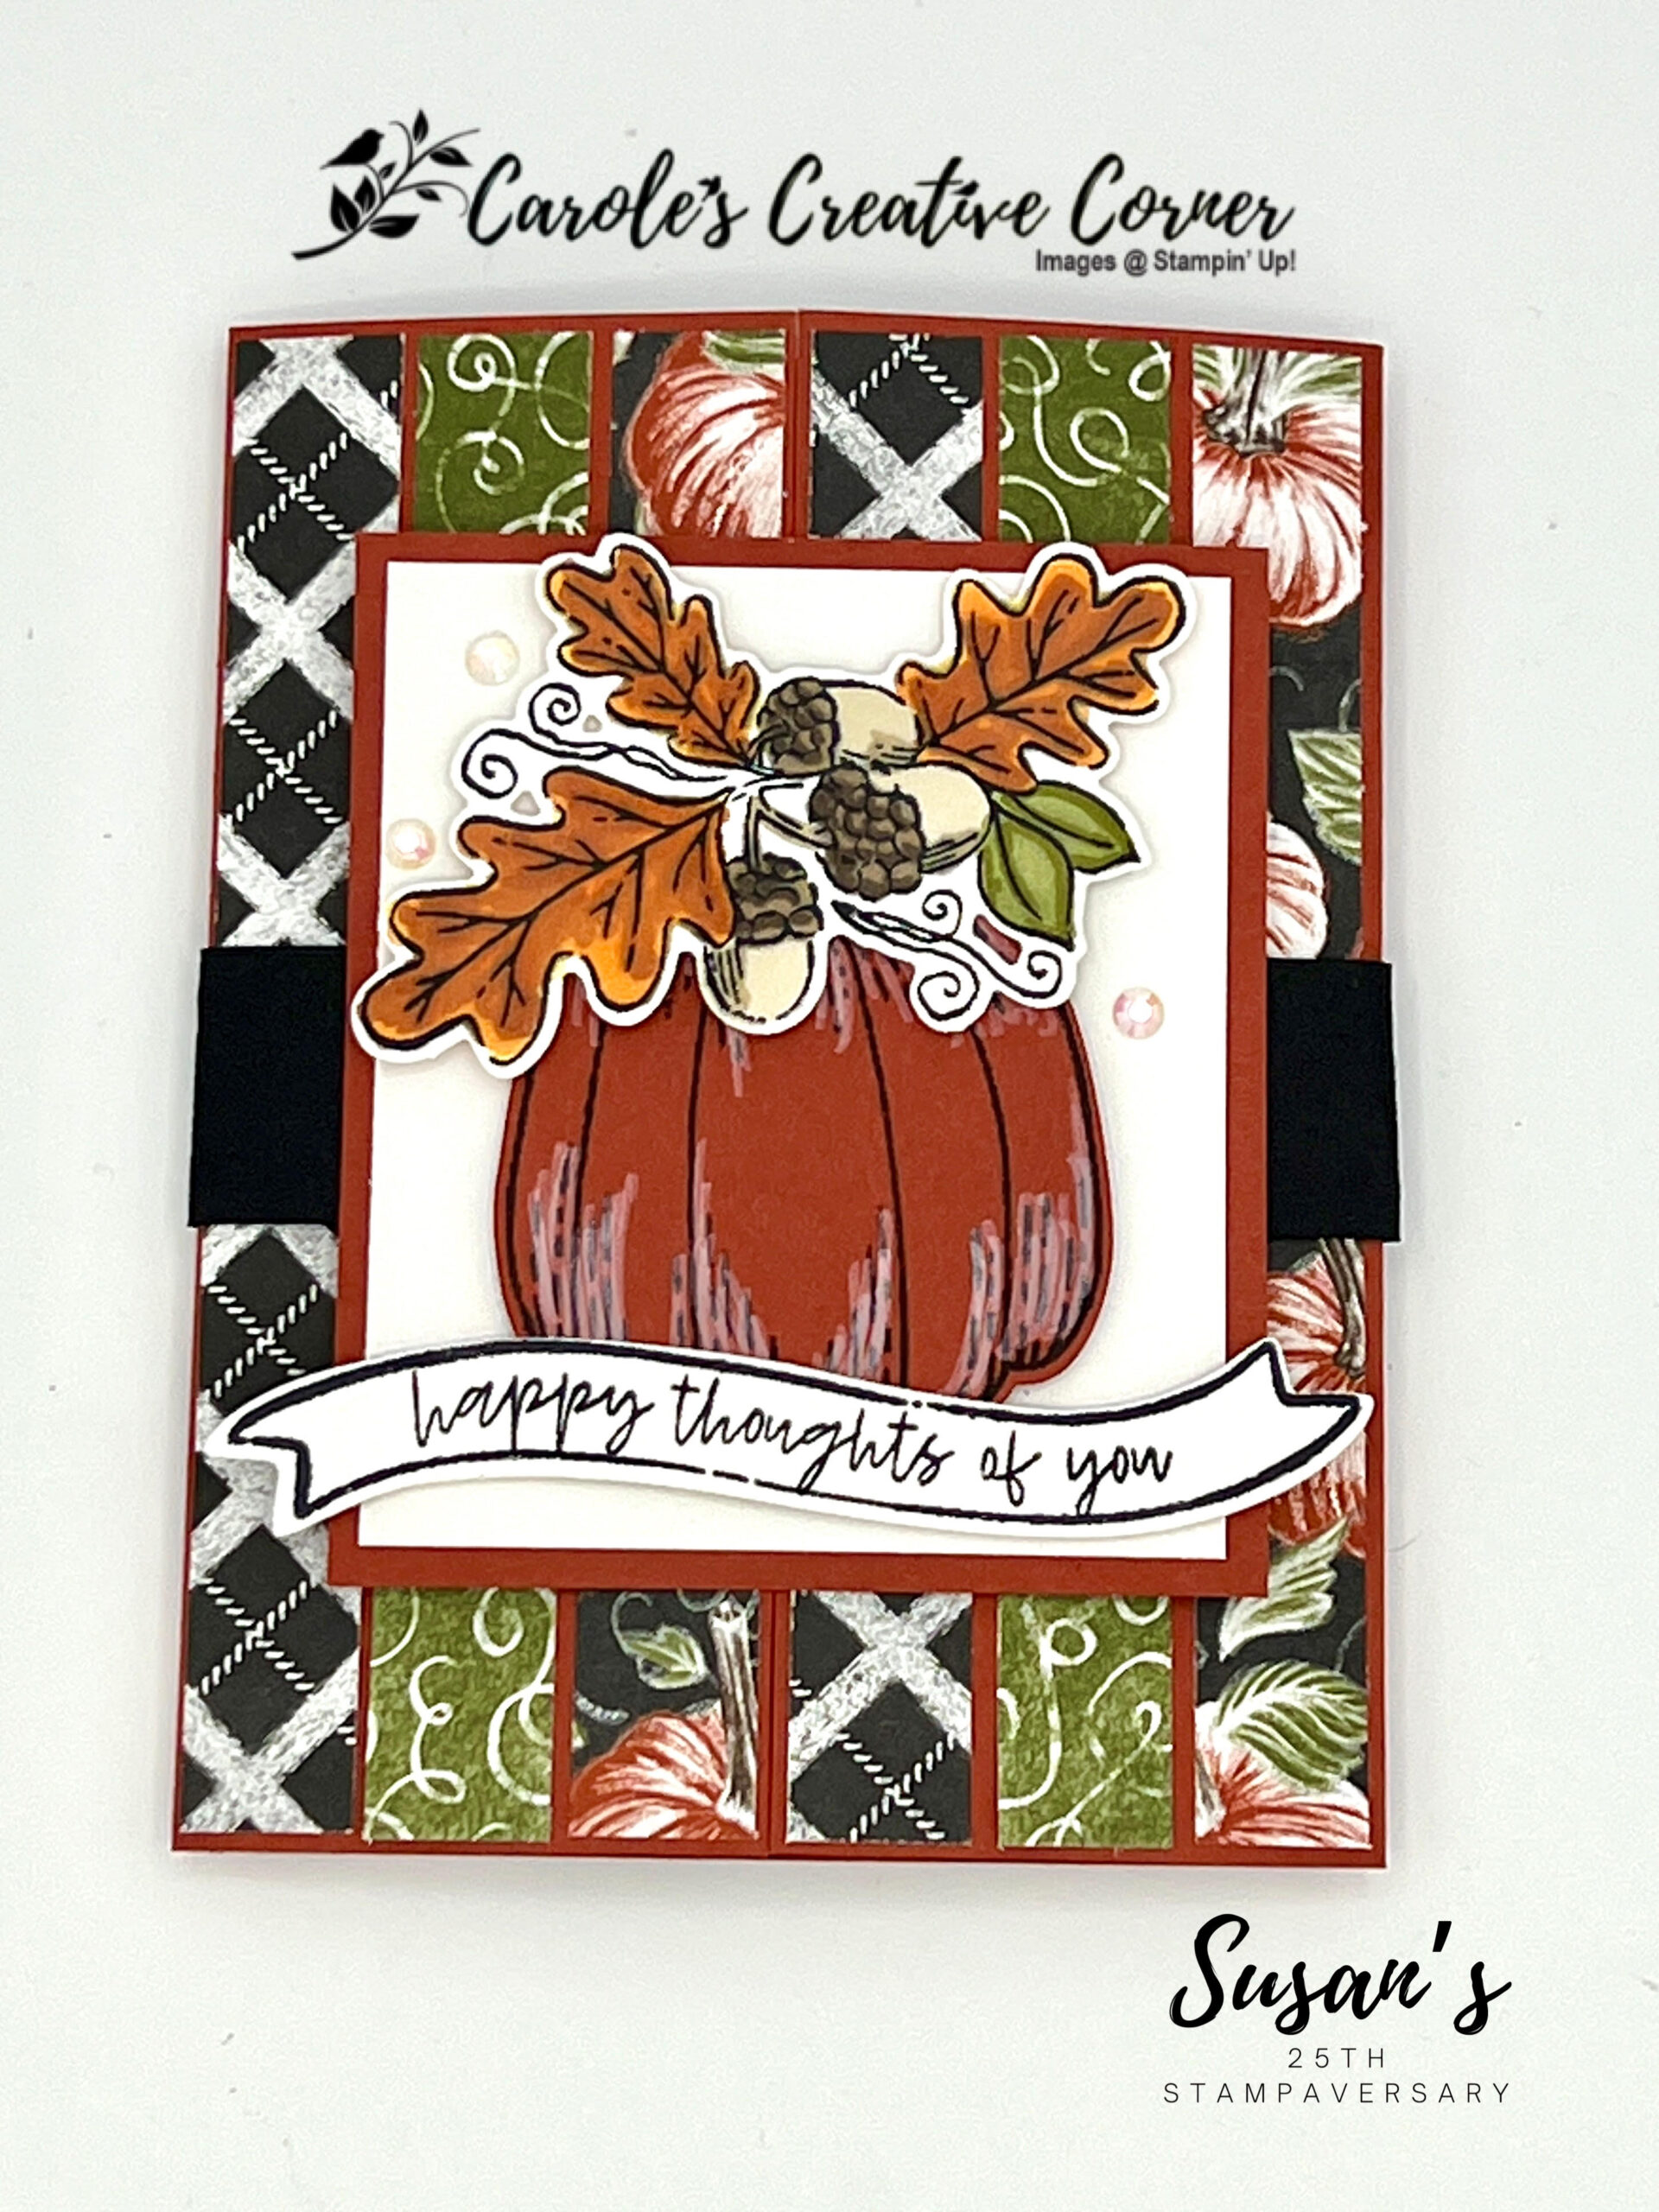
It’s an amazing achievement for Susan Campfield to reach 25 years with Stampin’ Up! That’s a lot of years of creating, giving to others, inspiring others, and being a great team leader. She’s been my team leader for about 5 years (in total) but I’ve known her since she started her career and she’s accomplished so much! Thanks for following this blog hop so that you can see all the different versions of the Pop Out Bendy Fold Card that Susan Campfield inspired her team members (and customers) with! Happy 25th Anniversary Susan! I hope this version of the fun fold gives everyone some fall inspiration!
Card Measurements:
Cajun Craze Cardstock:
Card base: 5.5″ x 8.5″ scored at t 2-1/8”, 4-1/4”, 6-3/8”
Bendy piece: 1” x 5-1/8” score at 1/2” and at 4-5/8” (1/2” in from each end)
Wobble piece: 1” x 3” score at 1/2”, 1”, 2”, 2-1/2”
Front and inside of card: (2) 3-1/4″ x 3-3/4″
Piece for die cutting pumpkin
Basic Black Cardstock: 1” x 9-1/4” for the bellyband
Basic White:
(2) 3″ x 3-1/2″, one for the front and one for the inside of the card
Piece for foliage and flower die cut and sentiment banner
Rustic Harvest Designer Series Paper:
(2) 3/4″ x 5 1/8″ of 3 different patterns of paper to decorate front of card
(2) 2″ x 5 1/8″ of pumpkin pattern for inside of card
Directions:
Click on Image below to link to Susan’s Video Tutorial on how to assemble the Pop Out Bendy Fold card:
Click on above image to link to Susan’s Video Tutorial
Card base: Basic White CS 12” x 4.75” scored on the long side at 4” and 8”
Real Red CS: 6.5” x 3.75” (two of these) scored on the long side at 2.75” and lightly at 5.5”
Basic White CS: 2.5” x 3.5” (four of these)
Pear Pizazz CS: 3.75” x 4.5”
Basic White: 3.5” x 4.25”
Designer Paper: 7/8” x 3.5” (two of these)
Designer Paper: 2.5” x 3.5” (two of these)
Gingerbread & Peppermint DSP for tree, snowflake, ornament cut-outs and peppermint candy pieces
Real Red ribbon: 7” piece and two 6” pieces
This shows the panel that goes in the middle – adhere the ribbon first and then the “Merry Christmas” and snowflake white cs pieces go UPSIDE DOWN as shown!
This shows the bottom panel – adhere the ribbon first and then the “happy holidays” and ornament white cs pieces.
Assembly
For this card, I’ve already adhered the 7/8” x 3.5” strips of designer paper to the Real Red cardstock pieces and attached those panels to the card base with brads.
Before you adhere the stamped white cardstock pieces, please review the video and take a look at these photos so you can see how everything is placed.
The ribbon for each Real Red cardstock panel needs to be adhered first BEFORE you adhere the white stamped cardstock pieces. Use some adhesive and place the ribbon so it forms a “loop” as shown – the ends will be covered by the white cs pieces.
For the bottom Real Read panel, the ribbon will be at the bottom of the cs piece. Then “happy holidays” and the ornament cs piece will be layered onto it.
When you flip the card base over to work on the Real Red cs panel that goes in the middle, you’ll adhere the red ribbon so it forms a “loop” as shown.
VERY IMPORTANT: Adhere the “Merry Christmas” and snowflake white cardstock pieces upside down on this Real Red panel because with the way they flip out of the card, they’ll need to be upside down the way you’re working on it.
Once you have adhered the white cardstock pieces, adhere the red or pear pizazz designer paper pieces to the other side of the Real Red cardstock panel. (the portion under the snowflake and under the ornament piece).
The next step is to adhere the base together, working around your Real Red panels. You’ll want to fold the card base so that you’re putting each Real Red panel inside two white panels. You should end up with white panels on the front and back and the folded Real Red panels “sandwiched inside.” (See video about the 12-minute mark)
9. Use liquid glue on the corners as shown. You want to give the Real Red panel room to pivot on the brad.
10. Glue the other two panels together the same way, only applying liquid glue in the corners, allowing the other Real Red panel to pivot.
11. Once you have the card base glued together and it has had a few minutes to set with you pressing it together or putting something heavy on it to seal it, do a test where you pull out the panels. You want to make sure which white panel to glue your card front pieces on so the card is right-side-up.
12. For the card front, use Scotch tape to adhere the longest Red ribbon around the white cardstock piece and then adhere that to the Pear Pizazz cardstock. Adhere that to the card front.
Adhere one of your tree/ornament/snowflake shapes to the card front near the red ribbon, tucking the left side of it under the ribbon, and use pop dots for the second one.
13. Adhere the peppermint candies all around the card front.
14. Add Wonderful Gems embellishments and use a glue dot to attach the Real Red bow.
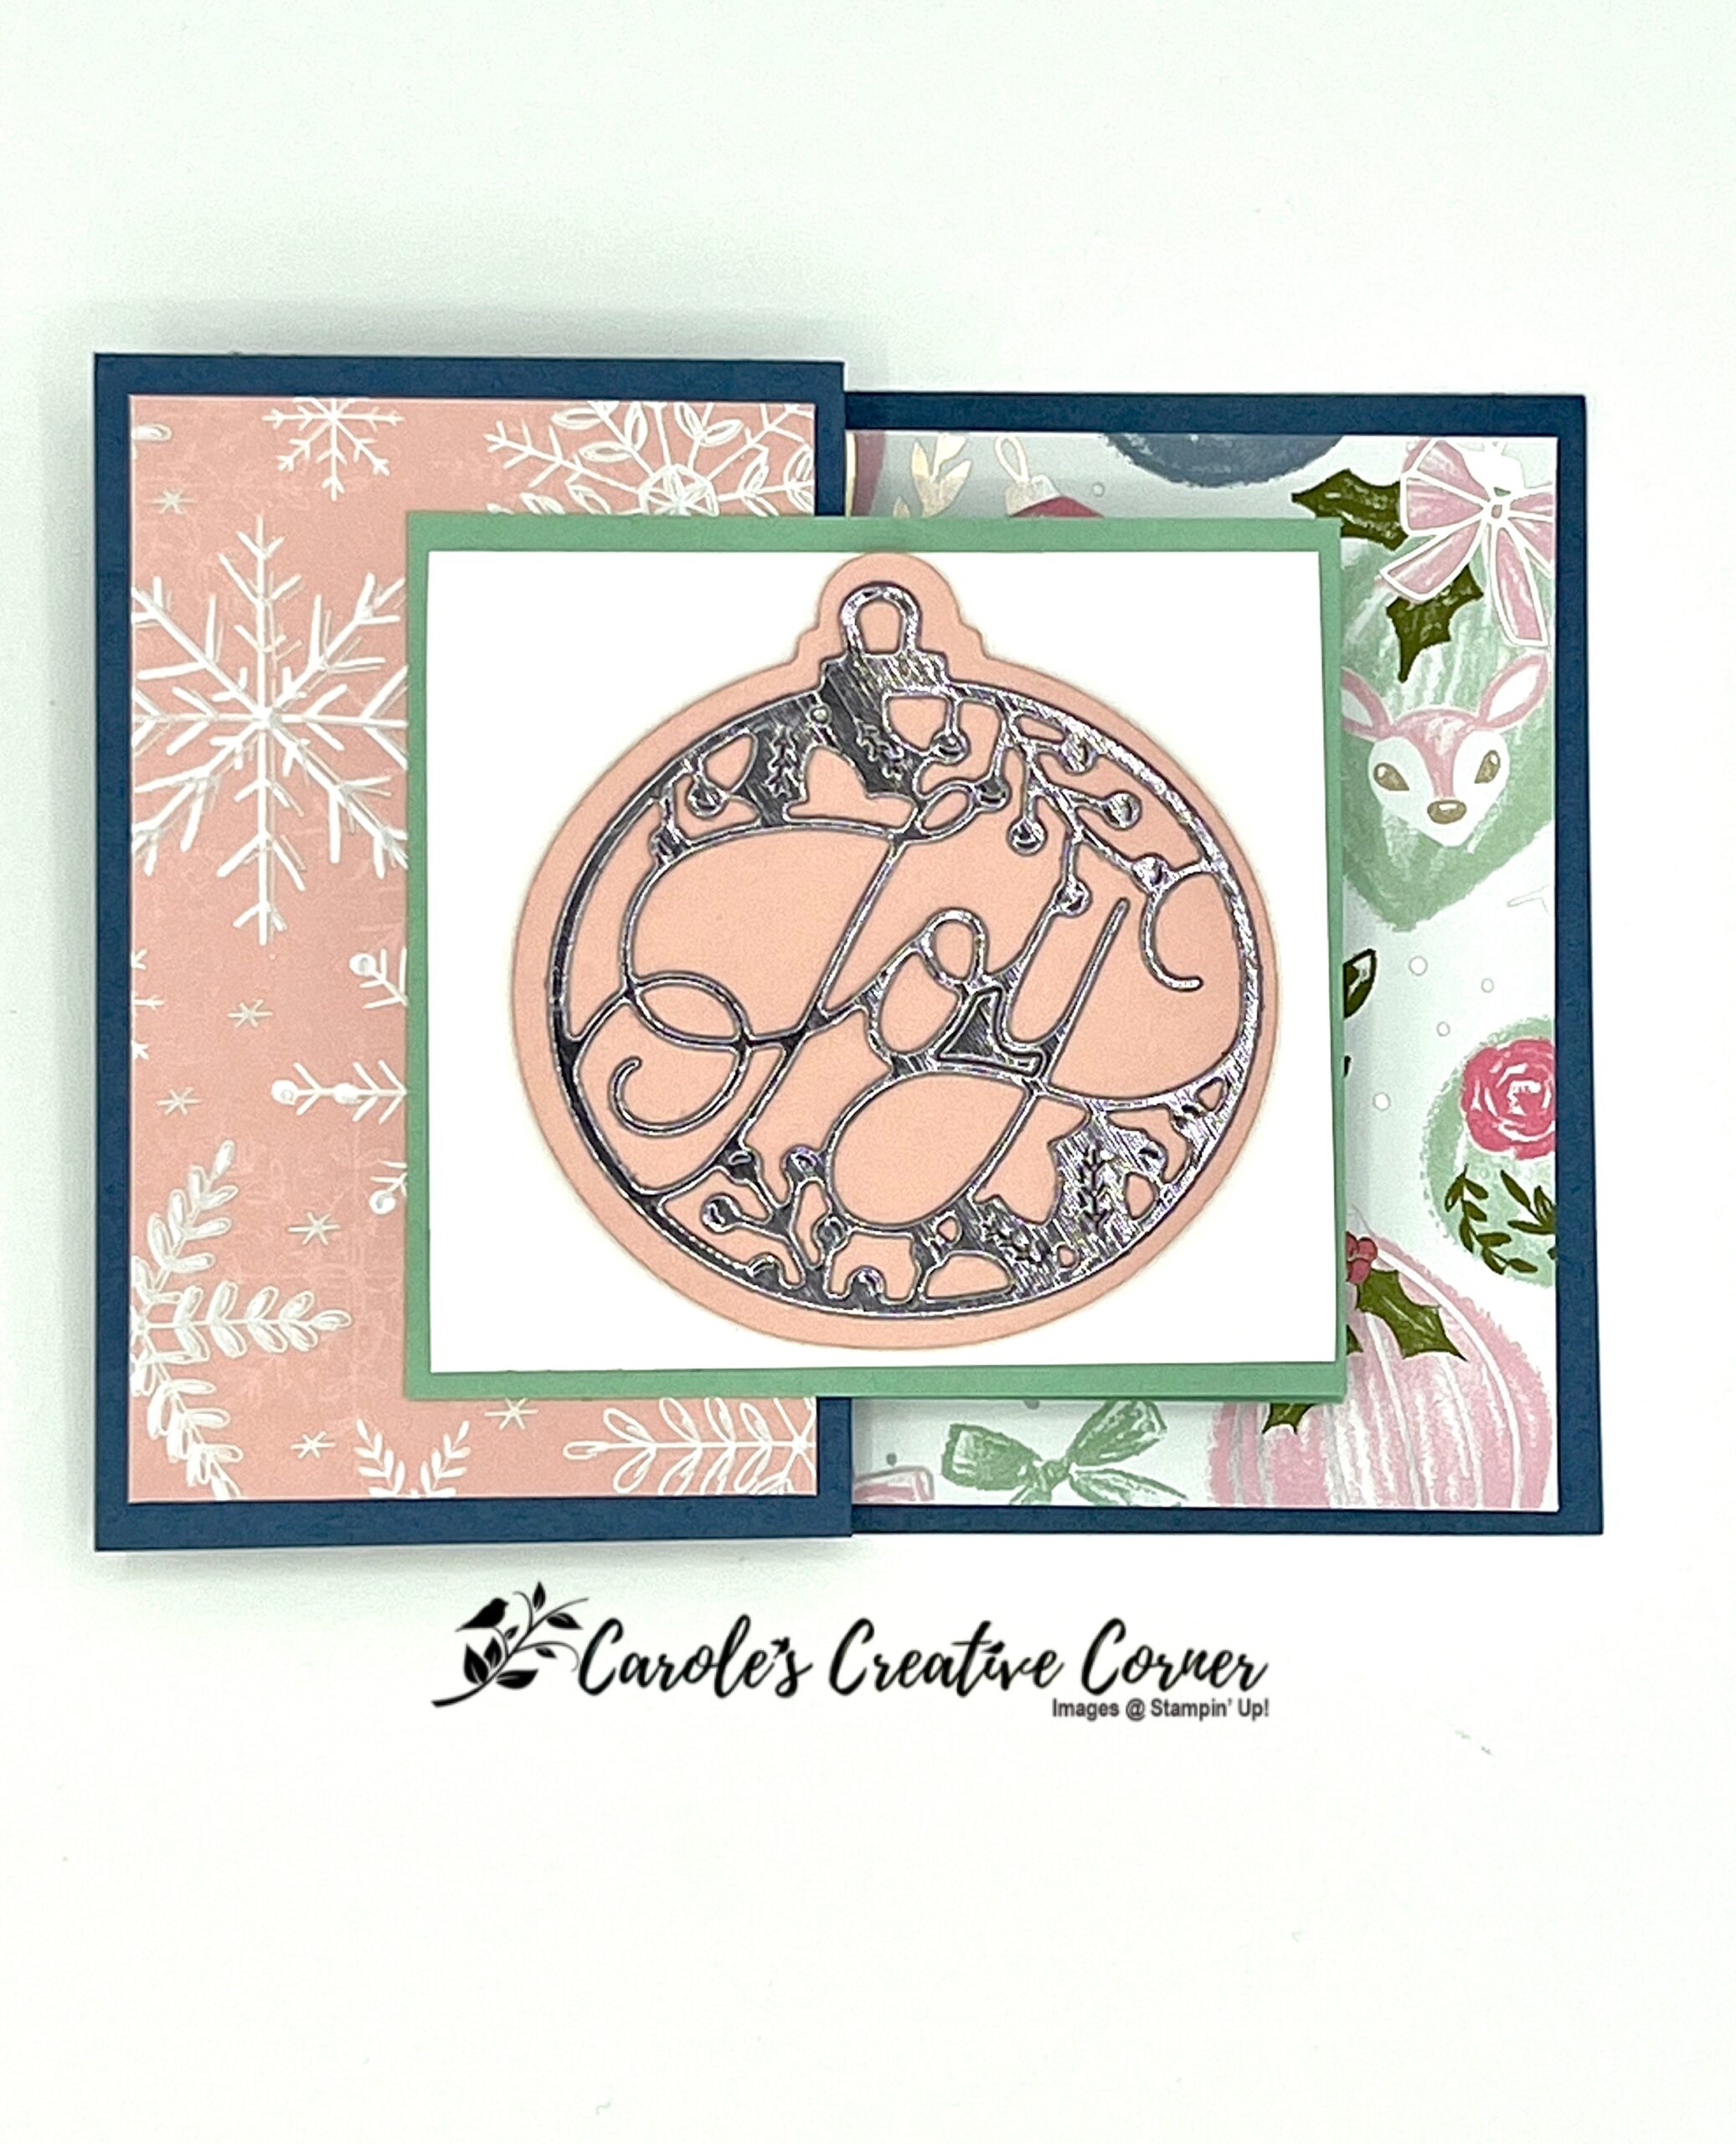
Card base: Misty Moonlight CS 11 x 4.25” scored at 2.75” and 5.5” for card base; piece for ornament die cut
Whimsy & Wonder Designer Paper: 5.25” x 4”, 4″ x 2.5″
Mint Macaron cardstock: 10.5” x 3.25” scored at 3.5” and 7”
Basic White cardstock: (3) 3″ x 3.25”
Silver Foil for ornament diecut
Blushing Bride cardstock: piece for ornament diecut
Assembly:
1. First, fold the Misty Moonlight card base in half. Then fold the front of the card in half so it “folds backward”
2. Adhere the 5.25” x 4” piece of designer paper to the inside of the card.
3. Adhere the 4” x 2.5” piece of designer paper to the folded back card front as shown.
4. Fold the Mint Macaron CS along its score lines in a mountain and then a valley fold. (It’s going to be the same fold as the Misty Moonlight base, which also has a mountain and then a valley.)
5. Adhere the White CS pieces to the Mint panels, with the two blank ones on the first and second panel and the Merry Christmas message on the third panel.
6. Close this Mint CS piece and adhere only the last panel of it to the center of 5.25” x 4” designer paper on the inside of the card.
7. Lift up the first panel of the Mint CS and adhere the back left half only to the folded back card front flap as shown in the picture. This forms your “Double Z” card.
8. Adhere the “Joy” ornament diecut to the Blushing Bride ornament diecut with liquid glue or your adhesive runner.
9. Use pop dots to adhere that Joy/Blushing Bride ornament to the card front.
10. Use liquid glue or your adhesive runner to adhere the Misty Moonlight ornament to the second panel of your card.
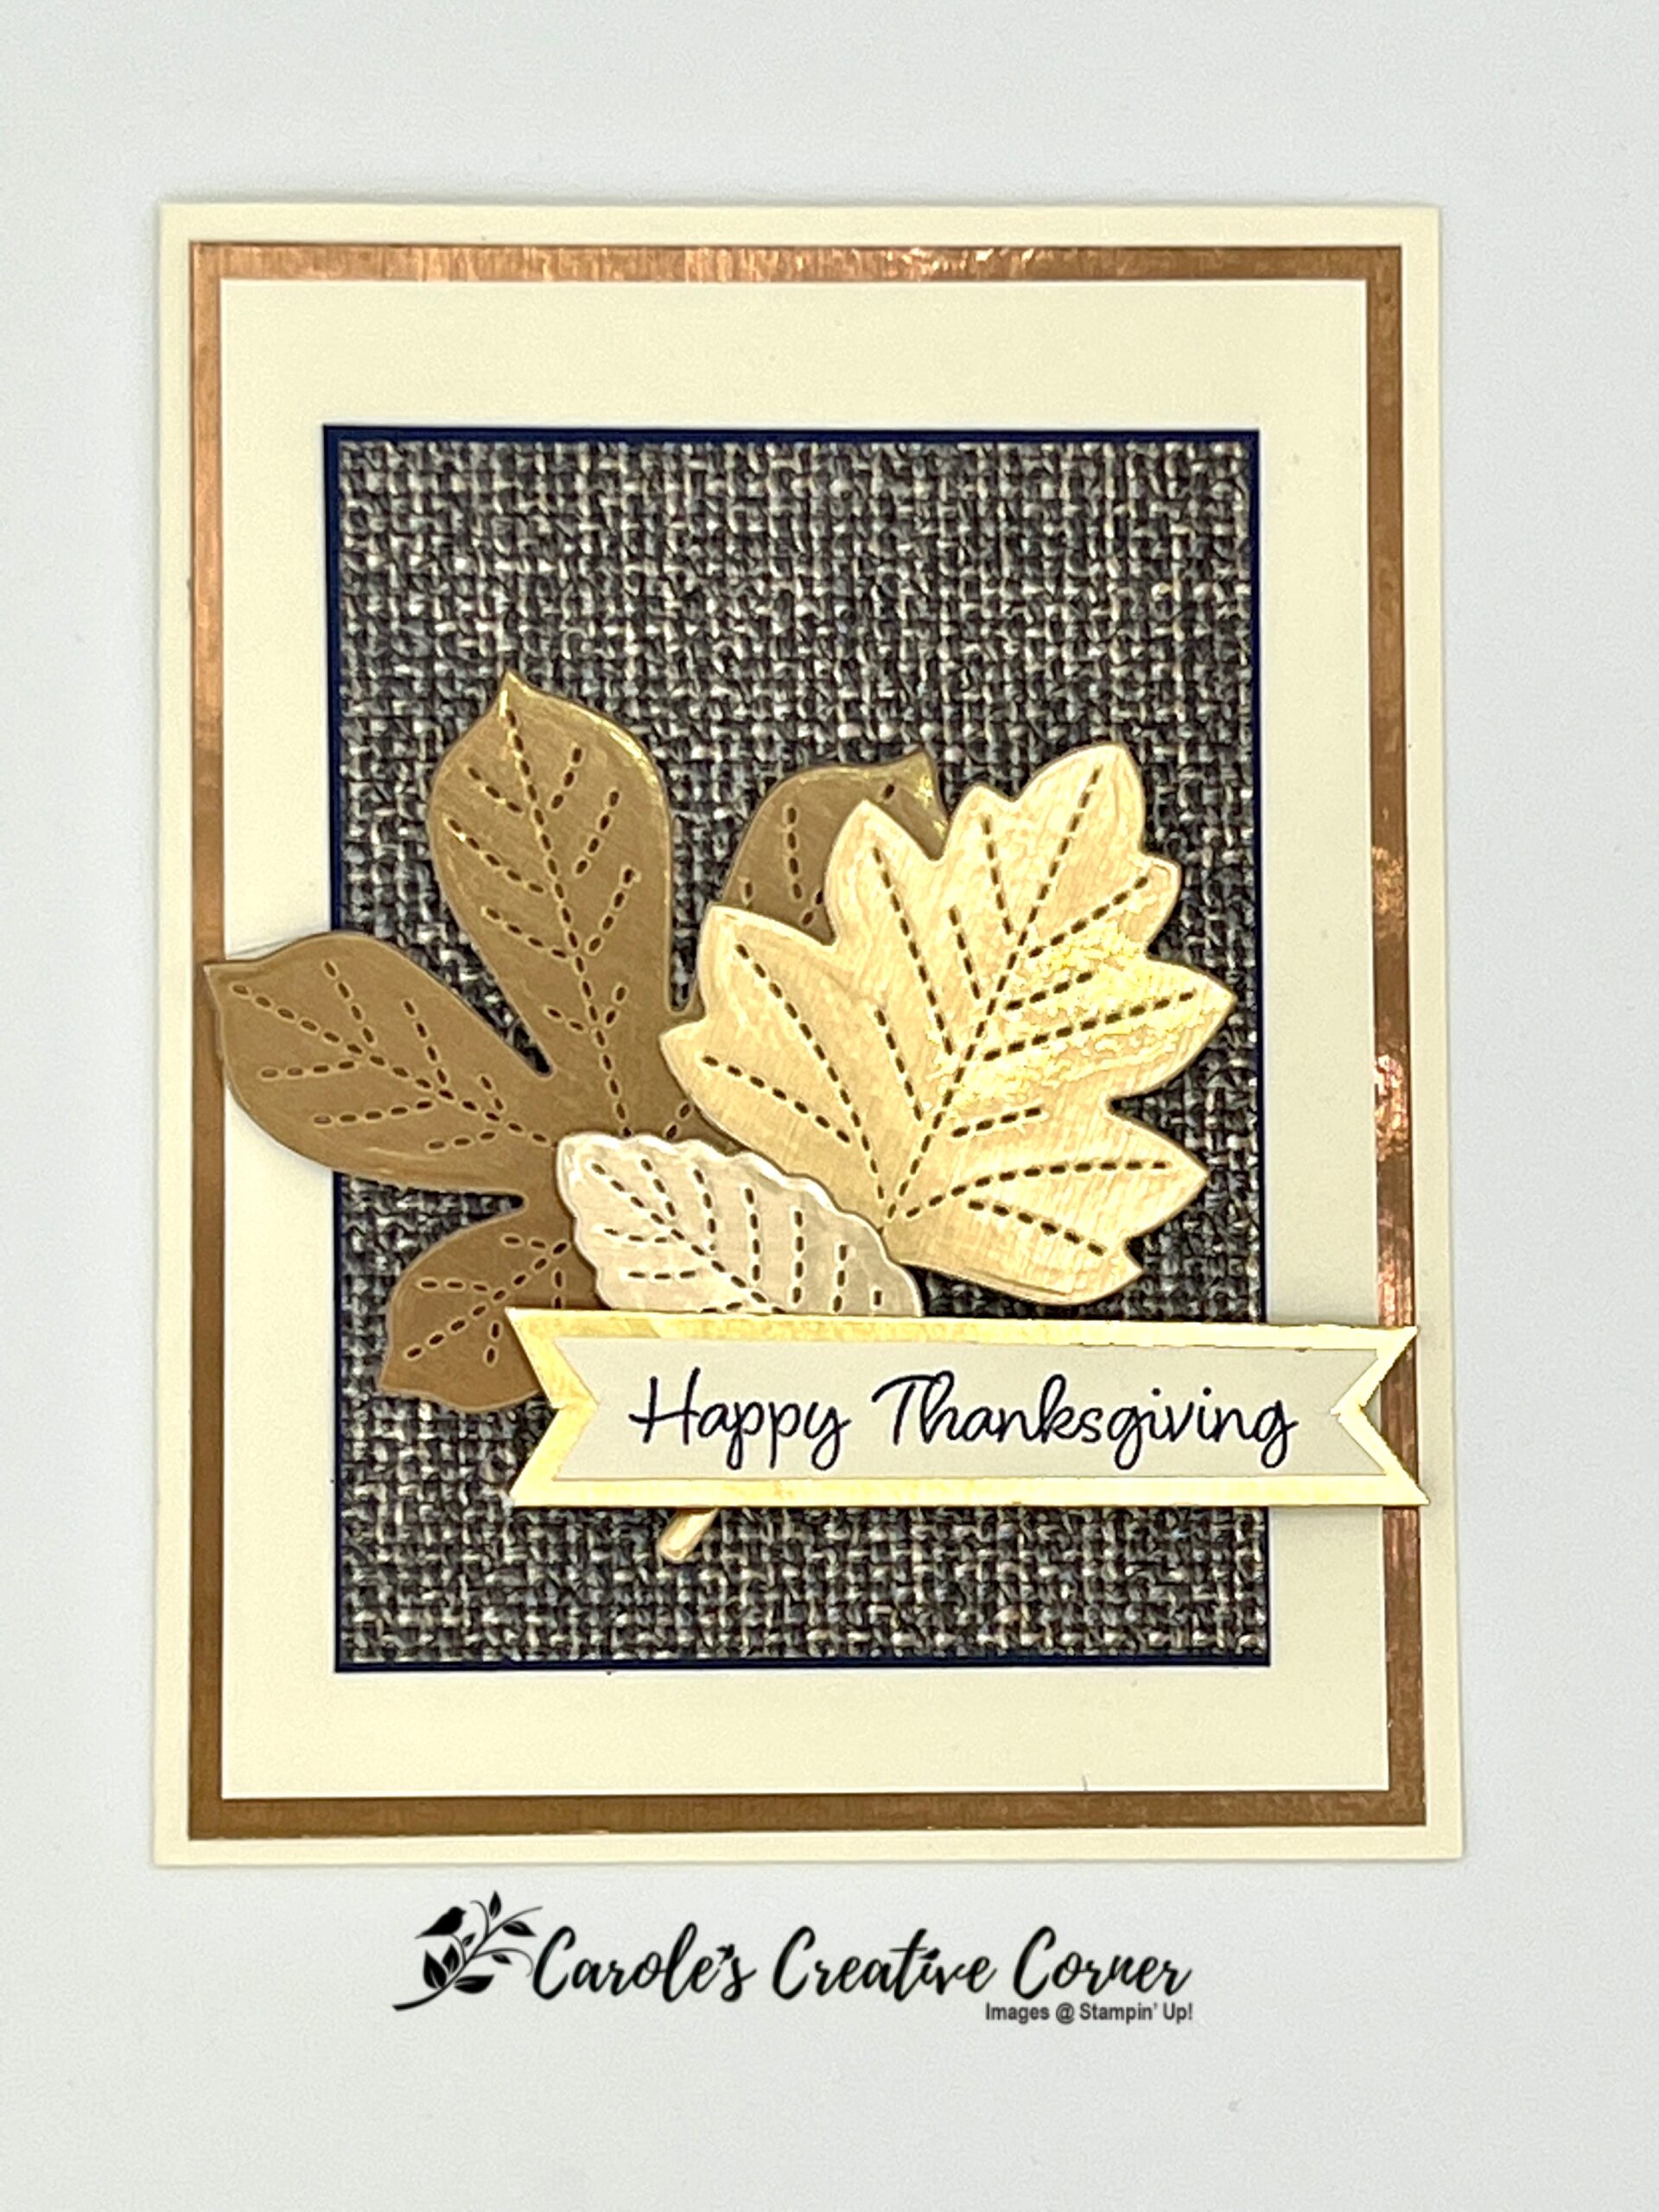
Very Vanilla cardstock: 8.5” x 5.5” scored at 4.25” for card base; (1) 5″ x 3.75″; for message 3 1/8” x ½” Brushed Metallic Cardstock: 5.25” x 4” (with leaves cut out of center) Night of Navy Cardstsock 4 1/8” x 3 1/8” In Good Taste Designer Series Paper: (blue/gray designs): 4” x 3”
Assembly:
First, fold the Vanilla card base.
Adhere the Brushed Metallic cardstock to the card front (it’s ok that it has leaves cut from it)
Adhere the Vanilla cardstock rectangle to the card front.
Adhere the Night of Navy cardstock to the card front
Adhere the Navy or Gray designer paper on top of that Navy cs.
Choose 3 leaves (you could do one of each metal color) and place them on the card front using pop dots.
Use your precision scissors to cut banner edges from the Vanilla message banner.
Adhere that Vanilla message to the Brushed Metallic cardstock strip and then use your scissors to cut the same edges in the backing piece. There should be a thin border all around the Vanilla cs.
I couldn’t wait for my order of Blackberry Beauty specialty DSP to arrive so I could use the Inspired Thoughts bundle with this paper. The gold foil in this Specialty paper looks great when used with the Inspiring Canopy dies! I love the random flecks of gold in the trees as well as the other rich colors. Read on to see how easy it is to make this card.
Click on Picture Above to Watch Video
Measurements:
Blackberry Bliss Cardstock: 5.5″ x 9.5″, scored at 1″, 2″ and 5.75″ along 9.5″ side, 4.25″ x 8.5″, scored at 4.25″ along 8.5″ side
Very Vanilla cardstock: 4.25″ x 3.25″ for scalloped rectangle die, 1.75″ square for circle sentiment, 4.75″ x 3.5″ for inside sentiment
Gold Metallic: 5.5″ x 1″ for hill die
Blackberry Beauty Specialty Designer Series Paper: 5.5″ x 4″ piece with gold foil for tree die cut, 3.75″ x 5.25″ coordinating piece from paper pack
Preparations:
Make the die cuts with the paper specified above for each die: trees, scalloped rectangle, circle sentiment, & hill.
Stamp sentiments on Very Vanilla circle and on 4.75 x 3.5″ piece in Blackberry Bliss paper.
Fold the large Blackberry Bliss paper with a mountain fold using the scoreline between the two 1″ sections. This will be the front of the card.
Also make a mountain fold with the scoreline between the two 3.75″ sections of the large Blackberry Bliss cardstock. Your card base will look like Figure 1 when you are done. Use a bone folder to crease all the folds so that it will lay more flat when finished.
Figure 1: 2 Mountain folds on Blackberry Bliss 5.5″ x 9.5″ paper
Assembly:
Adhere the 3.75″ x 5.25″ coordinating DSP to the 3.75″ Blackberry Bliss cardstock section facing the small mountain or front of card..
Fold the 4.25″ x 8.5″ piece of Blackberry Bliss cardstock along the scoreline. This panel will be adhered to the front and back of the card base, slightly off center towards the left hand side of the card. Adhere one side of the 4.25″ x 4.25″ panel to the back of the large piece of Blackberry Bliss. Then place about an inch of adhesive to the bottom inside edge of the other 4.25″ x 4.25 panel and adhere to the front of card base.
Adhere the Very Vanilla scalloped triangle to the center front of the 4.25″ x 4.25″ Blackberry Bliss cardstock.
Use adhesive to apply the gold metallic hill along the bottom front of the 1″ section of the Blackberry Blliss cardstock.
Next, adhere the trees to the front of the card and note that the trees are meant to hang over the edge of the 4.25″x 4.25″ section of Blackberry Bliss card stock and thus, will not need adhesive on the ends of the tree canopy.
Add circle sentiment with dimensions, only on the left side of circle and add to card.
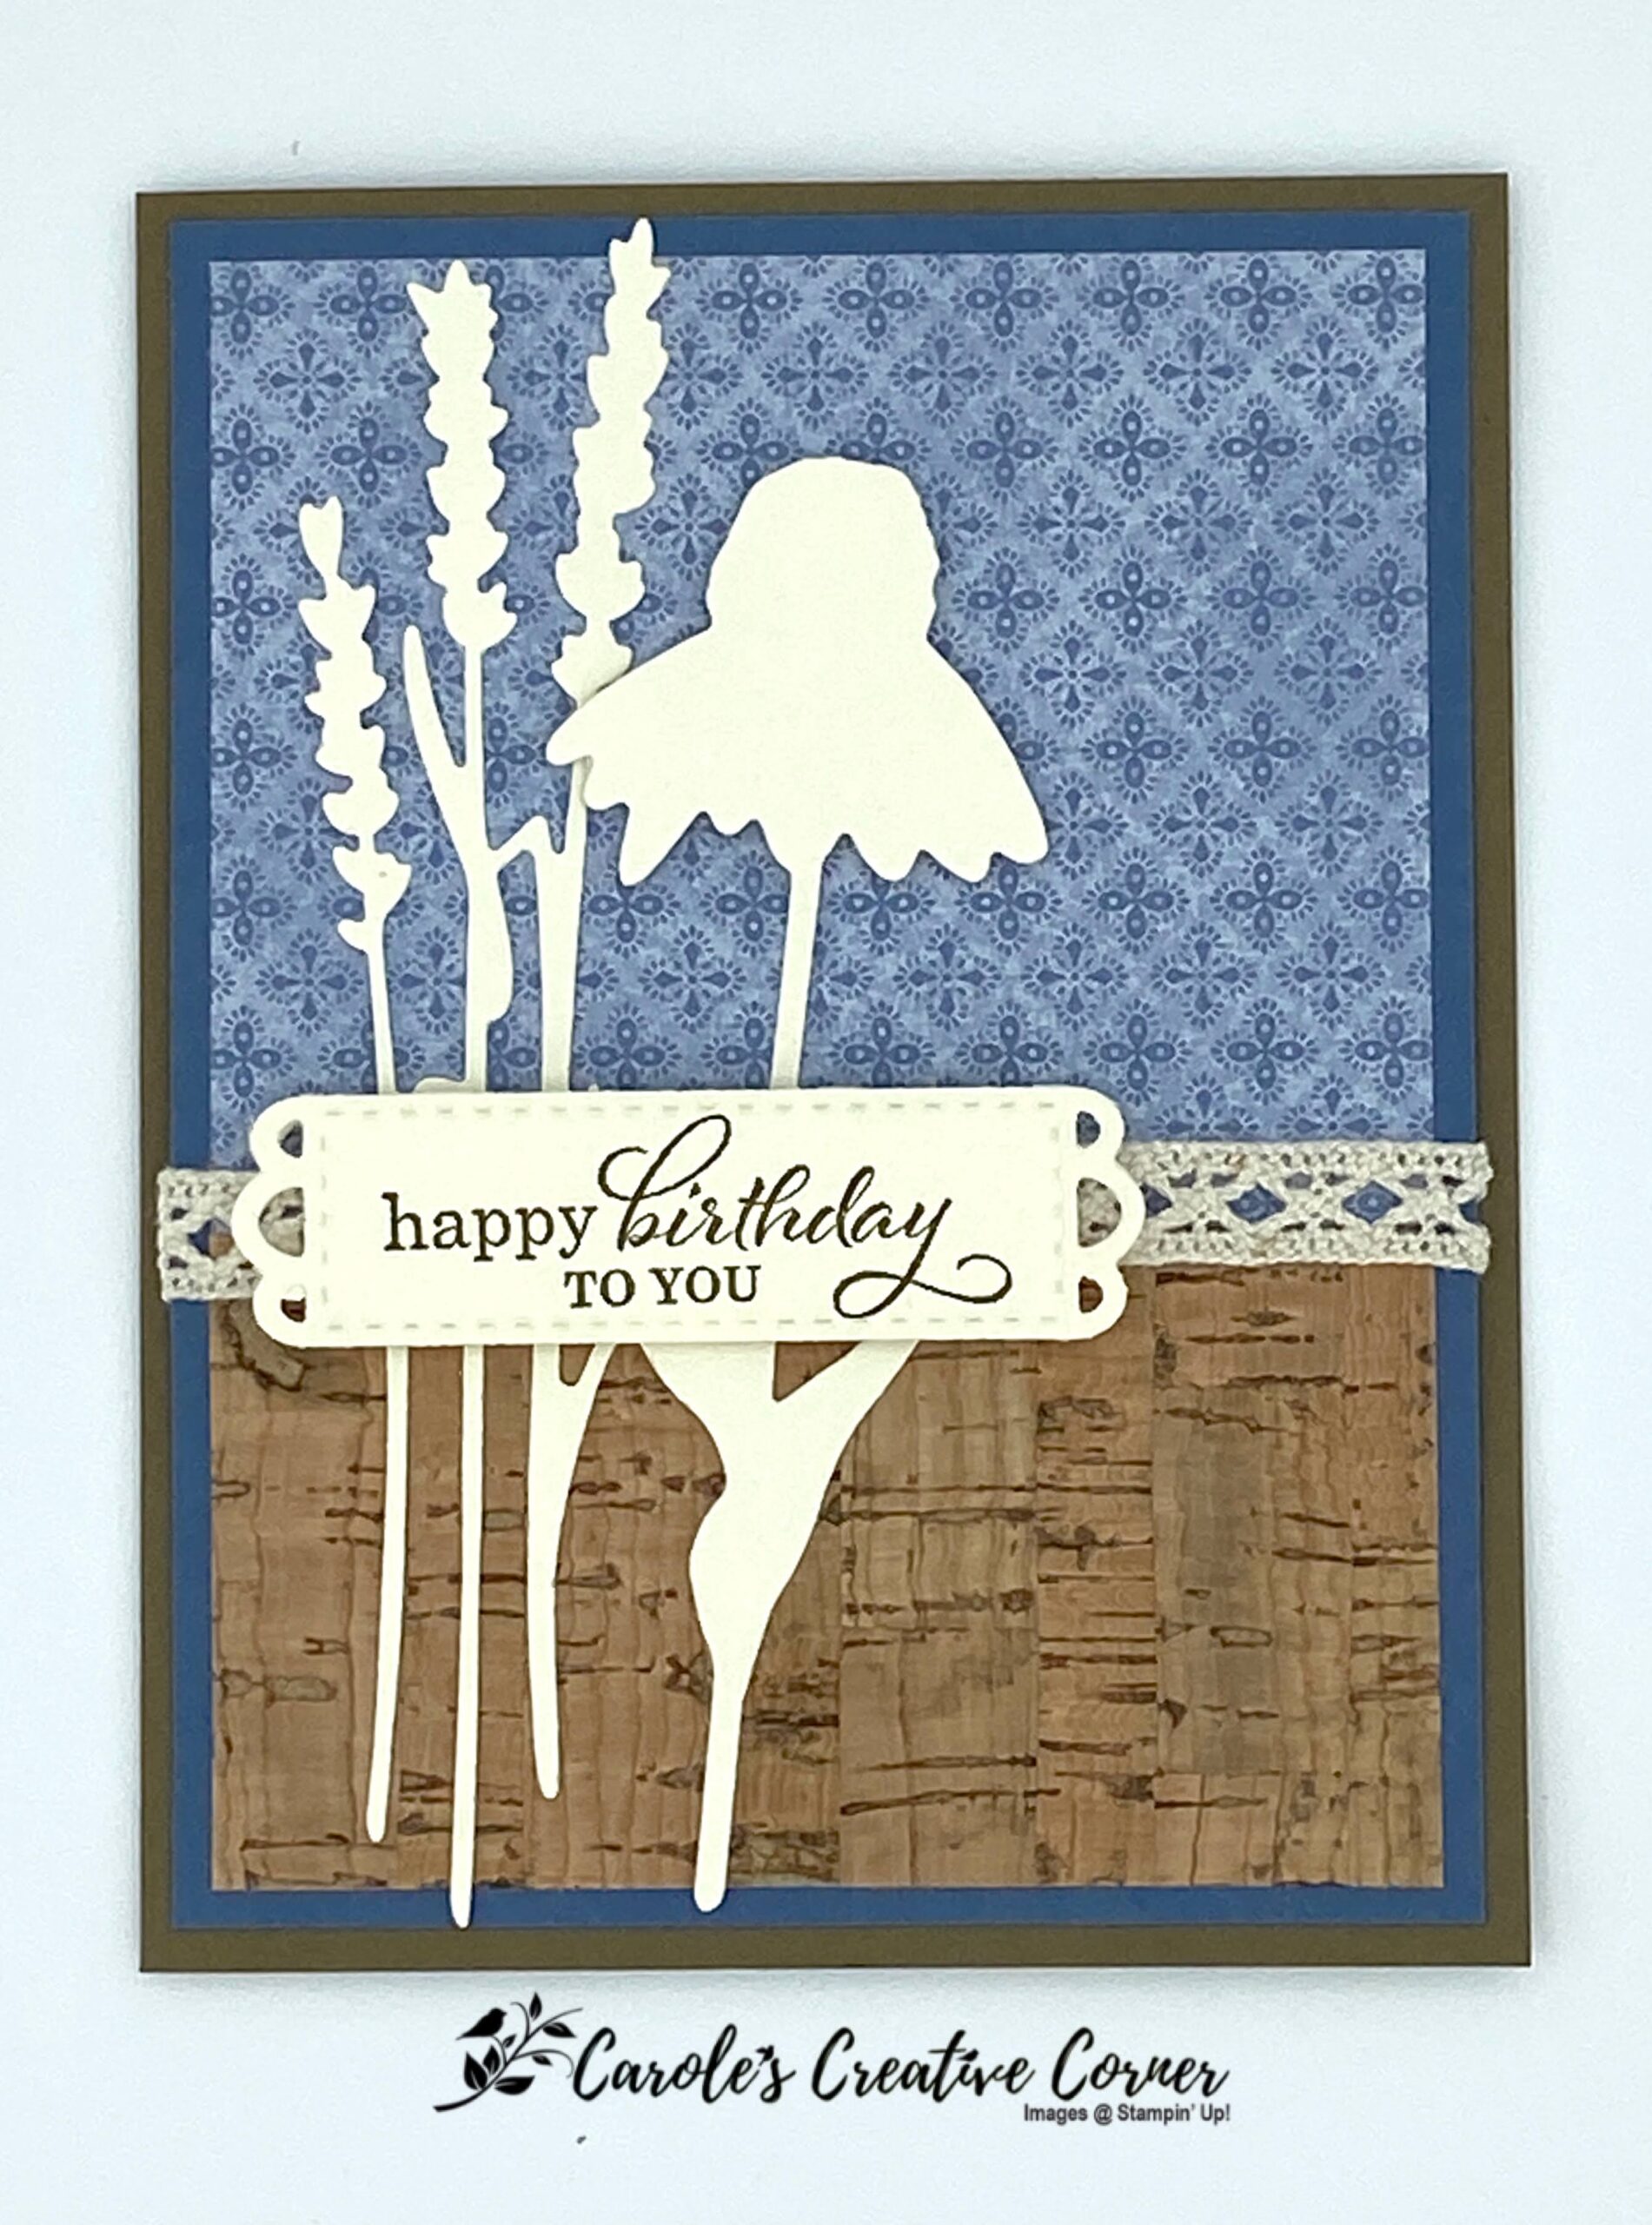
It’s fall and the set that inspires fall thoughts is Nature’s Harvest! Do you enjoy seeing all the fall wildflowers? I enjoy going for walks in Minnesota and seeing all the colors, not only on the trees but in the meadows. Even going on drives through rural areas and see the fields of wheat against the blue sky. This bundle features sillouette images which make it easy to add to cards, without having to color. Of course, you can always add color, but this card is simple in using 2 sillouette die cuts–the coneflower and wheat. If you liked the Quiet Meadow bundle, you will also enjoy this one. These 2 coordinate well together to give you both spring and fall wildflowers.
Click on Picture Above to Watch Tutorial
Measurements:
Soft Suede Cardstock: 5.5″ x 8.5″, scored at 4.25″ along 8.5″ side
Misty Moonlight cardstock: 4″ x 5.25″
Very Vanilla cardstock: 4.25″ x 3.5″ for flower and wheat die cut and label, 4″x5.25″ for inside
Harvest Meadow DSP: 3.75″ x 3″
Cork Specialty Paper: 3.75″ x 2″
Diamond Weave Ribbon: 5.5″
Preparation for Nature’s Harvest card:
Die cut flower and wheat from Very Vanilla cardstock.
Die cut label from Meadow dies and stamp in Soft Suede ink.
Stamp greeting for inside of card on Very Vanilla 4″x5.25″ piece. Example shown below.
Assembly for Nature’s Harvest card:
Place and adhere the Harvest Meadow DSP onto the top of he Misty Blue Cardstock so that there is 1/8″ on 3 sides.
Place and adhere the Cork paper at the bottom of the Misty Blue cardstock so that it butts up next to the Harvest Meadow DSP.
Use adhesive to mount the flower and wheat die cut to lefthand side of card front.
Put adhesive on one side of the Diamond Weave ribbon and place across the seam between the 2 papers. Take the ends to the back of the Misty Moonlight paper and adhere each end with scotch tape. Place and adhere this piece with adhesive on top of the Soft Suede card base. You can also use dimensionals to mount this piece to the cardbase.
Use dimensionals to adhere the label with the sentiment over the ribbon. Place the dimensionals near the top and bottom edges of the label so that it straddles the ribbon and card front, this way the label won’t tilt.
The Harvest Meadow Designer Series Paper has so many pretty, subtle fall colors. You can make this card in a variety of colors using this DSP. Do you have a favorite…I love them all!
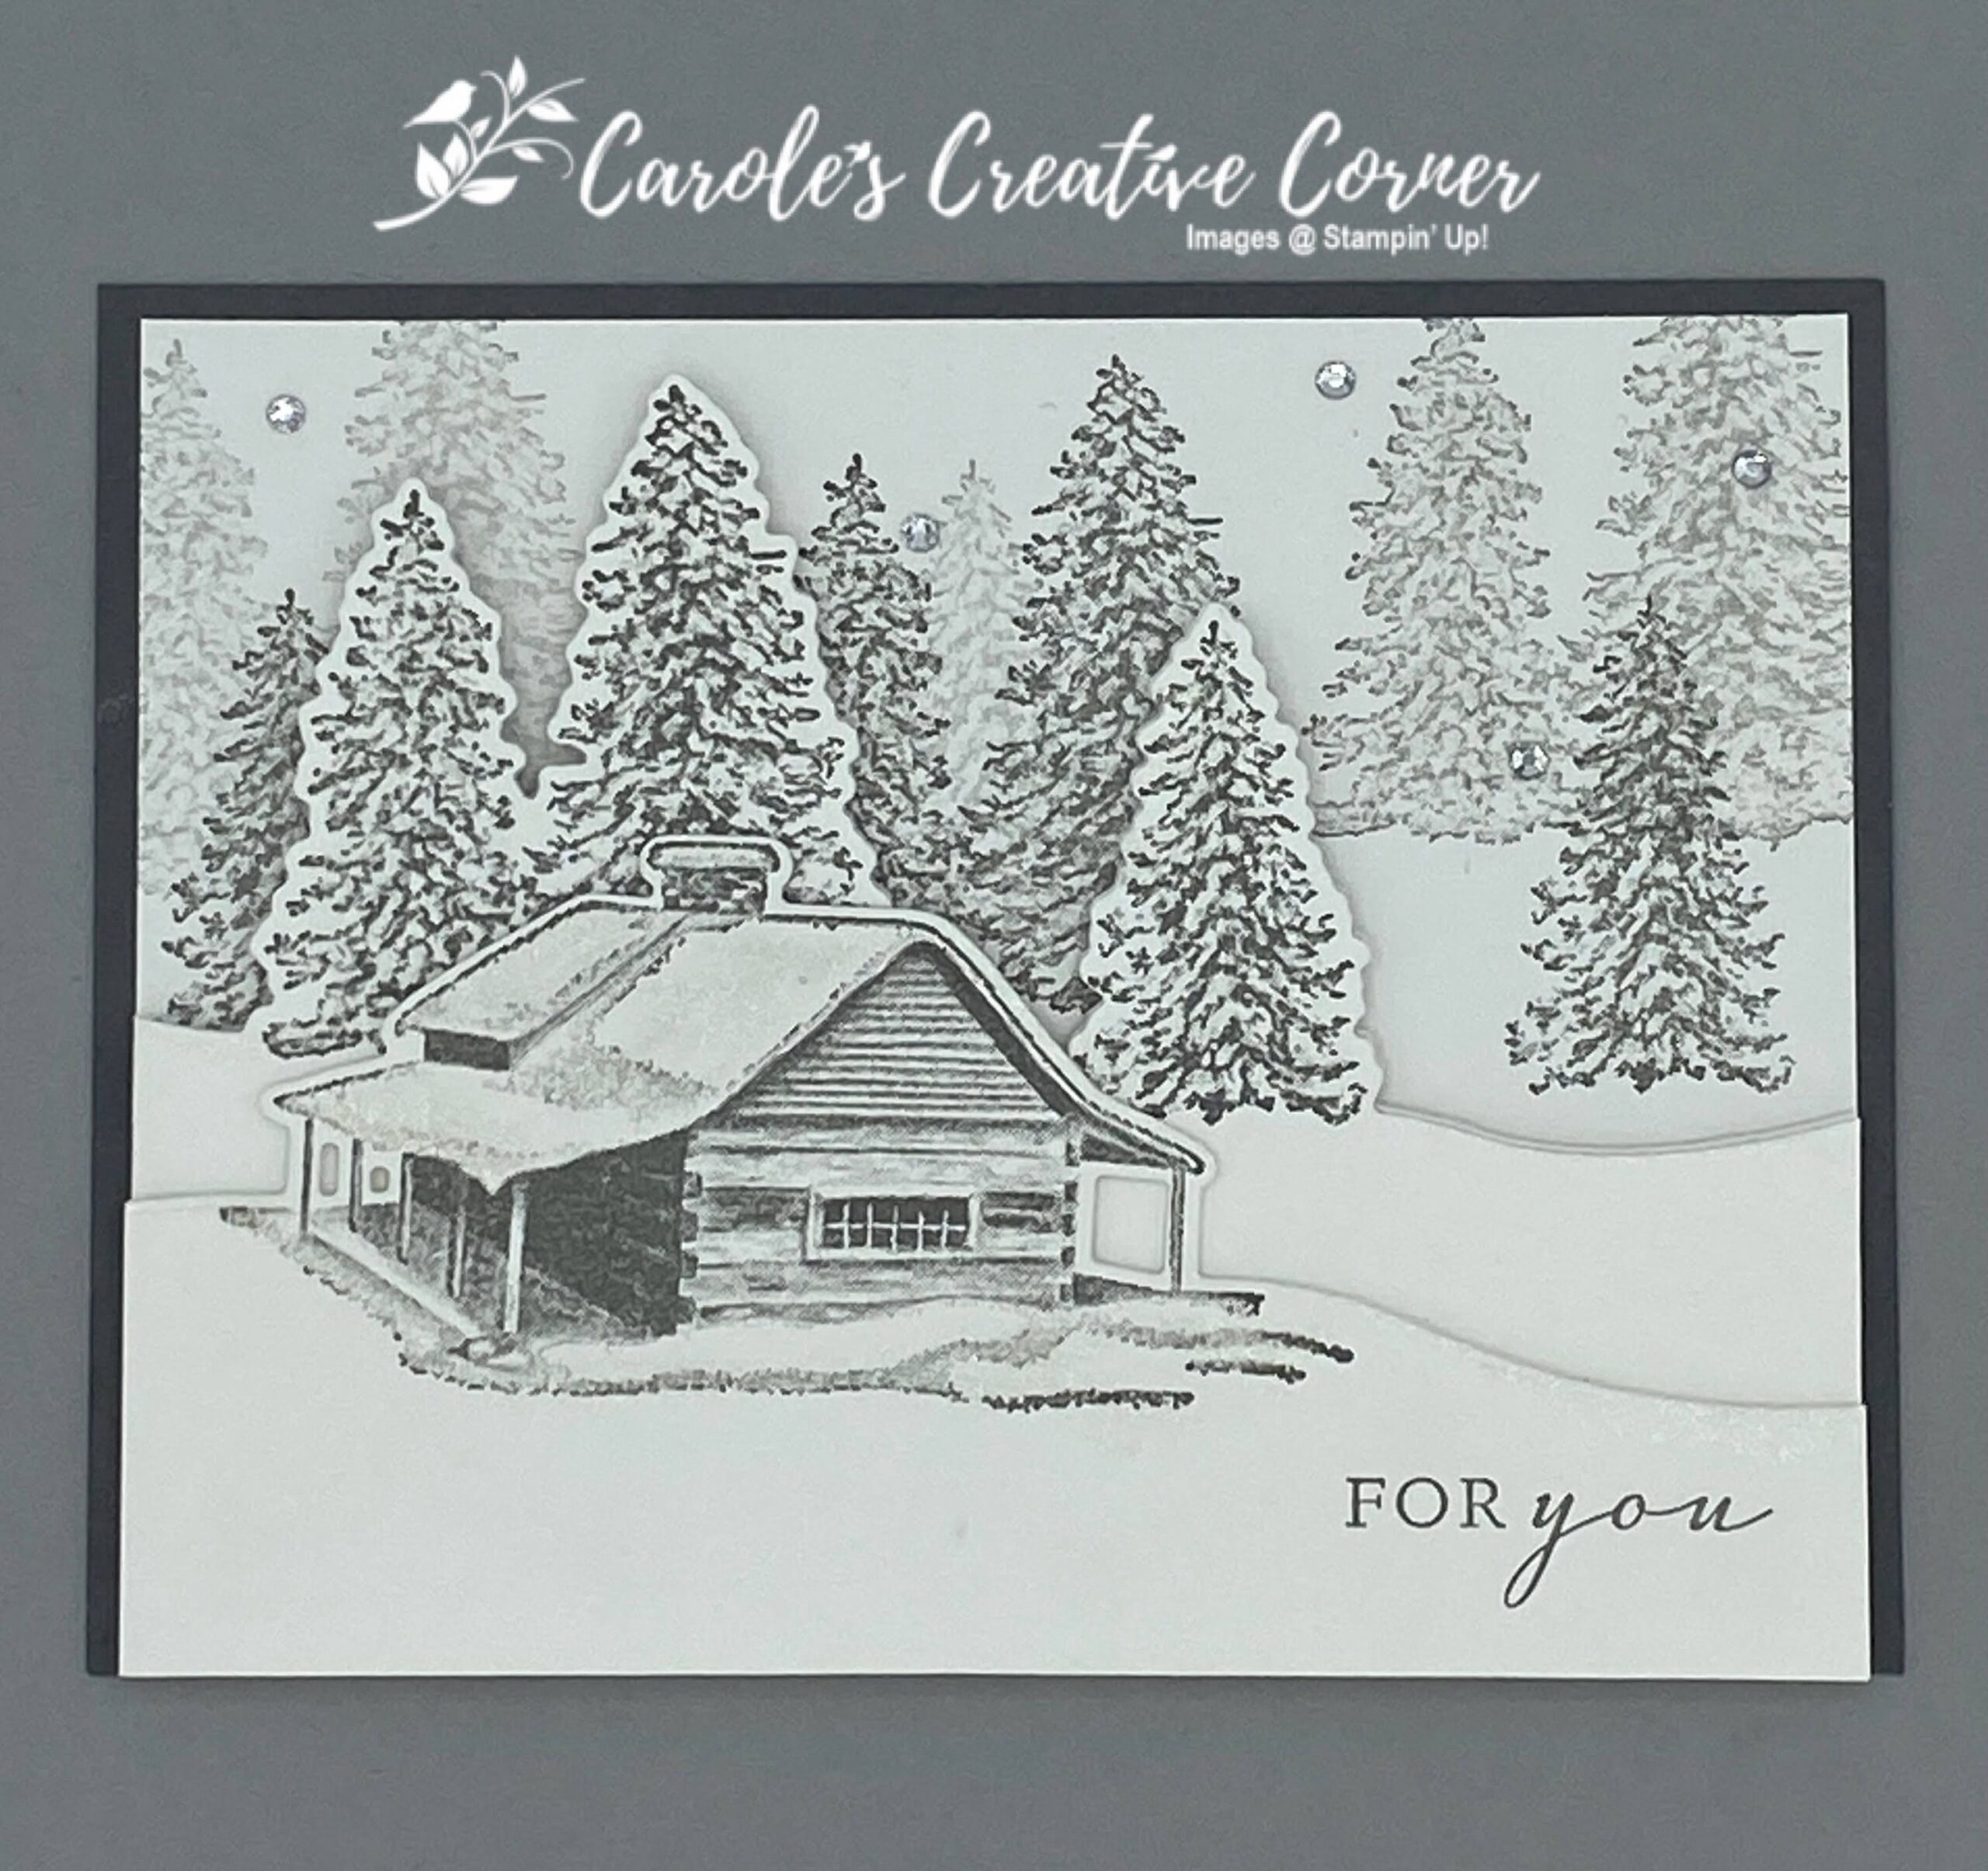
Peaceful Cabin bundle makes a great winter or holiday card. When I look at this card, it brings a feeling of peacefulness, which is why I had to have it and make it! Reminds me of the quiet of newly fallen snow. Thanks to Terri Gaines for the inspiration on this card. I received it from her in a swap and I just had to make several of them and you may want to recreate this too. Read on how to make this card. It takes very few supplies –the Peaceful Cabin bundle, paper, ink, and rhinestones!
Click on Picture Above to Watch Tutorial
Measurements:
Basic Gray cardstock: 4.25″ x 5.5″
Basic White: 4 1/8″ x 5.25″ (tree background), 2.75″ x 5.25″ (cabin), 11″ x 4″, scored at 5.5″ then fold in 1/2 and trim width to 5.25″ on ends (trees)–this way the ends will always line up.
Preparation:
Stamp the trees on the 4 1/8″ x 5.25″ pieces of white cardstock. Using Basic Gray ink, stamp the first set of trees where the bottom of the trees are sitting at the middle vertically and to the right horizontally. Stamp the trees a second time without re-inking so that it overlaps the first set of trees but is toward the top. Stamp the trees a third time without re-inking near the top left. Reink the smallest tree only and stamp in the middle vertically and on the left horizontally. (See Figure 1)
Figure 1
On the scored pieces of white cardstock, fold the card in 1/2 and die cut the tree outline at the very top, with the fold on the left using Basic Gray ink. Use the Stamparatus to stamp the trees onto to die cut piece. Use the top die cut piece that the trees were cut from to line the stamping up on the Stamparatus (see Figure 2). You can skip using the Stamparatus if you are an accurate stamper–I need the extra help to get it lined up!
Figure 2: Use Stamparatus to stamp trees.
Once the trees are stamped on the outside, fold the cardstock in 1/2 the other way so the front of the card is now inside and stamp the trees again. Stamp the sentiment on the inside. (see Figure 3 for the finished stamped piece.).
Figure 3: Stamp trees and sentiment on inside of Basic White folded section.
On the 2.75″ x 5.25″ Basic White piece, die cut the cabin outline along the top of the 5.25″ side. Use the Stamparatus again in the same way as above with the trees, to stamp the cabin in Basic Gray ink (Figure 4).
Figure 4: Stamp cabin using the Stamparatus.
Figure 5: Cabin with alternate verse from Heartfelt Wishes stamp set.
Assembly of Peaceful Cabin Winter Card:
Adhere the 4 1/8″ x 5.25 Basic White piece onto the the Basic Gray card base, placing the white cardstock even with the bottom of the Basic Gray and centered on the other sides.
Next, adhere the folded piece of Basic White cardstock with the trees on top with dimensionals.
Adhere the cabin piece on top of the folded trees.
Decorate with Rhinestones.
Add Wink of Stella to give the snow a glistening effect!
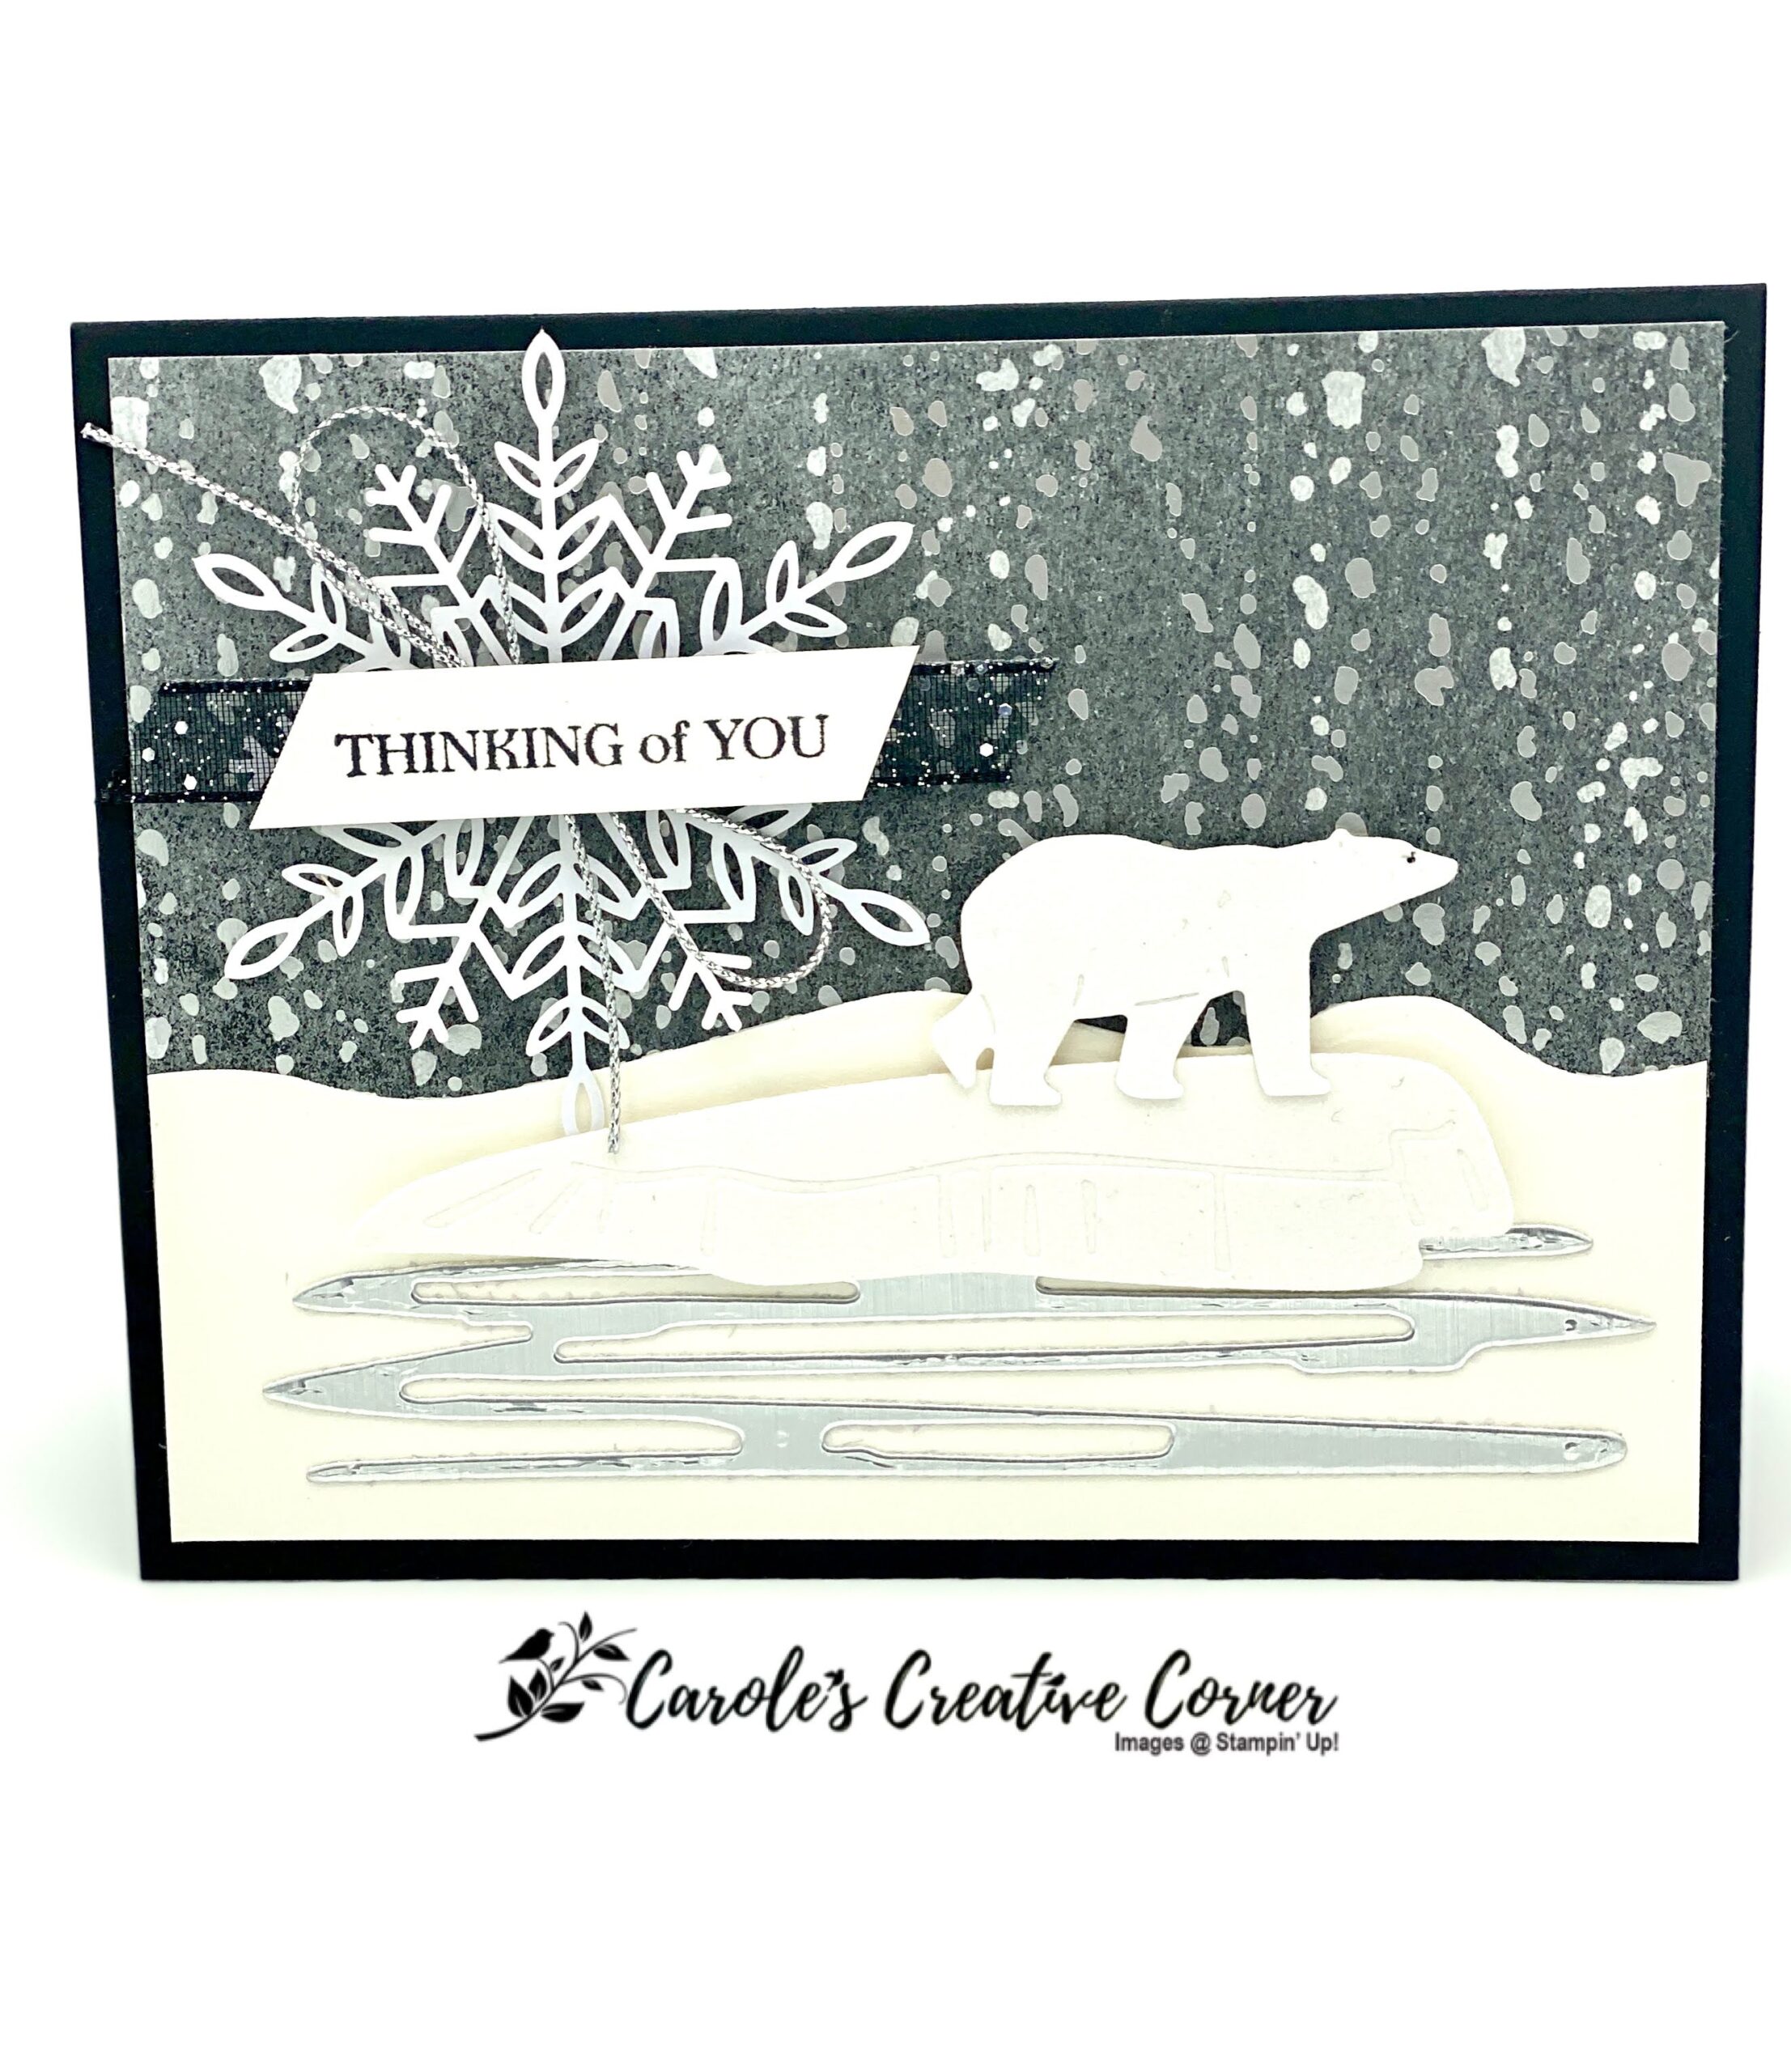
Arctic Bear bundle from Stampin’ Up makes such a great Winter and Holiday card. The artistry and uniqueness of this set is amazing! The polar bear, icicles, the glacier, and water effect die cuts are something I don’t have in my collection today, so it was a must have! The realism of the bears in the stamp sets is also amazing. If you would like to learn how to make this card, read on!
Measurements:
Basic Black cardstock: 5.5″ x 8.5″, scored at 4.25″ along the 8.5″ side
Peaceful Place DSP: 2.5″ x 5.25″
Shimmery White: 2″ x 5.25″, 4″ x 5.25″ for inside, 1/2″ x 3″ piece for sentiment
Metallic Silver: piece for water
White Velvet (or white glimmer paper): piece for bear and glacier
Preparation:
Die cut hill on the top of the 5.25″ side of the 2″x5.25″ side of the Shimmery White cardstock.
Die cut bear and glacier from the White Velvet paper (or white glimmer paper). Note: I used a black micro tip pen to make an eye on the bear die cut.
Die cut water from Silver Metallic paper.
Stamp sentiment with Tuxedo Black Memento ink on small Basic White piece and cut an angle on each end.
Assembly:
Adhere DSP 1/8″ from the top front of Basic Black card base.
Adhere snow hill 1/8″ from the bottom front of the Basic Black card base, overlapping the DSP.
Adhere metallic water die on top of snow hill.
Apply dimensionals to the glacier and bear and apply to card front.
Adhere snowflake to top left of card with a glue dot. Add silver twine with a glue dot. Use adhesive to apply a 4″ piece of black metallic ribbon to back of sentiment. Apply the sentiment on top of silver twine with glue dots.
Adhere inside Basic White piece to inside of card.
Here is a card example of using the Give it a Whirl Dies, the Penguin Place bundle along with new Sale-A-Bration (SAB) Paper. I love interactive cards and also love getting free items to make projects! This card uses the Penquin Place SAB paper, free with a $50 purchase until Sept. 30 or while supplies last. Another card example at the bottom of this blog uses the Peaceful Prints–both equally adorable!
Measurements:
Basic White cardstock: 5.5″x 8.5, scored at 4.25″ along the 8.5″ side; (1) 3.75″ x 2 1/8″; (1) piece for 3 3/4″ square piece for dial die cut; piece for 1 3/8″ circle; piece for penguin punch
Fresh Freesia cardstock: 4 1/8″ x 5 3/8″
Penguin Place Designer Series Paper: 4.25″ x 5.25″
White Glitter Paper: pieces for glacier, snowflake and icicle dies cuts; optional piece for hat and scarf
Basic Black cardstock: piece for penguin body
Pumpkin Pie cardstock: piece for feet punch
Preparation for Give it a Whirl card:
Using the Penguin Punch, punch the penguin body from Basic Black cardstock, the middle of the penguin with Basic White and the feet with Pumpkin Pie cardstock. Next, adhere pieces together. Note: the feet look good in front on the white or behind the black penguin body. Stamp the eyes in Tuxedo Black ink and the nose in Pumpkin Pie ink.
Make a circle template for stamping the penguins onto to the spinning wheel. This template will prevent the extra ink from getting in the other windows. To make the template, die cut the spinning wheel from Basic White cardstock and then die cut a window out of it, like Figure 1.
Figure 1.
Next, die cut the DSP using the Give it a Whirl Frame. Punch a 1 3/8″ circle in Basic White cardstock.
Die cut the icicles and glacier from the Polar Bear dies, and the snowflake from the So Many Snowflakes Dies using white glitter paper (non-SU).
Then die cut a spinning wheel from Basic White cardstock. Place the template (made earlier) over the spinning wheel, by lining up the open window with the embossed window frame on the spinning wheel. Stamp the penguin in Tuxedo Black ink so that his head and part of his shoulder is stamped in the open window. (Note: the excess ink from his body will stamp on the template and keep the spinning wheel clean of excess ink.) See Figure 2.
Figure 2.
Move the template so the open window is in the next embossed window area on the spinning wheel. Stamp again the penguin head and partial shoulders.
Move the template so the open window is in the last embossed window area on the spinning wheel. Stamp sentiment in Fresh Freesia ink.
Now you can remove the template and stamp a hat in Fresh Freesia on one penguin and antlers in Soft Suede on the other penguin and any other things you would like (for example, there are snowflakes that come with this stamp set, too!)
Punch a small hole in the center of the 1 3/8″ circle.
Take the 2.25″ x 3.75″ Basic White Cardstock and place the hill die from the Polar Bears dies at the very top along the 3.75″ side to create a hill. Then, emboss this piece with the Bark 3D embossing folder so the bark is going horizontal along the 3.75″ side.
Assembly:
Fold the Basic White cardstock base in half. Adhere and center the piece of Fresh Freesia to the cardbase.
Place a brad through the front of the spinning wheel and through the center of the 1 3/8″ circle and lightly close brad. (Note: if the brad is too tight, the wheel will not spin freely). Put 2 dimensionals on the back of the 1 3/8″ circle. This 1 3/8″ circle will allow the spinning wheel to move more freely, as shown in Figure 3.
Figure 3.
Set the spinning wheel behind the DSP, and line up the holes on the front of the DSP and the brad. Hold these 2 pieces in place and turn the DSP over so you can tell where to place the dimensionals on the DSP, making sure not to place a dimensional where the spinner will be turning.
Only take the backings off the dimensionals on the 1 3/8″ circle. Then hold the DSP and the spinner together and center onto the 4 1/8″ x 5 3/8″ Fresh Freesia cardstock. This allows you to place where the spinner properly. See Figure 4.
Figure 4.
Now take the backings off the dimensionals on the back of the DSP, by keeping the brad and hole on DSP centered, place onto the Fresh Freesia cardstock. See Figure 5.
Figure 5.
Now it’s time for the rest of the decorations! Adhere the snow hill at the bottom of the DSP.
Next, adhere the glacier with dimensionals on the front of the card. Adhere the icicles to the upper left part of the DSP. Place the penguin on top of the glacier with dimensionals. Adhere the glitter snowflake over the hole on the front of the card.
Here’s some alternative colors for additional ideas. I fussy cut the hat and scarf by stamping them on the back of glitter paper and then cutting them out. I think they should all have hats and scarves to keep them warm!
What a great time to get free items, like the Penguin Playmates 12″x12″ Designer Series Paper, to coordinate with the Playful Penguins bundle from the 2021 June-Dec. Mini catalog. This penguin is easy to make with the punch and stamp set–he is sooo cute and the paper and other cutouts from the paper give you so many options for cards.
Measurements for card using Penguin Playmates:
Fresh Freesia Cardstock: Cardbase is 4.25″ x 11″, score at 2.75″ and 8.25″ along the 11″ side, piece for large scallop
Soft Succulent Cardstock: piece for circle inset
Basic Black Cardstock: piece for penguin
Basic White Cardstock: piece for penguin inset, piece for sentiment tag, (1) 4″ x 5.25″ for inside, piece for hat and scarf
Pumpkin Pie Cardstock: piece for 2 feet
Penguin Playmates Designer Series Paper (SAB): Striped paper at 5.25″ x 2″; Snowflake paper at 5.25″ x 3″
Preparation:
To make penguin: Punch in black cardstock the penguin body and in white cardstock the penguin inset and adhere together. Stamp the eyes in Tuxedo black memento ink and the beak in Pumpkin Pie ink. Punch 2 feet using Pumpkin Pie cardstock and adhere to front of penguin. Stamp in Misty Moonlight ink a hat and scarf on Basic White cardstock then fussy cut them out. Adhere the hat and scarf onto the penguin.
Die cut the scallop circle in Fresh Freesia and the circle inset in Soft Succulent Cardstock and adhere together. Mount the penguin on top of Soft Succulent circle with dimensionals, using 2 regular size dimensionals and a mini dimensional for the hat.
Stamp in Misty Moonlight the hill as close to the top edge of the striped DSP as possible. Fussy cut the hill shape.
Die cut the sentiment tag in Basic White cardstock and stamp the sentiment on the tag in Misty Moonlight ink.
Cut the DSP in 1/2 at 2 5/8″ along the 5.25 side.
Stamp the Basic White inside with pine trees and presents in Soft Succulent ink and Misty Moonlight ink as shown.
Assembly:
Fold the Fresh Freesia cardstock on the score lines toward the center, so they form a gate.
Adhere the snowflake paper at the top with each 1/2 being flush with center of the cardstock base. Next, adhere the striped paper at the bottom of the card, also with the paper being flush with the center of the cardstock base. Note: It will overlap with the snowflake paper.
Stamp pine trees in Soft Succulent ink and presents in Misty Moonlight ink on top of the hill of the striped paper.
Adhere the scallop with the penguin to the front of the card with dimensionals on one side of the scallop, leaving one side without dimensionals so the card will open.
Add the tag in the same way to the front of the card.
Add Rhinestones to the hat and next to the penguin.
Adhere the Basic White inside piece to inside of card.
To see what Susan Campfield has posted, click the image below:
To see what Kelly Acheson has posted, click the image below: