Category: Fun Fold

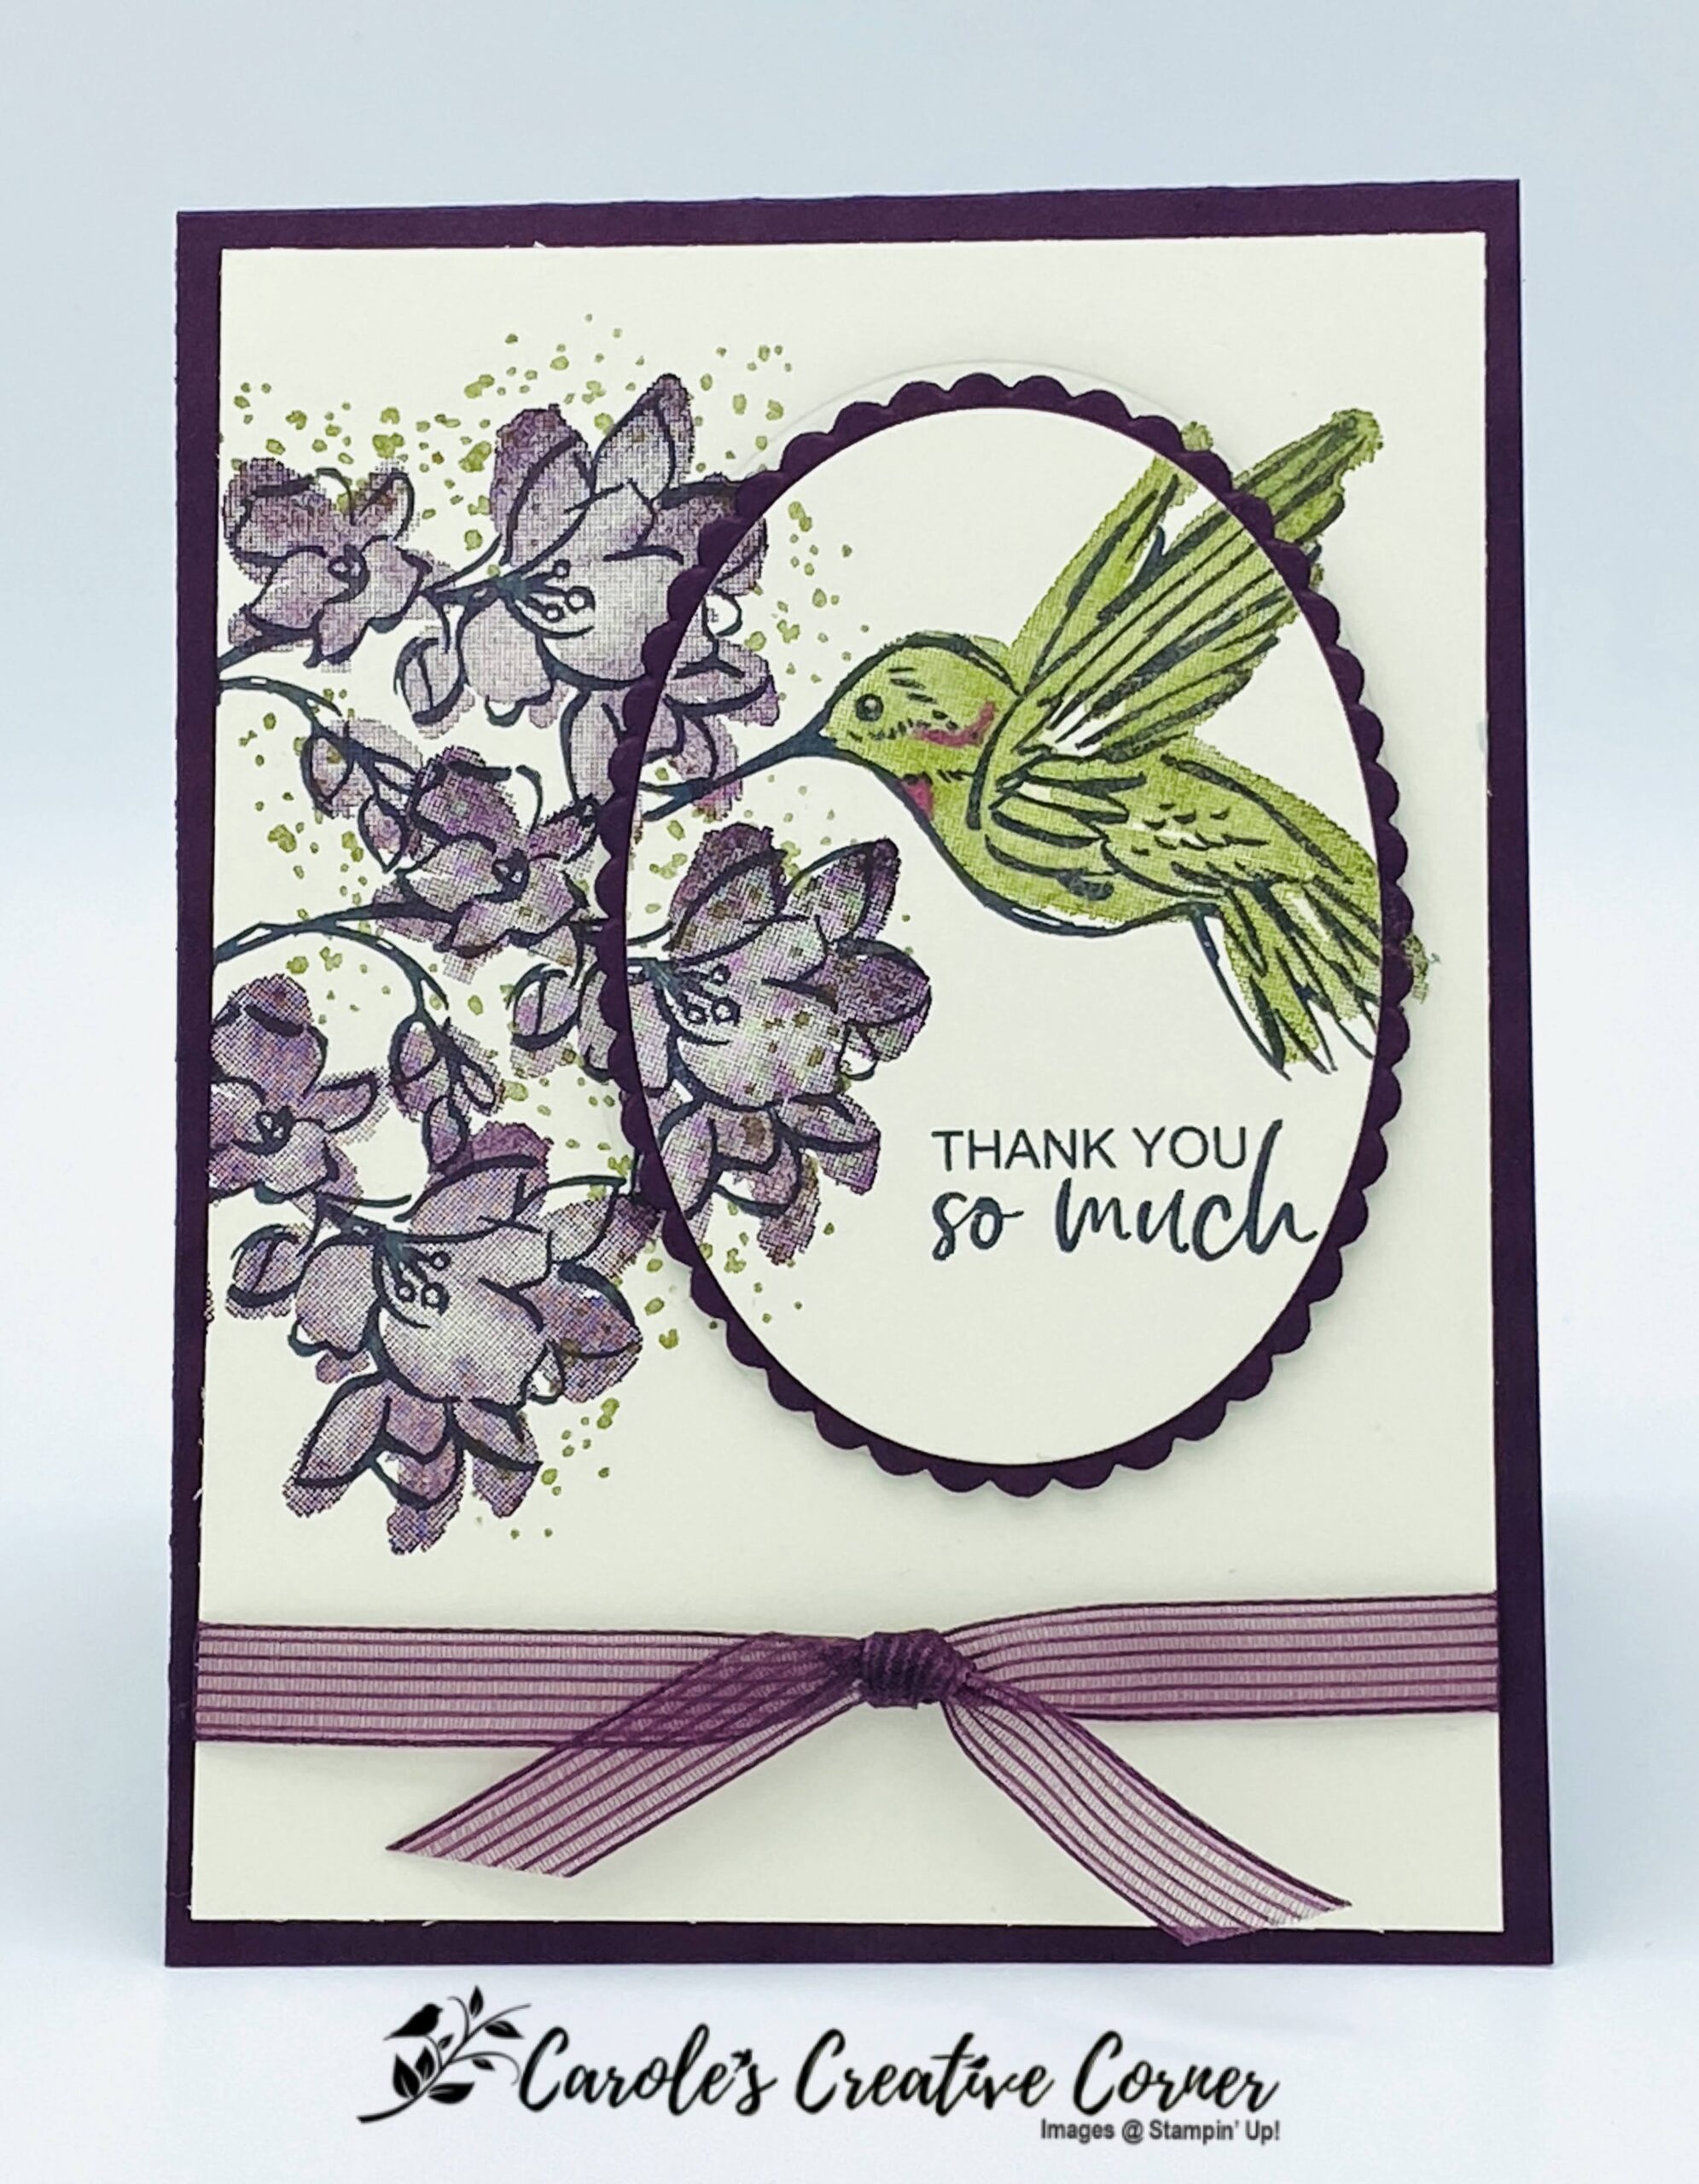
A Touch of Ink Spotlight Technique

This card uses A Touch of Ink stamp set and the Spotlight technique. A Touch of Ink is a Sale-A-Bration set you can get for free with a $50 purchase through February 2021. It is one of my favorite because of the two step stamping feature, dist-Ink-tive images, and the stamp set itself–butterflies and hummingbirds with flowers are high on my list in creating cards for others. Two-step stamping in this case is when you stamp the first image, which is an outline image, and then there is second stamp that will color in the outline image. Read on to see how easy it is to create this card!

Measurements:

Blackberry Bliss card stock: 4.25″ x 11″, scored on the 11″ side at 5.5″, 2.75″ x 3.75″ for scalloped oval
Very Vanilla card stock: (2) 4″ x 5.25″, (1) 2.5″ x 3.5″ for oval die cut

Directions for A Touch of Ink card:

The first step is to stamp the outline images on the 4″ x 5.25″ piece of Very Vanilla card stock. This card is oriented in portrait mode, where the 4″ side will be top and bottom and the sides will be the 5.25″ side. Stamp with Memento Tuxedo Black ink the flowers on the left hand side and primarily centered in the vertical middle. Add the hummingbird such that the tail is 1/4″ from the right edge and the beak is inside the flowers. Also stamp the sentiment.

A Touch of Ink

Using Blackberry Bliss ink, ink the flower second stamp and stamp inside the outline image of the flowers to add the color. Note: The stamp to add color is not an exact match to the outline stamp and this helps to provide a soft water color look. The hummingbird is stamped in Old Olive ink. The Blackberry Bliss blend pen was used to add color to the hummingbird. Add speckles randomly with the speckle stamp in the set in Old Olive ink around the flowers.

A Touch of Ink

Die cut an oval out of the Very Vanilla cardstock, to include the sentiment and a majority of the hummingbird.

A Touch of Ink

Layer the Hummingbird oval onto the Blackberry Bliss scalloped oval. Adhere the blackberry bliss ribbon to the lower front of the Very Vanilla cardstock. Next, adhere the 4″ x 5.25″ Very Vanilla card stock onto the front of the Blackberry Bliss card front. Adhere the hummingbird oval onto the front of the card with dimensionals, lining up the images to the front of the Very Vanilla base. Add Wink of Stella to the hummingbird for an added sparkle!

Supplies:

Nature’s Beauty Trifold Window Card

This Nature’s Beauty Trifold Window card will surprise your recipient! When the card is laying flat, it appears to be a standard card fold, however, once opened, it reveals a window and more layers inside! Learn how to make this card using this timeless stamp set

Nature's Beauty Trifold Window Card

Measurements:

Real Red cardstock: 5.5″ x 8.5″ scored at 4.25″ along the 8.5″ side
Toile Tidings Designer Series Paper (DSP): 4″ x 5.25″
Very Vanilla cardstock: 5.25″ x 8″, score at 2″, 4″ along the 8″ side, 4″ x 4″

Directions for Nature’s Beauty Trifold Window Card:

  • Fold cardbase and adhere the 4″x5.25″ piece of DSP to the front of the card. Use the adhesive in the corners and primarily around the perimeter of the back of your designer paper, and not much in the center at all.
  • Use the Stitched Nested Label die that cuts a 2 3/8″ x 4.25″ opening, and center on front of card and die cut. Use the next size down Nested Label die and die cut from the 4″x4″ Very Vanilla cardstock. Layer this Very Vanilla stamped Nested label on top of the larger red Nested Label that was cut from the front of the card. (Note: The DSP that was cut from the front of the card will not be used on this card.)
  • Take your Very Vanilla Nested Label diecut and stamp a message in Real Red ink and the fox in Tuxedo black Memento ink.
  • On the large piece of Very Vanilla, stamp in the 4″x5.25″ section with the scored section to the right. Stamp the deer, rabbit, grass, shrubs in Tuxedo Black Memento and the sentiment in Real Red ink. To get the shrubs to appear as if they are behind the deer, mask the backend of the deer with a fussy cut piece of Post-It note paper.
Nature's Beauty Trifold Window Card
Figure 1: Stamp Deer, Rabbit, shrubs and sentiment.
  • Adhere this stamped section to the inside flap of card, with the scored portion of the Very Vanilla to the right. Fold the cardstock to the left of the first score line and then fold the remaining cardstock to the right of the next score line. Close the card.
  • Apply adhesive to the fold that is exposed through the Nested Label window and then apply the large shape cutout to the card.
  • Tie a 22″ piece of ribbon around the inside front of the card and tie a bow on the front side of the card.

Supplies:

Poinsettia Petals Bridge Card

I love bridge cards because they are easy and fancy and this Poinsettia Petals bridge card is no exception. Read on to learn how to make this 3D card. It’s great that it also fits into a standard A2 envelope just by folding to one side. Isn’t the flocked paper absolutely gorgeous?

Poinsettia Petals bridge card

Measurements:

Night of Navy card stock: (1) Card base 4.25″ x 8″ scored on the 8″ side: 1.25″, 2.5″ , 5.5″ and 6.75″, (1) bridge layer: 1″ x 5.5″
Plush Poinsettia Specialty Paper: 1″ x 4″ side panels
Whisper White card stock: (2) 2.75″ x 4″: inside message & backside message, 4.25 x 5.5″ for poinstettia and leaves die cuts
Balmy Blue Glimmer paper: 3″ x 3″ for sprigs

Directions:

  • Fold on score lines. Fold the inside score lines to center of card, like a door, then fold outside score lines back to form a flap.
  • Adhere specialty paper strips to the flaps using glue dots or a light amount of adhesive to minimize the show-through of the adhesive.
  • Stamp sentiments in Misty Moonlight on the 2.75″ x 4″ pieces, one for the inside of the bridge card and one for the back and adhere to card.
  • Apply Night of Navy bridge strip across front of card using Tear & Tape on the backside of the strip, or other strong adhesive. Apply the left side of the bridge strip by folding the left side of the card flat. Then with the right side of the card extended and flat, adhere the right side of the bridge strip to the front of the right side of card.
  • Stamp 3 sizes of poinsettias and 2 leaves in Misty Moonlight ink on Whisper White cardstock and die cut. Also stamp the interior of the leaves with filler stamp.
  • Layer the poinsettias to each other in the center only, starting with the largest poinsettia to the smallest and offset the petals from each other on each layer.
  • Add dimensionals to the back of the poinsettia in the center only and adhere to front of bridge card.
  • Adhere leaves behind the poinsettia.
  • Die cut 2 sprigs and 1 poinsettia center from the Balmy Blue glimmer paper and apply adhesive to the back side of the sprigs on the lower half only then arrange them behind the poinsettia.
  • Adhere the Balmy Blue Glimmer poinsettia center to flower and add blue gem.

Supplies for Poinsettia Petals Bridge Card

Poinsettia Double Fan Fold Card

Make this beautiful Poinsettia Double Fan Fold card in Night of Navy and Silver to dazzle your friends at the holidays. I love using blue and white for holiday cards–the colors remind me of the glistening snow and night skies. Since this card is also self-standing, it can be displayed for all to see!

Poinsettia petals Double Fan Fold Card
Poinsettia Petals Double Fan Fold Card

Measurements:

Night of Navy Cardstock: Card base 5.5″ x 7.5″, scored at 1.25″, 2.5″, 5″, 6.25″ on 7.5″ side; 2″x 3″ for poinsettia leaves
Silver foil mat: 2.25″ x5.25″ for inside front; (4) 1″ x 2.25″ pieces for triangles; (2) 1″x 5″ for large triangles; piece for 2 sprigs
Snowflake DSP: 2″ x 5″ for inside front, (4) 0.75″ x 2″ pieces for triangles
Whisper White card stock: 4.25″ x 5.5″ for poinsettias, 3/4″ x 3″ for sentiment, 2.25″ x 5.25″ for back of card

Directions for Poinsettia Double Fan Fold:

  • On Night of Navy cardstock on 7..5″ side, scored at 1.25″, 2.5″, 5″, 6.25″.
  • To make score lines, start from upper left corner (0) to bottom 2.5″ score line then score from 2.5″ score line to bottom left corner (0) on 7.5″ side (see Figure 1).
  • Score also from upper 5″ score line to bottom right (7.5″) corner; score from upper right corner (7.5″) to bottom left 5″ score line. (see Figure 1).
Poinsettia Petals Double Fan Fold
Figure 1: White lines are score llines.
  • Cut the silver foil 1″ x 2.25″ pieces at a diagonal. To do this, cut from upper left corner on 1″ side to lower right corner for 2 of the pieces. Next, cut from upper right corner to bottom left corner on 1″ side for the remaining 2 pieces (see Figure 2).
  • Cut DSP 0.75″ x 2″ pieces at a diagonal. To do this, cut 2 pieces from upper left corner on 0.75″ side to lower right corner then cut 2 pieces from upper right corner to bottom left corner on 0.75″ side (see Figure 2).
Poinsettia Double Fan Fold Card
Figure 2: Cut at a diagonal the pieces for small triangles.
  • Create triangles from the 1″ x 5″ silver strips. To do this, mark the center along the 5″ side on the backside of the silver strip. Cut from the center point to one end and then the same of the other (see Figure 3)
Poinsettia Petals Double Fan Fold
Figure 3: Cut a triangle from the 1″ x 5″ strip of silver foil.
  • Die cut and emboss 3 different size poinsettias in Whisper White cardstock. Next, die cut and emboss 2 Night of Navy leaves. Die cut 2 silver foil sprigs.
  • Stamp sentiment on 1″x3″ whisper white in Night of Navy ink.
  • Fold each diagonal score line on the Night of Navy cardstock and burnish with a bone folder (Figure 4)
Poinsettia Petals Double Fan Fold
Figure 4: Fold on the diagonals on each side of the card base
  • Create a mountain fold (noted with an ‘M’ on Figure 5) with the small top and bottom triangles on each side.
Poinsettia Petals Double Fan Fold
Figure 5: Create a Mountain fold with small triangles
  • Fold left side down on remaining folds (Figure 6) and burnish with bone folder. Do the same with the right side folds.
Poinsettia Double Fan Fold
Figure 6: Fold down left side and burnish with bone folder.
  • Fold sides to the back of the card along the 2 center scored lines (Figure 7.)
Poinsettia Petals Double Fan Fold
Figure 7: Fold sides to the back of the card along the center scored lines.
  • Adhere all triangle DSP pieces to silver foil mat triangle pieces.. Layer triangles on the Night of Navy cardstock.
  • Take large silver triangles and adhere to Night of Navy cardstock.
  • Layer the 2″x5″ DSP to the Silver Foil layer and adhere to the center of the card.
  • Gently curl each of the petals of the poinsettias upward with a bone folder. Adhere each poinsettia layer to each other, starting from largest to smallest. and offsetting the petals in each layer. Next, adhere poinsettia to center of card with dimensionals. Use a glue dot to adhere the beaded pearls to the center of the poinsettia.
  • Adhere the 2 Night of Navy leaves underneath the poinsettia, applying adhesive only to the bottom of the leaf. Adhere the 2 silver sprigs on top of the Night of Navy leaves, applying adhesive only at the bottom of the sprigs.
  • Apply the sentiment underneath the poinsettia using dimensionals.
  • Stamp the sentiment for the backside of the card using Night of navy ink.
Poinsettia Petals Double Fan Fold Card
  • Apply Wink of Stella to the Poinsettia for some extra sparkle.
Poinsettia Petals Double Fan Fold Card

Supplies:

Gather Together Buckle Fold Card

I’m so glad the Gather Together bundle carried over to the 2020-2021 Mini Catalog because I have so many more cards I want to make with this set. Learn this Buckle Fold card technique in this post and let your imagination run wild on what other sets can be used with this technique!

Measurements for Gather Together Buckle Fold Card

Cajun Craze: Card Base 4.25″ x 8.5″, scored at 5.5″ on the 8.5″ side, Maple Leaf 3″ square, Belt 5.5″ x 1.5″ scored at 1/2″ on the 5.5″ side, piece for 2.5″ circle
Very Vanilla inside: 4″ x 5.25″
Brushed Metallic Copper Layer: 2.75″ x 4″ (cut out your leaves from this piece (see figure 1), pieces for 2 leaves, 2 branches
Designer Series Paper (DSP) on flap: 2.5″ x 3.75, on belt 1.25″ x 5″

Figure 1: Keep the die cuts towards inside so there is enough room on edges to use as border layering piece

Directions:

To make this card, start by getting all your pieces cut, scored, and die cut. Layer the Very Vanilla Cardstock on the inside. Layer the brushed metallic copper on the front of the card flap, followed by the DSP. Use the Classic Label Punch to punch a slot centered on the front of the card. Push the front flap into the punch (see Figure 2) as far as it will go.

Figure 2: Punch slot on front of card flap.

Place Cajun Craze circle centered over the slot, apply tear & tape to left side of circle (i.e. on the part that will be to the left side of the slot) and adhere.

Apply DSP to the card belt. Slip the belt into the slot, centering top to bottom in the slot, and align the other end with the score line at the edge of the card. Place tear & tape on the 1/2″ scored piece (on the side opposite the DSP) and adhere belt to the backside of the card.

Now you’re ready to decorate your card! Place the large stamped maple leaf on top of the circle with dimensionals. Add the 2 brushed metallic copper leaves and branches as shown. Stamp sentiments and images on Very Vanilla cardstock. Stamp pumpkins with flap closed in order to center properly.

Supplies:

  • New demonstrators who submit their Independent Demonstrator Agreement (IDA) before 1 September or after 30 September will not be eligible for this promotion.
  • In addition to the regular starter kit (for $99 USD, new recruits choose $125 USD-worth of products) new recruit will also receive enough cardstock pieces to make 16 cards, a pack of Rhinestone Basic Jewels, the So Much Love stamp set, and the Queen Anne’s Lace stamp set—all for their first event.
  • 8 packs of precut cardstock of the coastal cabana pack will be provided, and 8 packs of precut cardstock of the Granny Apple Green pack, for a total of 16 cards (packs include envelopes). The new recruit can choose what samples to replicate and how to distribute the packs to their customers.

You can see more details about joining and about our team on my blog here.  You can also see more information about the benefits of becoming a Stampin’ Up! Demonstrator here.

It is such a great deal!!  If you’ve been considering joining, September will be a great time to jump in!  Drop me an email [email protected]

  • Visit my online store here.
  • Shop the Clearance Rack here.
  • Shop My Personal Sales here.
  • Don’t forget to follow me and comment on Instagram, Pinterest, YouTube, Facebook. Links at top and bottom of this blog!

Stampin Up Whale Done – Floating Gatefold Card

It’s so fun and easy to create an ‘under the sea’ scene with Stampin’ Up’s Whale Done bundle and coordinating paper. When you add the coordinating sequins, it creates a beautiful sparkle to the card. Open the doors of this gatefold card and it reveals some floating under the sea creatures!

Measurements:

Pretty Peacock Base cardstock: 8.5″ x 5.5, scored” at 2 1/8″ and 6 3/8″; cardstock for 2 seaweed die cuts and spout from punch; (1) 10.75″ x 1.25″ scored at 2 1/8″ and 6.5″ along 10.75 edge for belly band
Balmy Blue cardstock: (2) 1″x4.5″ scored at 1″, 2.5″, & 3.5″along the 4.5″ edge for arms, (1) piece for label
Whisper White cardstock: (2) pieces for greeting label
Whale of a Time Designer Series Paper: (3) 2″ x 5.25″ of the seaweed print; (1) 4″x5.25″ and (1) 2″x5.25″ cut consecutively from one of the scenic patterns
Granny Apple Green for seaweed die cut
Vellum for seaweed die cut

Directions:

  1. Fold card base on score lines so that doors form on the front of the card.
  2. Adhere the seaweed patterned designer series paper to door fronts.
  3. Adhere the designer series paper to the inside, with the 4″x5.25″ scene in the center panel.
  4. Fold the 2 Balmy Blue 1″x4.25″ strips in the same direction along all the score lines. Fold each end toward center and and apply adhesive (tear and tape is recommended) See Figure 1 example.
Figure 1: Example of how to fold the arms and apply tear and tape.
  1. Apply Balmy Blue arms to inside of card where desired. This card shows one arm in the lower left and one in the upper right. To do this, take off tear and tape adhesive on the end by the longest section of the arm strip. This end will be applied to the inside panel next to the score line. (See Figure 2.) Take tear and tape of the other end and apply to center panel of card base by lying arm flat (so 2 scored sections show on the top) and the taped end tucked under and tape facing card base. Repeat for second arm.
Figure 2: Example of how to apply the arm
  1. Decorate arms. Fussy cut a turtle from the designer series paper. You can punch a whale from the designer series paper, as shown in this card, or stamp one in pretty peacock and then punch out using whale punch. Die cut 6 seaweed: 2 each from vellum, 2 from Granny Apple Green cardstock, and 2 from Pretty Peacock cardstock. Adhere 3 seaweed to the lower arm and adhere the turtle on top. Adhere sequins as desired. My video showed applying the sequins with a glue dot and using the Take Your Pick tool to position on card. Adhere the whale to the upper right arm.
  2. Belly band: Burnish scored lines of belly band, and wrap band around card so ends overlap in the front of the card and small end is on top. Adhere belly band ends together. Die cut a Balmy Blue label and 2 white labels. Stamp sentiments on white labels using Pretty Peacock ink. Add Balmy Blue label to front of belly band with dimensionals. Add white label with front sentiment on top of Balmy Blue label. Decorate with 3 seaweed, a punched whale adhered with dimensionals, and a spout made from whale punch and Pretty Peacock paper. Add sequins as desired. Adhere inside sentiment to inside of card. Enjoy your ‘under the sea’ scene!

Supplies for Stampin Up Whale Done card:

Stampin Up Celebrate Sunflowers: Floating Gatefold Card

Make a gatefold card using the Stampin’ Up Celebrate Sunflowers bundle with a floating sentiment and a sunflower flower on the inside! A fun surprise for the recipient. This is such a versatile technique for any occassion. Learn how easy it is to make this card with the attached tutorial.

Stampinup CelebrateSunflower Floatinggatefold
Celebrate Sunflower Floating Gatefold Card

Measurements (using Misty Moonlight example, center card in photo):

Base Cardstock (Misty Moonlight): 8.5″ x 5.5, scored” at 2 1/8″ and 6 3/8″, 1″x4.5″ scored at 1″, 2.5″, & 3.5″
Flowers for Every Season Designer Paper: (2) 2″ x 5.25″
Whisper White cardstock : 4″ x 5.25″, 3.5″x 3.5″ for sunflower outline
Bumblebee cardstock: 3.5″x3.5″ for sunflower base
Cinnamon Cider cardstock piece for sunflower center and sunflower leaves

Directions for Celebrate Sunflowers:

  1. Fold card base on score lines so that doors form on the front of the card.
  2. Add designer series paper to door fronts.
  3. Put adhesive on the back of the leaves, and fit the leaves behind the sunflower.
  4. Next, stamp the sunflower in Misty Moonlight ink then die cut. Die cut the sunflower outline from white paper and adhere to the front of sunflower base. Tip: Use adhesive sheets on the white card stock for the sunflower outline before die cutting; this makes it easy to apply to sunflower base. Find the 3 curved petals on sunflower for easy alignment (See Figure 1). Die cut sunflower center and adhere sunflower center with a dimensional.
Figure 1. Line up sunflower outline die cut using 3 currved petals as starting point.
  1. Put 3 dimensionals (in a triangle formation) on the right door of front of card near center where sunflower will be applied. Center and apply sunflower to front of card.
  2. Stamp sunflower in Bumblebee ink in the center of the 4.5″x5.25″ white cardstock and adhere to the center panel on the inside of the card.
  3. Fold in the same direction along all the score lines on the 1″x4.5″ arm strips. Fold each end toward center and and apply adhesive (tear and tape is recommended). (See Figure 2)
Figure 2: Apply tear n tape to arm strips
  1. Apply arms to inside of card, where desired. Take off tear and tape adhesive on the end by the longest section of the arm strip. This end will be applied to the inside panel next to the score line. (See Figure 3.) Take tear and tape of the other end and apply to white cardstock. Repeat for second arm.
Figure 3: how to apply arms to inside of card
  1. Stamp sentiment in memento ink and apply to the top of one of the inside arms. Stamp, die cut and color with blends the small sunflower and adhere to the other inside arm.

Stampin Up Sailing Home: Double Z-Fold Card

Need a masculine card? Sailing Home is a wonderful set to create beautiful masculine cards for any occasion. Making a card using a double z-fold card will surely WOW them! Two different patterned papers were used, showing you the versatility of this set! Have fun making this one!

Measurements (using Navy Card sample):

Outside Z card base:

  • Night of Navy cardstock: (1) 4.25″ x 11″ scored at 2.75″ & 5.5″ along 11 side
  • Come Sail Away Designer Series Paper: 2.5″ x 4″
  • Whisper White cardstock: 4″ x 5.25″

Inside Z card base:

  • Night of Navy cardstock: 3″ x 10″ scored at 2.75″ and 5.5″ along 10″ side; piece for stiched circle
  • Whisper White cardstock: (2) 2.5′ x 2.75″; piece for lighthouse, piece for sentiment
  • Soft Suede cardstock: Piece for wheel
  • Come Sail Away Designer Series Paper: 2.75″ x 4.25″

Directions:

  1. Burnish all creases with bone folder like a ‘ Z’ as shown in Figure 1.
  2. Stamp sailboat and birds on one of the small pieces of whisper white cardstock in Night of Navy ink.
  3. Adhere designer series paper and small white pieces to Inside Z card base.
  4. Adhere designer series paper and white cardstock to Outside Z card base.
Figure 1.
  1. Adhere Inside Z card base to Outside Z card base: To do this, fold outside card base so its easy to find center of card front. Put adhesive on 1/2 of the back of the Inside Z card base front and center and adhere on top of Outside Z card base. Put adhesive on the back of the Inside Z card base on last square (behind sailboat) Fold both bases together to adhere the last square (this will line up the last square for you).
  2. Die cut stitched circle in Navy Cardstock. Stamp lighthouse in Night of Navy ink and die cut. Die cut wheel in Soft Suede cardstock. Punch white label and stamp sentiment in Night of Navy Ink.
  3. Adhere label and navy stitched circle, where sentiment is slightly underneath circle. Add dimensionals to back of light house and adhere to center of navy blue circle. Adhere wheel to top of lighthouse. Use glue dot to apply small twine knot to center of wheel. (see Figure 2)
Figure 2

Supplies for Sailing Home Double Z-Fold Card:

Stampin’ Up! Annual Catalog Kickoff Celebration – Extra Host Rewards For YOU!!

The brand new 2020–2021 Stampin’ Up! Annual Catalog is going live on June 3 2020, and Stamipn’ Up! is having a celebration!

Anyone who places an order of $250+ or holds a party with $250+ in sales during the month of June will receive $25 in extra Stampin’ Rewards!!  So that means that you’ll earn $50 in Stampin’ Rewards with any order or party of $250+ that is submitted between June 3 and June 30! Yay!!! Head over to my online store here to place your order!


Stampin’ Up! Pick A Free Bundle Starter Kit Promotion!!

Wow!!!  Stampin’ Up! is offering an AWESOME promotion if you join during the month of June!!  You get to pick a FREE bundle of your choice with your Starter Kit Purchase!!

Here are the details:

  • Joining promotion dates:  June 3–30, 2020
  • New demonstrators who submit their Independent Demonstrator Agreement (IDA) before June 3 or after June 30 will not be eligible for this promotion.
  • When you purchase your Starter Kit for $99, you get to select $125 worth of products of your choice for your Starter Kit PLUS you get to select ONE stamp and punch bundle (p. 168–169) or ONE stamp and die bundle (p. 173-179) from the new 2020–2021 Annual Catalog—in addition to your regular Starter Kit for FREE.  And your Starter Kit always ships for free…double bonus!!

You can see more details about joining and about our team here on my blog here.  You can also see more information about the benefits of becoming a Stampin’ Up! Demonstrator here.

That is such a great deal!!  If you’ve been considering joining, June will be a great time to jump in!  Drop me an email [email protected]


If you need any stamping supplies, I’d be very happy to be your Demonstrator.  Just click on the Shop Online button on the right side of the screen to go directly to my online store or drop me an email at [email protected] if you have any questions.  Happy Stamping!

  • Visit my online store here.
  • Shop the Clearance Rack here.
  • Shop My Personal Sales here.
  • Don’t forget to follow me on Instagram, Pinterest, YouTube, Facebook. Links at top and bottom of this blog!

Stampin Up Card Ideas: Beautiful World

Do you need Stampin Up card ideas using the Beautiful World bundle? The new in-color Cinnamon Cider pairs so nicely with black–great for masculine cards! The Cinnamon Cider and Basic Black cardstock pair so well together. I love the new the Brass Foil–it’s so super shiny? I will be using this a lot! Tip for using foil paper: I like using the adhesive sheets to glue foil pieces on the card because there is less likelihood of getting glue on the front of the foil. If you do get glue on the front of the foil, rubbing it in one direction (and patience :-)) with your finger seems to work best for keeping it shiny!

Measurements:

  • Black Cardstock: (1) 4.25″ x 11″, scored at 5.5″ and 8.25″ along the 11″ side; (1) 3.25″ x 4.5″, 5/8″ small circle
  • Cinnamon Cider Cardstock: (1) 3.5″ x 4.75″; (1) 4″ x 2.75″; 2.25″x2.5″ for tag
  • World of Good Specialty Designer Series Paper: (1) 4″ x 5.25″; .5″ x 4″
  • Brass Foil Sheets: For globe, globe stand and swirly, 3/4″ small circle
  • Adhesive Sheets: For globe, globe stand and swirly shape

Directions:

  1. Prepare Brass Foil sheets with adhesive sheets on the back. Die cut globe, glove stand, and swirly from the brass sheet.
  2. Fold the black cardstock on the score lines, making a mountain fold with the 2 smallest sections (See Fig 1.)
Figure 1: Easel fold
  1. Place 4″ x 5.25″ piece of designer paper on the black cardstock in the largest section. Add the 3.5″ x 4.5″ Cinnamon Cider cardstock in the middle of the designer paper. This will be the inside sentiment.
  2. Adhere the 3.25″ x 4.5″ piece of black cardstock on top of the Cinnamon Cider 3.5″ x 4.75″ cardstock. Fold card on score lines. Center and adhere the Cinnamon Cide cardstock to front of card; only putting adhesive on the lower 1/2 of the cardstock where it adheres to the black folded section.
  3. Add .5″ x 4″ strip of designer paper to lower portion of card front.
  4. Take adhesive backing off globe and place in upper left of black card front, ensuring there is enough room on left edge to fit globe stand on the black cardstock.
  5. Take adhesive backing off globe and place over globe. Add 2 small gilded gems to globe stand ends.
  6. Die cut label with Cinnamon Cider cardstock. Stamp sentiment in upper portion of label, so there is enough room to add swirly without interfering with sentiment. Take adhesive backing off swirly and add to tag. Add dimensionals to the back of the label and add to front of card.
  7. Adhere the small black circle on top of the gold foil circle. Fold easel card, to determine the best placement for the gold circle to allow the card to stand. Place glue dot on upper portion of gold circle, leaving room at the bottom of the gold circle for the card to slip underneath. Add medium gilded gem to top of black circle.

Supplies for Stampin Up Card Ideas – Beautiful World card:

Stampin’ Up! Annual Catalog Kickoff Celebration – Extra Host Rewards For YOU!!

The brand new 2020–2021 Stampin’ Up! Annual Catalog is going live on June 3 2020, and Stamipn’ Up! is having a celebration!

Anyone who places an order of $250+ or holds a party with $250+ in sales during the month of June will receive $25 in extra Stampin’ Rewards!!  So that means that you’ll earn $50 in Stampin’ Rewards with any order or party of $250+ that is submitted between June 3 and June 30! Yay!!! Head over to my online store here to place your order!


Stampin’ Up! Pick A Free Bundle Starter Kit Promotion!!

Wow!!!  Stampin’ Up! is offering an AWESOME promotion if you join during the month of June!!  You get to pick a FREE bundle of your choice with your Starter Kit Purchase!!

Here are the details:

  • Joining promotion dates:  June 3–30, 2020
  • New demonstrators who submit their Independent Demonstrator Agreement (IDA) before June 3 or after June 30 will not be eligible for this promotion.
  • When you purchase your Starter Kit for $99, you get to select $125 worth of products of your choice for your Starter Kit PLUS you get to select ONE stamp and punch bundle (p. 168–169) or ONE stamp and die bundle (p. 173-179) from the new 2020–2021 Annual Catalog—in addition to your regular Starter Kit for FREE.  And your Starter Kit always ships for free…double bonus!!

You can see more details about joining and about our team here on my blog here.  You can also see more information about the benefits of becoming a Stampin’ Up! Demonstrator here.

That is such a great deal!!  If you’ve been considering joining, June will be a great time to jump in!  Drop me an email [email protected]


If you need any stamping supplies, I’d be very happy to be your Demonstrator.  Just click on the Shop Online button on the right side of the screen to go directly to my online store or drop me an email at [email protected] if you have any questions.  Happy Stamping!

  • Visit my online store here.
  • Shop the Clearance Rack here.
  • Shop My Personal Sales here.
  • Don’t forget to follow me on Instagram, Pinterest, YouTube, Facebook. Links at top and bottom of this blog!

Stampin Up Good Morning Magnolia – Shutter Card

Making cards that ‘wow’ the recipient are the kind I love to make! This shutter card does exactly that and its so pretty using the Good Morning Magnolia stamp set and Magnolia Lane Designer Series Paper. Here are the directions for making this lovely card.

Good Morning Magnolia Shutter Card

Measurements for Good Morning Magnolia Shutter Card

  • Black Cardstock: (1) 5.5″ x 8.5″, scored at 2 1/8″ and 6 3/8″ along the 8.5″ side; (2) 4″ x 3.5″, scored at 1/2″ along 4″ side, white piece for the magnolia stamp image, 1.25″ x 11.25′ scored at 2 1/8″ and 6.5″ along the 11.5″ side for belly band
  • White cardstock: 3″ x 5.5″, 3.5″ x 2.25″ for inside sentiment
  • Designer Series Paper: Outside (2) 1 7/8″ x 5 1/4″; Inside (1) 2 3/4″ x 5 1/4″

Directions

  • Fold black base card stock on the scored lines inward so that it forms a 2 panel gate.
  • Adhere the 2 pieces of designer series paper to the card front on each gate panel.
  • Fold belly band on score lines. Overlap the ends so that the smaller piece is on top and adhere Stamp the magnolia image with black memento ink and color the image using the blends. Adhere the magnolia stamp image to the belly band, making sure that flower does not extend beyond the folded belly band (otherwise it won’t fit in the envelope)
  • To make shutter card pieces, score 1/2″ on 4″ side of black 3.5″x 4″ piece of black card stock. Place a piece of tear & tape on the 1/2″ scored edge. From opposite the scored end, cut 2″ down the center. If doing this 2″ cut on a paper trimmer, line up the paper edge at the 1 3/4″ mark and cut 2″ from non scored end. Using a pair of long blade scissors, cut from each corner to the end of the 2″ cut to form a banner. See Figure 1.
Figure 1: Making the Shutters
  • Take the inside designer series paper (2 3/4″ x 5 1/4″) and adhere to the 3″x5″ white piece of cardstock. Punch a 2.25″ circle in the center
  • Stamp the sentiment on the 3.5″ x 2.25″ white card stock. Adhere this to the inside of the card by centering it, using the white card stock with the 2.25″ circle punch out as a guide.
  • Line up the first shutter (with the tear & tape facing up) on the inside of one of the scored lines so it is centered over the circle. Take off the tear & tape and fold the side gate panel down, making sure the shutter is lined up against the score line. See Figure 2.
Figure 2. Adhering first shutter panel
  • Repeat this step for the second shutter on the opposite side, making sure it’s also parallel to the first shutter. See Figure 3.
Figure 3. Adhering second shutter panel
  • Place dimensionals (pop up dots) on the top and bottom of the back of the white card stock to be used for the inside. Adhere the top first so it’s centered left to right between score lines, then adhere the bottom.

Supplies: