Blog

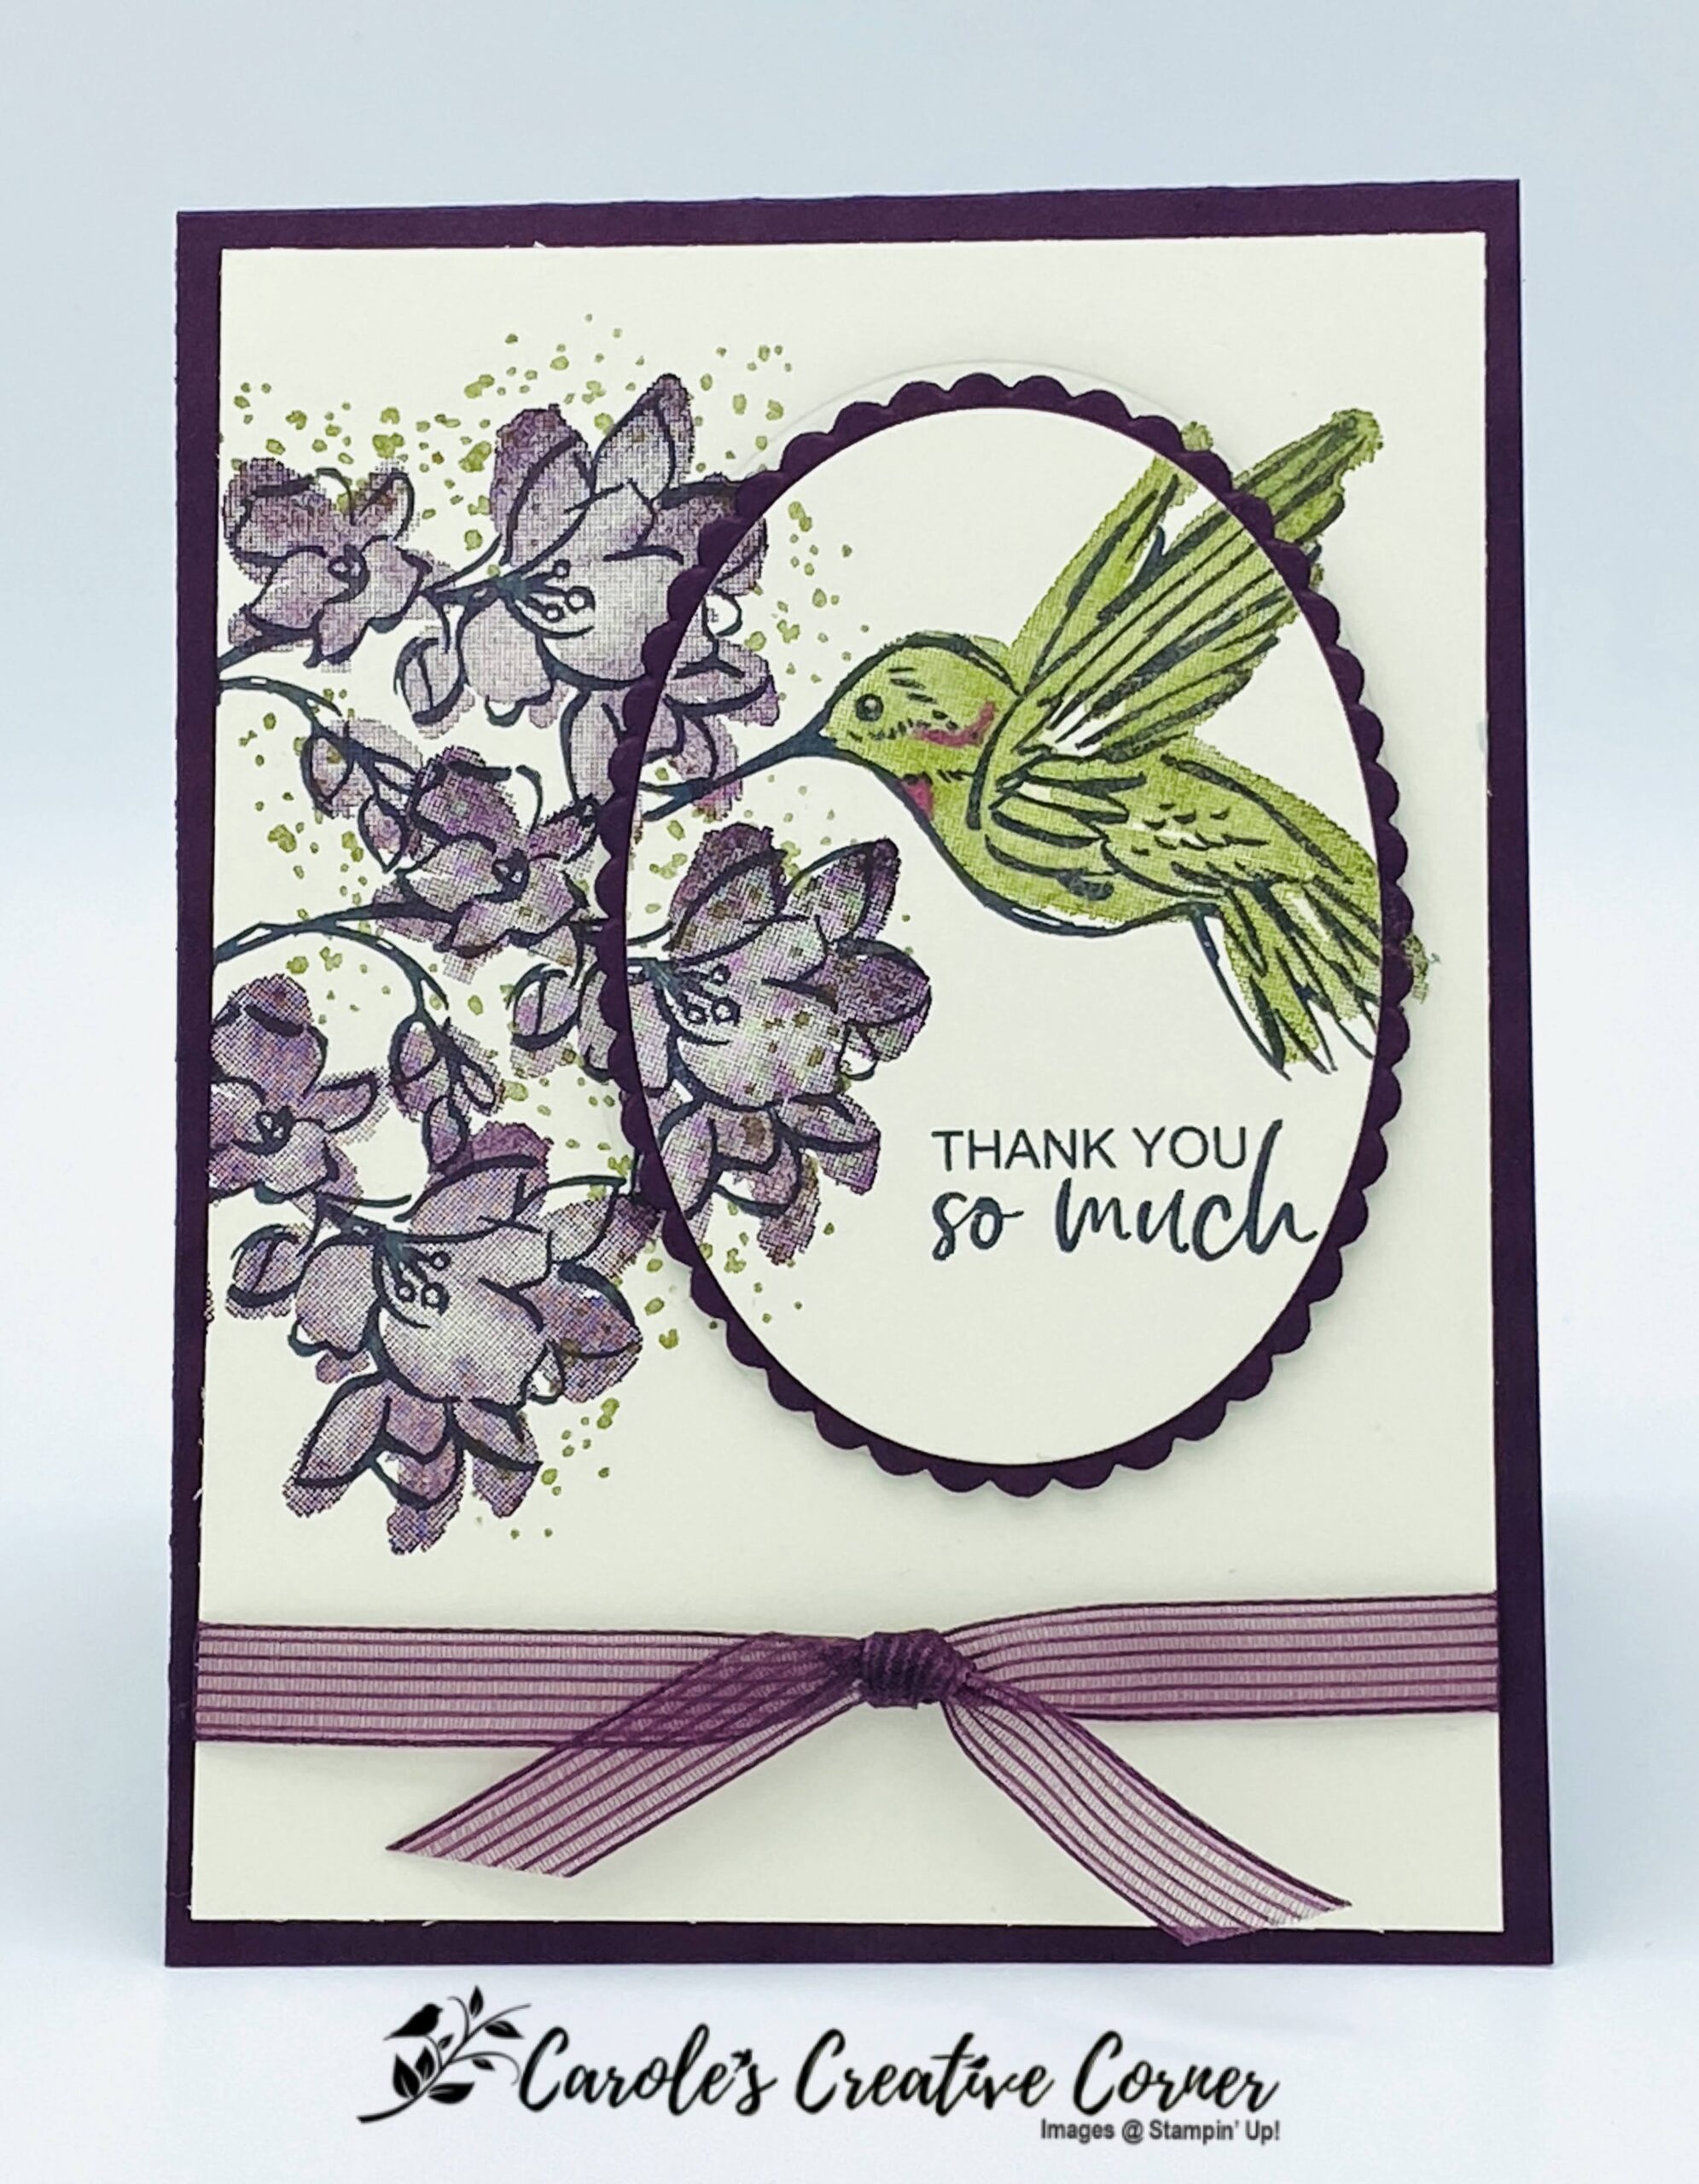
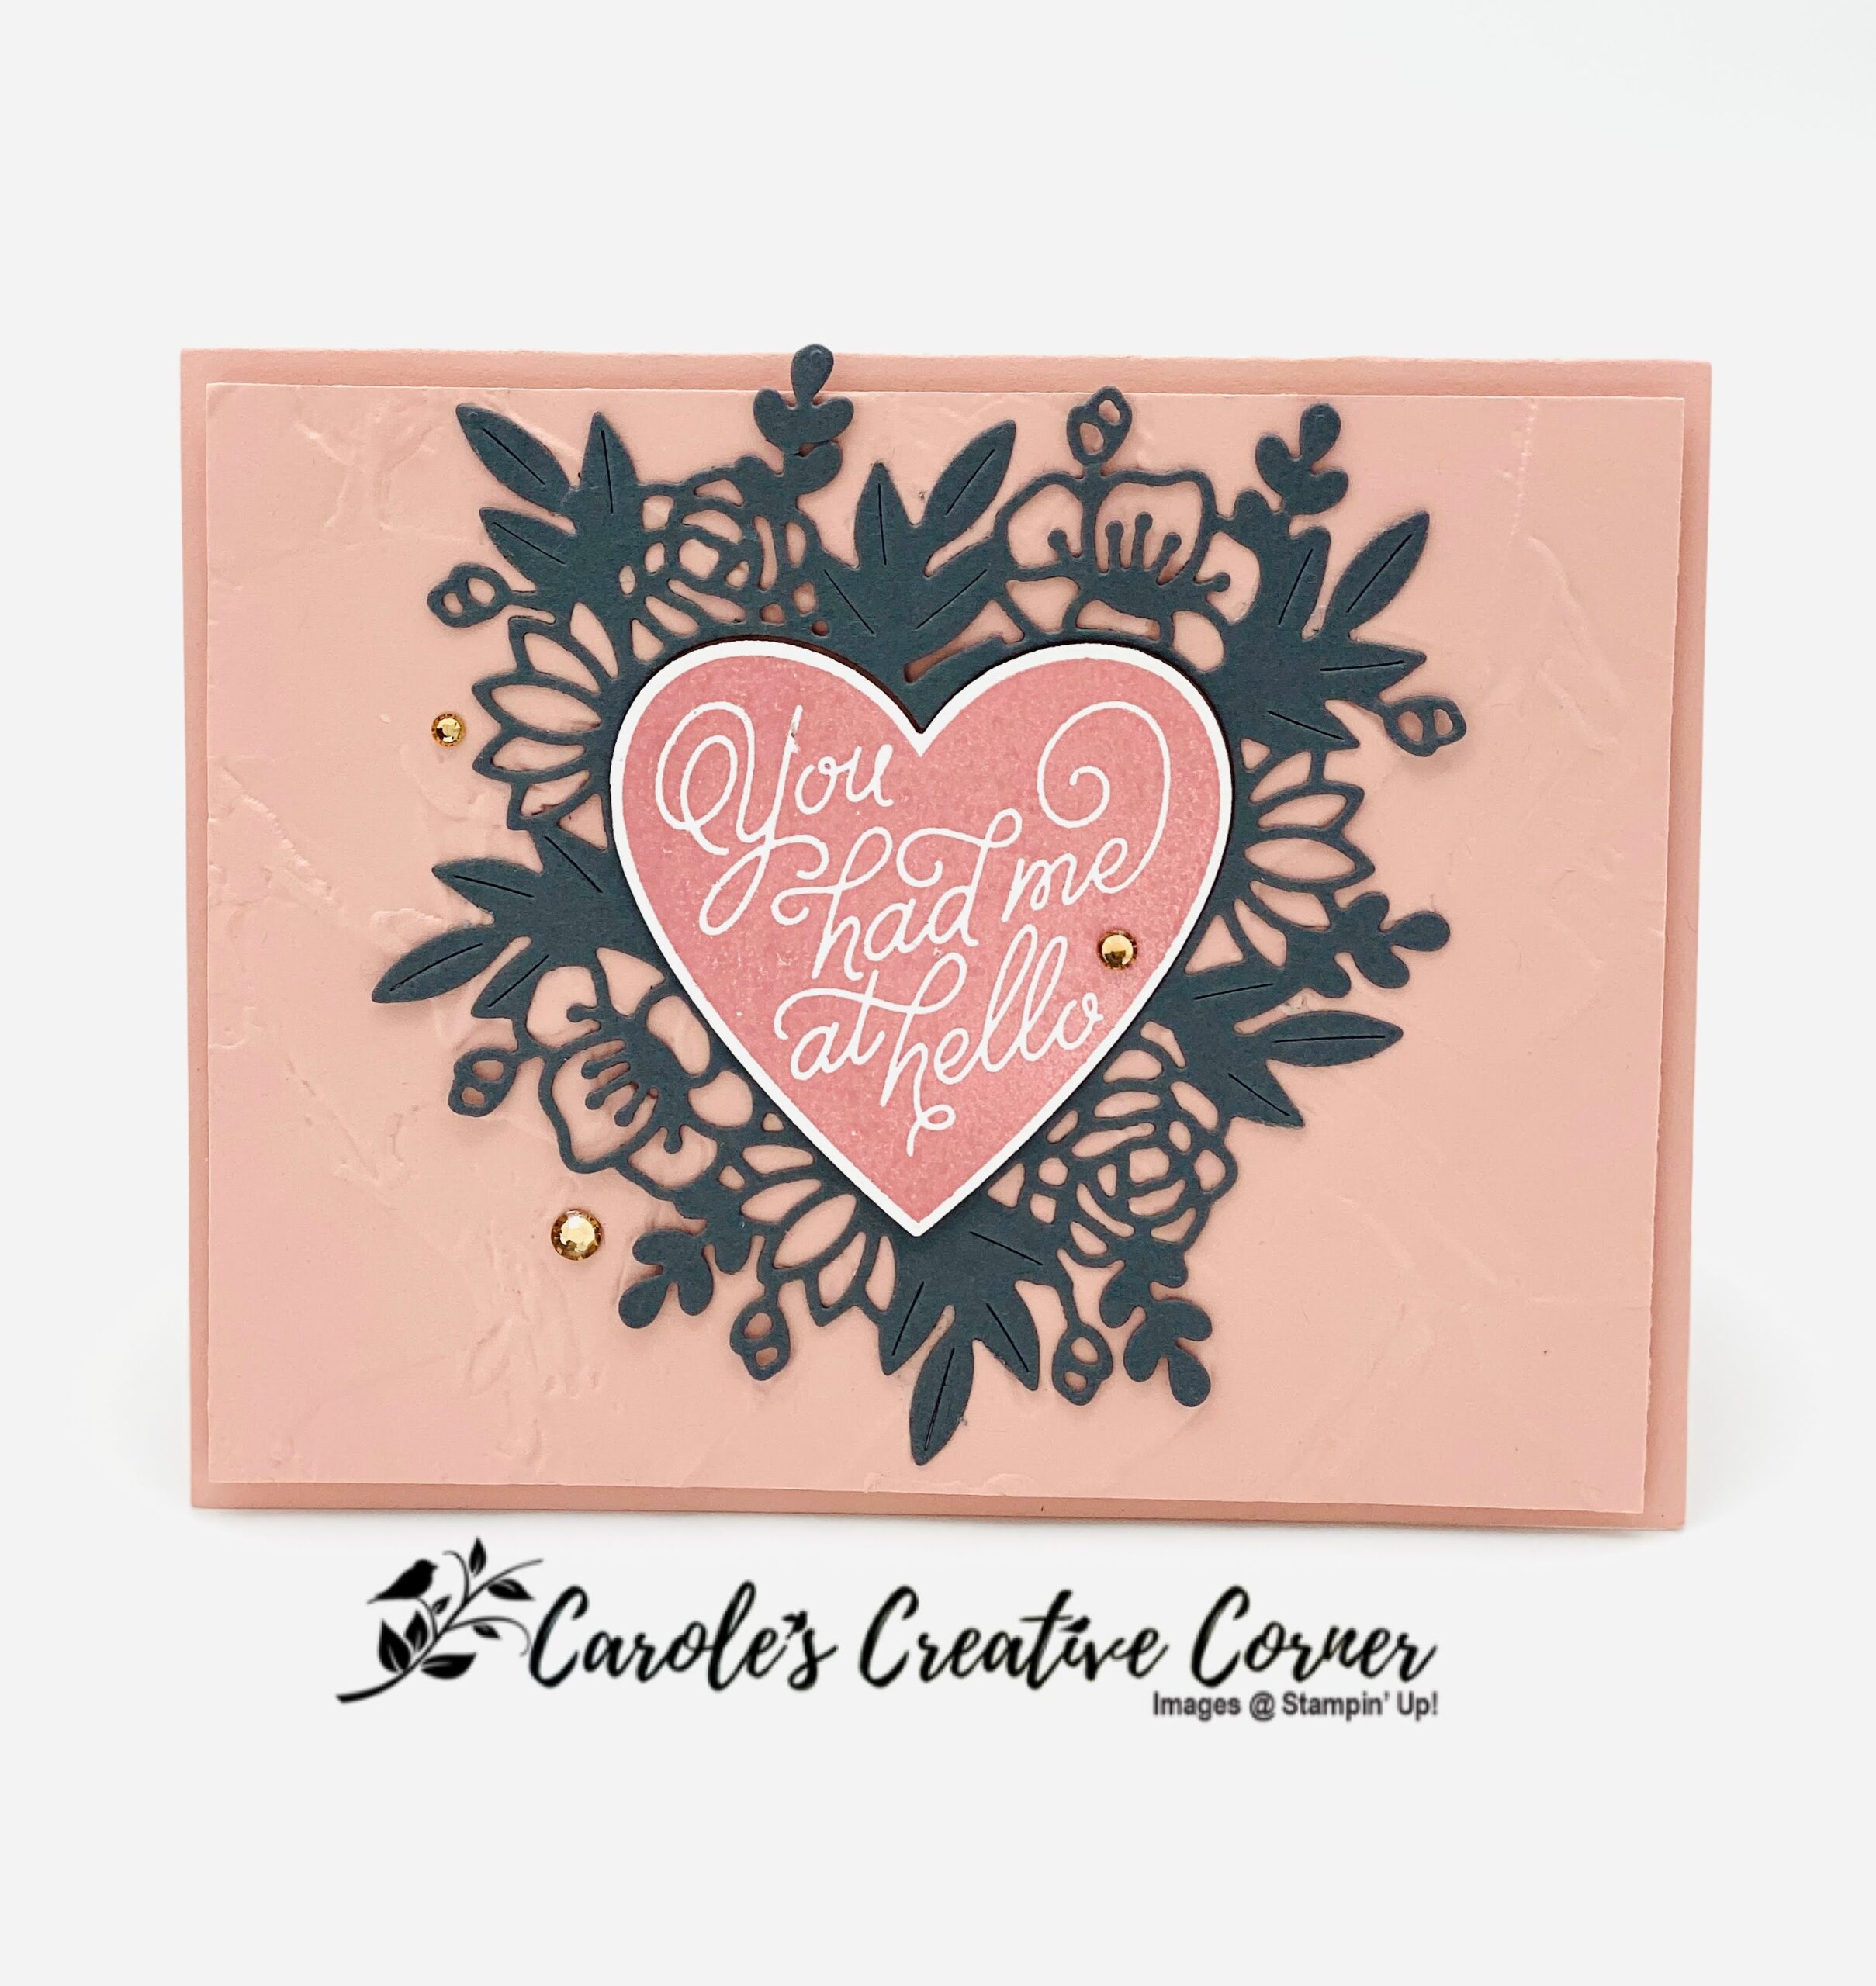
Always in My Heart Card

This Always in My Heart card using the Always in My Heart bundle is so pretty with such little work! If you have to make a quick and easy card this may be your go to design. There are so many ways to use the this suite and bundle–be sure to watch my YouTube video which will be posted on 2/24/21 to get all the details on the different ways you can use this suite of products.

The floral die in the set does all the work on this card. I have found that even though the die is detailed, it cuts so easily and comes out of the die without any ripping and no need for a precision plate. Did you notice that it also makes marks in the leaves so that they look 3D? Just think of all the color combinations and paper types you can use with this die, and your possibilities become endless. Read on to see how easy this card is to create.

Measurements:

Petal Pink card stock: 5.5″ x 8.5″, scored at 4.25″ on the 8.5″ side, (1) 4″ x 5.25″
Basic White card stock: 2.5″ x 2.5″ for heart
Basic Gray card stock: 4″ x 4.5″ for floral

Directions:

After die cutting the floral heart in Gray Granite, I used the die again to cut only a heart in Basic White card stock. I stamped the ‘You had me at Hello” heart stamp in Blushing Bride ink onto the white heart. (Remember this is where you can change the card to any occasion you want just by changing the sentiment in on the center heart!) After running the 4″ x 5.25″ piece of Petal Pink cardstock through the Stampin’ Cut and Emboss machine using the Painted Texture embossing folder, the card is ready to be assembled.

Always Love You

I used dimensionals to layer the embossed piece of Petal Pink card stock onto the card base. I then adhered the Basic Gray floral heart to the front of the card. I applied adhesive only to the bunches of leaves and not every surface of the die, as that it’s not needed and it gives more depth to the die to have some of the pieces floating. Next, I applied the stamped white heart to the center of the floral die cut using dimenstionals. Then I added different sizes of the champagne rhinestones to give the card some sparkle.

Stamping the inside of the card adds a nice touch to the card. In this example, I used the flower stamp from Forever and Always stamp set to give some decoration to the inside using Tuxedo Black Memento ink.

Always Love You
Sale-A-Bration

 Would you like to get a 20% discount on everything you order?  Sale-A-Bration is the perfect time to join. During this time (January & February), you can choose your $125 Starter Kit for only $99. Plus, you’ll get a FREE exclusive BONUS gift from the upcoming catalog — an assortment of 6″X 6″ stacks of Designer Series Paper, 200 sheets!

Did you know that the majority of Stampin’ Up! Demonstrators are hobby demonstrators? They appreciate Stampin’ Up! products, like you do, and enjoy the 20% discount. The addition of the stacks of  6X6 Designer Paper during Sale-A-Bration is an added incentive, giving the kit a $182.50 value. I’d love for you to join my Stamps-A-Lot Sweethearts Team, click on the picture below to join:

Supplies:

Love You Always Treat Box

It’s getting close to Valentines Day and time to get treats ready for your loved! The Love You Always Treat box makes giving treats easy. The box is easy to assemble and easy to decorate. Learn how to make this treat box and be ready to send your love.

Love You Always Treat Box

Measurements:

True Love Designer Series Paper (DSP): 4 1/8″ x 8 7/8″, scored at 1/4″, 1 13/16″, 4 5/8″, and 6 1/4″
Blushing Bride card stock: 2″ x 3 3/4″, cut 1/2″ on 2″ side to form banner
Basic Black card stock: piece for sentiment
Love You Always Foil sheets: piece for Love die cut

Directions for Love You Always Treat Box:

Assemble the box.
Wrap the True Love DSP around the sleeve cover, aligning the scored lines with the corner seams of the box and adhere with Tear & Tape.
On the 2″ side of the Blushing Bride card stock, cut a 1/2″ line along the center (1″ ). Next, cut from each corner of the Blushing Bride cardstock to the upper part of the cut to form the banner.
Die cut the Love word from Rocco Rose foil and the Love outline out of vellum. Adhere the foil Love die cut on top the vellum outline love die. Adhere the Love to the the banner and stamp the hearts in Blushing Bride ink around the sentiment.
Adhere the banner to the box with adhesive.
Die cut the small banner take from Basic Black card stock. Emboss the “you” on the black banner with white embossing powder and adhere to box banner with mini dimensionals.
Wrap the ribbon around the box sleeve and attach a Heart Charm while tying the bow. Hold bow in place with a glue dot.
Fill with treats!

Love you Always Treat Box
Love You Always Treat Box

Supplies:

https://www.stampinup.com/categories/sales-specials/sale-a-bration

 Would you like to get a 20% discount on everything you order?  Sale-A-Bration is the perfect time to join. During this time (January & February), you can choose your $125 Starter Kit for only $99. Plus, you’ll get a FREE exclusive BONUS gift from the upcoming catalog — an assortment of 6″X 6″ stacks of Designer Series Paper, 200 sheets!

Did you know that the majority of Stampin’ Up! Demonstrators are hobby demonstrators? They appreciate Stampin’ Up! products, like you do, and enjoy the 20% discount. The addition of the stacks of  6X6 Designer Paper during Sale-A-Bration is an added incentive, giving the kit a $182.50 value. I’d love for you to join my Stamps-A-Lot Sweethearts Team, click on the picture below to join:

Join during SAB

A Touch of Ink Spotlight Technique

This card uses A Touch of Ink stamp set and the Spotlight technique. A Touch of Ink is a Sale-A-Bration set you can get for free with a $50 purchase through February 2021. It is one of my favorite because of the two step stamping feature, dist-Ink-tive images, and the stamp set itself–butterflies and hummingbirds with flowers are high on my list in creating cards for others. Two-step stamping in this case is when you stamp the first image, which is an outline image, and then there is second stamp that will color in the outline image. Read on to see how easy it is to create this card!

Measurements:

Blackberry Bliss card stock: 4.25″ x 11″, scored on the 11″ side at 5.5″, 2.75″ x 3.75″ for scalloped oval
Very Vanilla card stock: (2) 4″ x 5.25″, (1) 2.5″ x 3.5″ for oval die cut

Directions for A Touch of Ink card:

The first step is to stamp the outline images on the 4″ x 5.25″ piece of Very Vanilla card stock. This card is oriented in portrait mode, where the 4″ side will be top and bottom and the sides will be the 5.25″ side. Stamp with Memento Tuxedo Black ink the flowers on the left hand side and primarily centered in the vertical middle. Add the hummingbird such that the tail is 1/4″ from the right edge and the beak is inside the flowers. Also stamp the sentiment.

A Touch of Ink

Using Blackberry Bliss ink, ink the flower second stamp and stamp inside the outline image of the flowers to add the color. Note: The stamp to add color is not an exact match to the outline stamp and this helps to provide a soft water color look. The hummingbird is stamped in Old Olive ink. The Blackberry Bliss blend pen was used to add color to the hummingbird. Add speckles randomly with the speckle stamp in the set in Old Olive ink around the flowers.

A Touch of Ink

Die cut an oval out of the Very Vanilla cardstock, to include the sentiment and a majority of the hummingbird.

A Touch of Ink

Layer the Hummingbird oval onto the Blackberry Bliss scalloped oval. Adhere the blackberry bliss ribbon to the lower front of the Very Vanilla cardstock. Next, adhere the 4″ x 5.25″ Very Vanilla card stock onto the front of the Blackberry Bliss card front. Adhere the hummingbird oval onto the front of the card with dimensionals, lining up the images to the front of the Very Vanilla base. Add Wink of Stella to the hummingbird for an added sparkle!

Supplies:

Snowman Season Slim Line Card

Learn how to make this cute Snowman Season Slim Line Card.. The slim line card fold is so enjoyable because there is more card space for stamped images! Give it a try!

Measurements:

Thick Whisper White cardstock: 7″ x 9.25″, scored at 3.5″ along the 7″ side
Real Red cardstock: 3.25″ x 9″, 3″x3″ for scalloped circle, piece for snowman hat
Pool Party cardstock: 3″ x 8.75″
Whisper White cardstock: for snowman, 3/4″ x 3.5″ for sentiment
White glitter paper: 2″ x 7.25″
Early Espresso: pieces for snowman arms

Directions for Seasonal Snowman Slim Line card:

  • Layer the Pool Party cardstock on top of the Real Red cardstock. Die cut a 2.5″ circle on the right hand side of the 2 layers. Emboss the Pool Party later with the snowflake embossing fold.
  • Adhere the Pool Party cardstock onto the Real Red layer and then adhere this to the front of the thick white card base.
  • Stamp the snowman in the center of the circle with Memento Ink. Outline the snowman with the light Pool Party Blend & snowballs to give a 3D effect.
  • Die cut a 2.5″ circle and the outline scallop at the same time on the 3″x3″ piece of Real Red Cardstock. Adhere over the circle on front of card.
  • Die cut a hill and trees from white glitter paper and adhere to card front.
  • Stamp snowman on whisper white paper with Memento ink. Punch out the 2 arms from Early Espresso Paper. Stamp the hat on Real Red cardstock and punch out with snowman builder punch. Assemble snowman on card front and adhere to card with dimensionals.
  • Stamp sentiment in Real Red ink on whisper white cardstock and punch ends with banner punch. Adhere to card front.

Supplies:

Click Here to Shop the Sale

Merry Moose Pine Tree Card

This Merry Moose Pine Tree card has the feel of the northwoods–perfect for those who love the forest! Reminds me of the Minnesota Northwoods! It was so much fun to put together. Inspiration for this card came from Erica Cerwin…

CLICK HERE TO WATCH VIDEO

Measurements:

Whisper White Thick Cardstock: 5.5″ x 8.5″ scored along the 8.5″ side at 4.25″
Whisper White cardstock: 4″x5.25″, small piece for sentiment
Shimmery White cardstock: 5.25 x 2″
In Good Taste DSP: piece for 2 pine trees
Gilded Autumn Specialty DSP: piece for 1 tree
Cherry Cobbler cardstock: piece for 1 pine tree, small piece for the scarf
Crumb Cake cardstock: for the moose
Linen Thread: 16″

Directions for Merry Moose Pine Tree Card:

  • Die cut 2 of the pine trees from 2 different patterns in the In Good Taste DSP, die cut 1 small pine tree from the brown houndstooth pattern from Gilded Autumn Specialty DSP.
  • Use the buffalo checked background stamp with Memento Black ink to stamp onto Cherry Cobbler card stock. Die cut one pine tree from this pattern.
  • Use the hill die from the Pines dies to cut a curve from the Shimmery White paper so that the hill is higher on the left than the right. Stamp footprints on the left hand side of the hill onto the Shimmery White paper with Memento Black ink.
  • Stamp the moose on Crumb Cake in Early Espresso ink and punch out with Moose punch.
  • Stamp the card front sentiment on whisper white in Early Espresso ink and punch out with the classic label punch.
  • Stamp the moose scarf on Cherry Cobbler card stock with Cherry Cobbler ink and fussy cut.
  • Stamp inside the card base with sentiment in Cherry Cobbler ink and the raccoon in Memento Ink.
  • Emboss the 4″x5.25″ white card stock with the Woodlands embossing folder. Layer onto the card base with dimensionals.
  • Adhere the trees on the front of the card using dimensionals placed down the center of each tree.
  • Wrap the linen thread around the snow hill and make a bow in the front on the left hand side of the snow hill.
  • Place dimensionals on the back of the snow hill (2 on each end, straddling the linen thread to hold it in place). Make sure the linen thread is underneath the footprints on the snow hill.
  • Place moose on the front of the snow hill with 2 dimensionals (on its body.)
  • Adhere the sentiment with 2 mini dimensionals or regular dimensionals cut in 1/2.
  • Color in the raccoon with Stampin’ Up Blends (smoky slate, cherry cobbler, crumb cake)
Merry Moose

Supplies:

CLICK HERE TO SHOP

Pretty Poinsettia Curvy Dies Card

Pretty Poinsettia and Curvy dies (early released product) is one of my absolute favorite combinations. Both are beautiful independently but so beautiful together. Learn how to make this beautiful card!

Pretty Poinsettia

CLICK HERE TO WATCH VIDEO

Measurements:

Cherry Cobbler cardstock: 4.25′ x 6 for poinsettia, 3.5″ x 5.25 for layer
Garden Green cardstock: piece for 3 leaves
Plush Paper: 3″ x 5.25″
Thick Whisper White cardstock: 5.25″ x 8.5″ scored at 4.25″ along 8.5″ side for card base
White glitter paper: piece for 2 sprigs

Directions for Pretty Poinsettia Curvy Card:

  • Die cut the 4 flower pieces for the poinsettia from Cherry Cobbler card stock using the inside embossing pieces. Die cut 2 large leaves and 1 small leaf using the inside embossing pieces from Garden Green card stock. Die cut 2 sprigs from white glitter paper.
  • Die cut 1 curve on the long side of the Plush Paper. To die cut the curve on the long side of the Cherry Cobbler card piece, align the Plush Paper near the bottom of the Cherry Cobbler and align curve die just under the Plush Paper curve and then die cut the curve on the Cherry Cobbler card piece. See Figure 1.
Pretty Poinsettia
Figure 1: Align curve die along the Plush Paper curve to get the same curve on the Cherry Cobbler card piece
  • Fold the thick whisper white card base in 1/2. Poke all holes out of curvy layers and then adhere the Cherry Cobbler piece to the card base and then the Plush paper piece on top of the Cherry Cobbler.
  • Take a chalk marker and trace the outside edges of the 4 poinsettia flower pieces and the 3 green leaves. Apply Wink of Stella to all pieces.
  • Begin to gently fold the leaves of the flower in 1/2 and upward, as shown in figure 2.
Pretty Poinsettia
Figure 2: Shape the flower pieces
  • Layer the pieces of the poinsettia from largest to smallest with a glue dot (see Figure 3)
Pretty Poinsettia
Figure 3: Layer poinsettia flower pieces from largest to smallest
  • Apply bead with a glue dot to center of flower. Apply 1-2 dimensionals to the back of the flower and apply to the card front, leaving room for leaves and sprigs so they don’t go over the card base edges.
  • Adhere leaves and sprigs, by applying adhesive to bottom 1/2 of leaf/sprig.
  • Stamp sentiment in Cherry Cobbler ink.
Pretty Poinsettia

CLICK HERE TO SHOP

Snowman Season Snowball Card

Tis the season to be jolly and the Snowman Season Snowball card says it all! This little snowman is one of my favorites–he/she is just so happy that I had to put a few snowballs in his/her hands and make it look like he/she is juggling them! Then a few sparkles with our newest snowflake sequins and it makes the card complete!

Snowman Season

CLICK HERE TO WATCH VIDEO

Meaurements

Shimmery White cardstock: 3×3″
Highland Heather cardstock: 2 3/4″ x 2 3/4″; 5.5″ x 8.5″ scored at 4.25″ along the 8.5″ side
Pool Party cardstock: 3.5″ x 4.5″
Whisper White cardstock: 3 5/8″ x 4 5/8″; 4″ x 5.25″ for inside
Snowflake Splendor DSP: 2″ x 4″
10″ ribbon

Directions for Snowman Season Snowball Card:

  • Die cut the largest stitched square from the Shapes die from Shimmery White Paper. Stamp the snowman in Memento Ink towards the top of the stitched square. Take the light Pool Party blend and trace around outside of snowman and ground to create a 3D look.
  • To make the banner, make a 1/2″ slit from the center of the Snowflake Splendor DSP along the 2″ side. Cut from the bottom corners to the top of the slit to form the banner shape.
  • Apply a small amount of puff paint to the Shimmery White square where you want the snowballs. Tip: You need just the smallest amount of puff paint to make the snowball (see Figure 1). If you put too much, just absorb the puff paint with a kleenex or paper towel and start again. Having too much puff paint will make the snowballs too big. Practice on scrap paper till you achieve the right size. I typically tilt the bottle tip to the side and apply the paper to the tip of the puff paint to control the amount of puff paint that comes out; i.e. do not completely face the tip of the puff paint down onto the paper.. Then apply heat with a heat gun to make the snowballs (Figure 2). Tip: Allow the heat gun to heat up before heating the puff paint.
Figure 1: Apply small amount of Puff Paint
Figure 2: Heat Puff Paint to create snowballs.
  • Adhere and center snowman to square piece of Highland Heather. Wrap ribbon around bottom part of squares and tie a square knot to the front on the right side. Apply dimensionals to the back of the Highland Heather square. Straddle 2 of the dimensionals on the ribbon and paper to help keep the ribbon in place.
  • Stamp sentiment on the piece of pool party on the right hand side.
  • Adhere and center the Pool Party card stock to the smaller piece of white cardstock. Adhere and center to the Highland Heather card base.
  • Adhere the banner on top of the Pool Party card stock on the left hand side. Use the square snowman piece to help with centering, such that the banner will be centered under the squares.
  • Take dimensional backings off the Highland Heather square and adhere on top of banner.
  • Decorate card with snowflake sequins.
  • Adhere 4″ x 5.25″ white card stock to inside of card and stamp sentiment of choice.

Supplies:

CLICK HERE TO SHOP NOW!

Perfectly Plaid Pop Up Cube Card

This Perfectly Plaid Pop Up Cube card is a fun card to give for the holidays! The deer scene at the bottom is a fun inside surprise! The options for decorating this fun fold are limitless. Give it a try with your favorite designer series paper and stamp set…

Measurements:

  • Pacific Point cardstock:
    • Card Base large cube: (1) 4″ x 8.5″, on the 8.5″ side score at 2″, 4″, 6″ and 8″;
    • Card Base small cubes: (2) 2″x8.5″, on the 8.5 side, score at 2″, 4″, 6″, and 8″;
    • Tabs: (4) 3/4″ x 1.5″, scored on the 1.5″ side at 3/4″,
    • Bottom Scene: 1.5″ x 2.5″
  • Whisper White cardstock:
    • Bottom scene mat: (1) 1.75″ x 2.75″
    • Upper sentiment: 1.5″ x 3.5″
    • Slip-in sentiment: 3.75″ x 4.5″ , scored on 3.75″ side at 1 7/8″
  • Snowflake Splendor Designer Series paper (DSP):
    • (6) 1.5″ x 1.5″,
    • (1) 3/4″ x 3.75″ for slip in sentiment
  • Pool Party cardstock: piece for 2 punched trees
  • White Glitter paper: piece for die-cut reindeer

Directions for Perfectly Plaid Pop Up Cube Card:

Stamp 2 plaid trees on Pool Party paper in Pacific Point ink and then punch.
Die cut the Pacific Point label and white label. Stamp the sentiment on the right hand side of the white die cut and then adhere the white die cut to the Pacific Point label.
Add the Plaid tree to the label on a dimensional, ensuring the tree stump is not lower than the bottom of the Pacific Point label.
Lay the three 8.5″ pieces on your work surface. Crease all the folds in the same direction and crease with a bone folder.

Pop Up Cube Card
Note: This paper should be Pacific Point (not White) per measurements above.

Place a piece of Tear & Tape on the 1/2″ scored section on all three pieces, closer to the scored edge. Remove backing from the Tear & Tape.

Pop Up Cube Card
Note: This paper should be Pacific Point (not White) per measurements above.

Fold the opposite side over onto the adhesive, press to adhere. This should now form a cube shape. Repeat until all three pieces are cube shapes.

Pop Up Cube Card
Pop Up Cube Card

Place two pieces of Tear & Tape on one side of each of the small cubes. (Put tape on the side of the cube next to the seam–this way the seam will be toward back of card)

Pop Up Cube Card

Flatten the tall rectangular cube (put the seam toward the side (versus front or back). Flatten one small cube and adhere it to the left side of the tall rectangular cube–lining it up with the center seam, the outside left edge, and the bottom edge. Adhesive should be near the bottom.

Repeat to the right side of that center seam on the tall rectangle cube and attach the second small cube on the right side of the flattened tall rectangular cube with the adhesive portion at the bottom.

Pop Up Cube Card
Pop Up Cube Card

Flatten the cubes and adhere the 1.5″ x 1.5″ square of designer series paper to the center of each square.

Pop Up Cube Card
Note: Pacific Point cardstock and different pattern of DSP is used on the card (vs. the White & blue snowflakes)

Lay out the four small scored tabs. Place 1/2″ piece of Tear N Tape to the left side of the score and a 1/2″ piece to the right side of the score. Fold on the score.

Pop Up Cube Card

Pull off the backing pieces of the Tear & Tape and adhere two of them to the upper portion to the left and right of the center seam. This is where you will place your top greeting and bottom scene. Test where to place the tabs by holding up the label on top of the small cubes and eye where the center would be.

Pop Up Cube Card

Add greeting to upper section. Assemble the scene and add to lower section.
Add bow to upper section and add faceted blue gems.
Adhere DSP to the top of slip-in white cardstock and stamp sentiment in Pacific Point. Crease on fold and slip-in to inside of tall cube.

Supplies:

Nature’s Beauty Trifold Window Card

This Nature’s Beauty Trifold Window card will surprise your recipient! When the card is laying flat, it appears to be a standard card fold, however, once opened, it reveals a window and more layers inside! Learn how to make this card using this timeless stamp set

Nature's Beauty Trifold Window Card

Measurements:

Real Red cardstock: 5.5″ x 8.5″ scored at 4.25″ along the 8.5″ side
Toile Tidings Designer Series Paper (DSP): 4″ x 5.25″
Very Vanilla cardstock: 5.25″ x 8″, score at 2″, 4″ along the 8″ side, 4″ x 4″

Directions for Nature’s Beauty Trifold Window Card:

  • Fold cardbase and adhere the 4″x5.25″ piece of DSP to the front of the card. Use the adhesive in the corners and primarily around the perimeter of the back of your designer paper, and not much in the center at all.
  • Use the Stitched Nested Label die that cuts a 2 3/8″ x 4.25″ opening, and center on front of card and die cut. Use the next size down Nested Label die and die cut from the 4″x4″ Very Vanilla cardstock. Layer this Very Vanilla stamped Nested label on top of the larger red Nested Label that was cut from the front of the card. (Note: The DSP that was cut from the front of the card will not be used on this card.)
  • Take your Very Vanilla Nested Label diecut and stamp a message in Real Red ink and the fox in Tuxedo black Memento ink.
  • On the large piece of Very Vanilla, stamp in the 4″x5.25″ section with the scored section to the right. Stamp the deer, rabbit, grass, shrubs in Tuxedo Black Memento and the sentiment in Real Red ink. To get the shrubs to appear as if they are behind the deer, mask the backend of the deer with a fussy cut piece of Post-It note paper.
Nature's Beauty Trifold Window Card
Figure 1: Stamp Deer, Rabbit, shrubs and sentiment.
  • Adhere this stamped section to the inside flap of card, with the scored portion of the Very Vanilla to the right. Fold the cardstock to the left of the first score line and then fold the remaining cardstock to the right of the next score line. Close the card.
  • Apply adhesive to the fold that is exposed through the Nested Label window and then apply the large shape cutout to the card.
  • Tie a 22″ piece of ribbon around the inside front of the card and tie a bow on the front side of the card.

Supplies:

Poinsettia Petals Bridge Card

I love bridge cards because they are easy and fancy and this Poinsettia Petals bridge card is no exception. Read on to learn how to make this 3D card. It’s great that it also fits into a standard A2 envelope just by folding to one side. Isn’t the flocked paper absolutely gorgeous?

Poinsettia Petals bridge card

Measurements:

Night of Navy card stock: (1) Card base 4.25″ x 8″ scored on the 8″ side: 1.25″, 2.5″ , 5.5″ and 6.75″, (1) bridge layer: 1″ x 5.5″
Plush Poinsettia Specialty Paper: 1″ x 4″ side panels
Whisper White card stock: (2) 2.75″ x 4″: inside message & backside message, 4.25 x 5.5″ for poinstettia and leaves die cuts
Balmy Blue Glimmer paper: 3″ x 3″ for sprigs

Directions:

  • Fold on score lines. Fold the inside score lines to center of card, like a door, then fold outside score lines back to form a flap.
  • Adhere specialty paper strips to the flaps using glue dots or a light amount of adhesive to minimize the show-through of the adhesive.
  • Stamp sentiments in Misty Moonlight on the 2.75″ x 4″ pieces, one for the inside of the bridge card and one for the back and adhere to card.
  • Apply Night of Navy bridge strip across front of card using Tear & Tape on the backside of the strip, or other strong adhesive. Apply the left side of the bridge strip by folding the left side of the card flat. Then with the right side of the card extended and flat, adhere the right side of the bridge strip to the front of the right side of card.
  • Stamp 3 sizes of poinsettias and 2 leaves in Misty Moonlight ink on Whisper White cardstock and die cut. Also stamp the interior of the leaves with filler stamp.
  • Layer the poinsettias to each other in the center only, starting with the largest poinsettia to the smallest and offset the petals from each other on each layer.
  • Add dimensionals to the back of the poinsettia in the center only and adhere to front of bridge card.
  • Adhere leaves behind the poinsettia.
  • Die cut 2 sprigs and 1 poinsettia center from the Balmy Blue glimmer paper and apply adhesive to the back side of the sprigs on the lower half only then arrange them behind the poinsettia.
  • Adhere the Balmy Blue Glimmer poinsettia center to flower and add blue gem.

Supplies for Poinsettia Petals Bridge Card