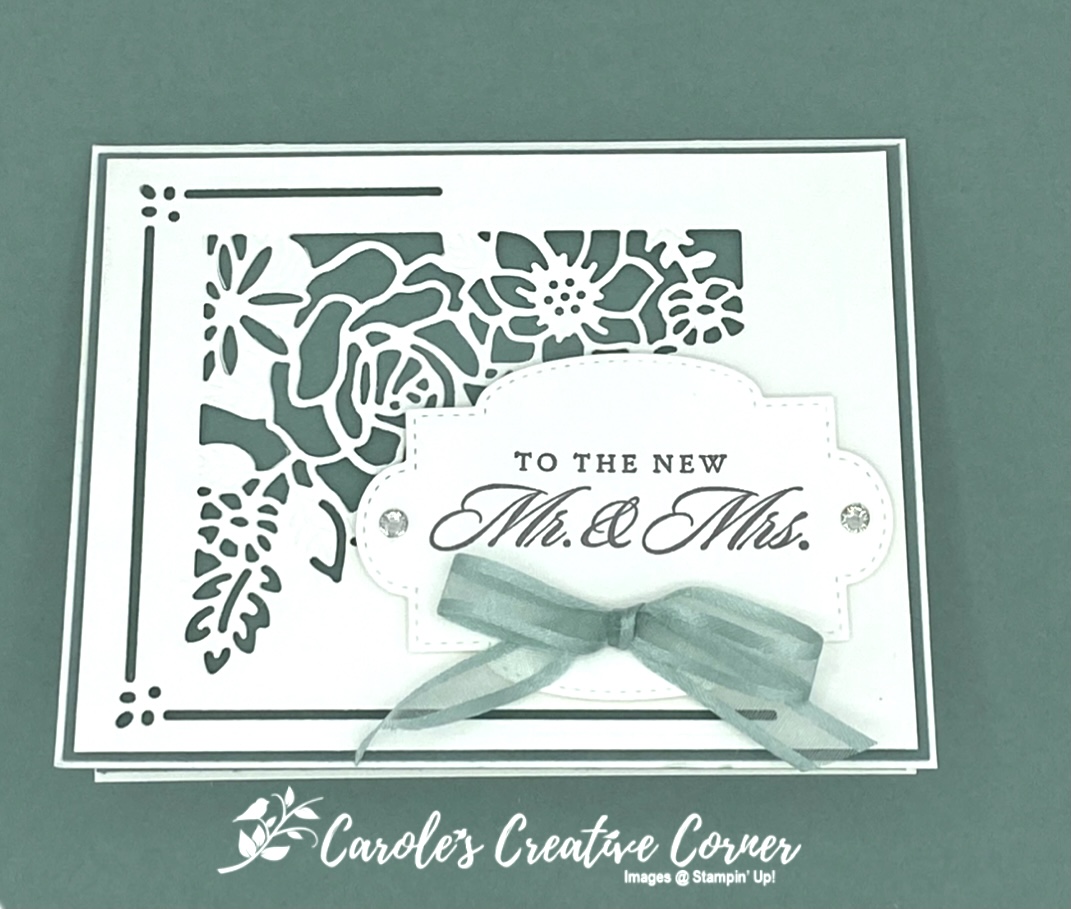
Spring is in the air and there tends to be more weddings coming up–or anniversaries and general love cards are always needed. I have an easy but elegant card to show you using the Last a Lifetime stamp set and Lasting Elegance dies. This set is retiring but is available until May 3rd or while supplies last. This card is 4 die cuts and 2 stamped images and look at the beautiful results with very little effort!
Measurements:
Thick Basic White card stock: 5.5″ x 8.5″, scored at 4.25″ on the 8.5″ side Basic White card stock (2) 4″ x 5.25″ Soft Succulents card stock: (2) 5 3/8″ x 4 1/8″ (Available on May 4, 2021)
Directions:
Die cut one of the 4″ x 5.25″ Basic White pieces of cardstock with the outline edge and large flower die cut. Die cut the white label and stamp the sentiment in Basic Gray Ink. This is the most of the work for the front of the card!
Adhere one of the pieces of 4 1/8″ x 5 3/8″ Soft Succulent card stock to the front. Then add the die cut white cardstock onto the Soft Succulent cardstock with dimensionals.
Apply the label to the front of the card with dimensionals. Add the bow to the front with a glue dot. Now its time to stamp the inside!
Stamp the sentiment on the second piece of Basic White cardstock and use the small floral die cut in the corner. Layer the Soft Succulent card stock to the inside and then layer the Basic White card stock onto the Soft Succulent card stock.
It’s a nice touch to add the beautiful floral stamp on the back of the card and to decorate the envelope in Soft Succulent ink to match the card.
Thanks for stopping by. Click the image below to see what Susan Campfield has created.
Thanks for stopping by. Click the image below to see what Kelly Acheson has created.
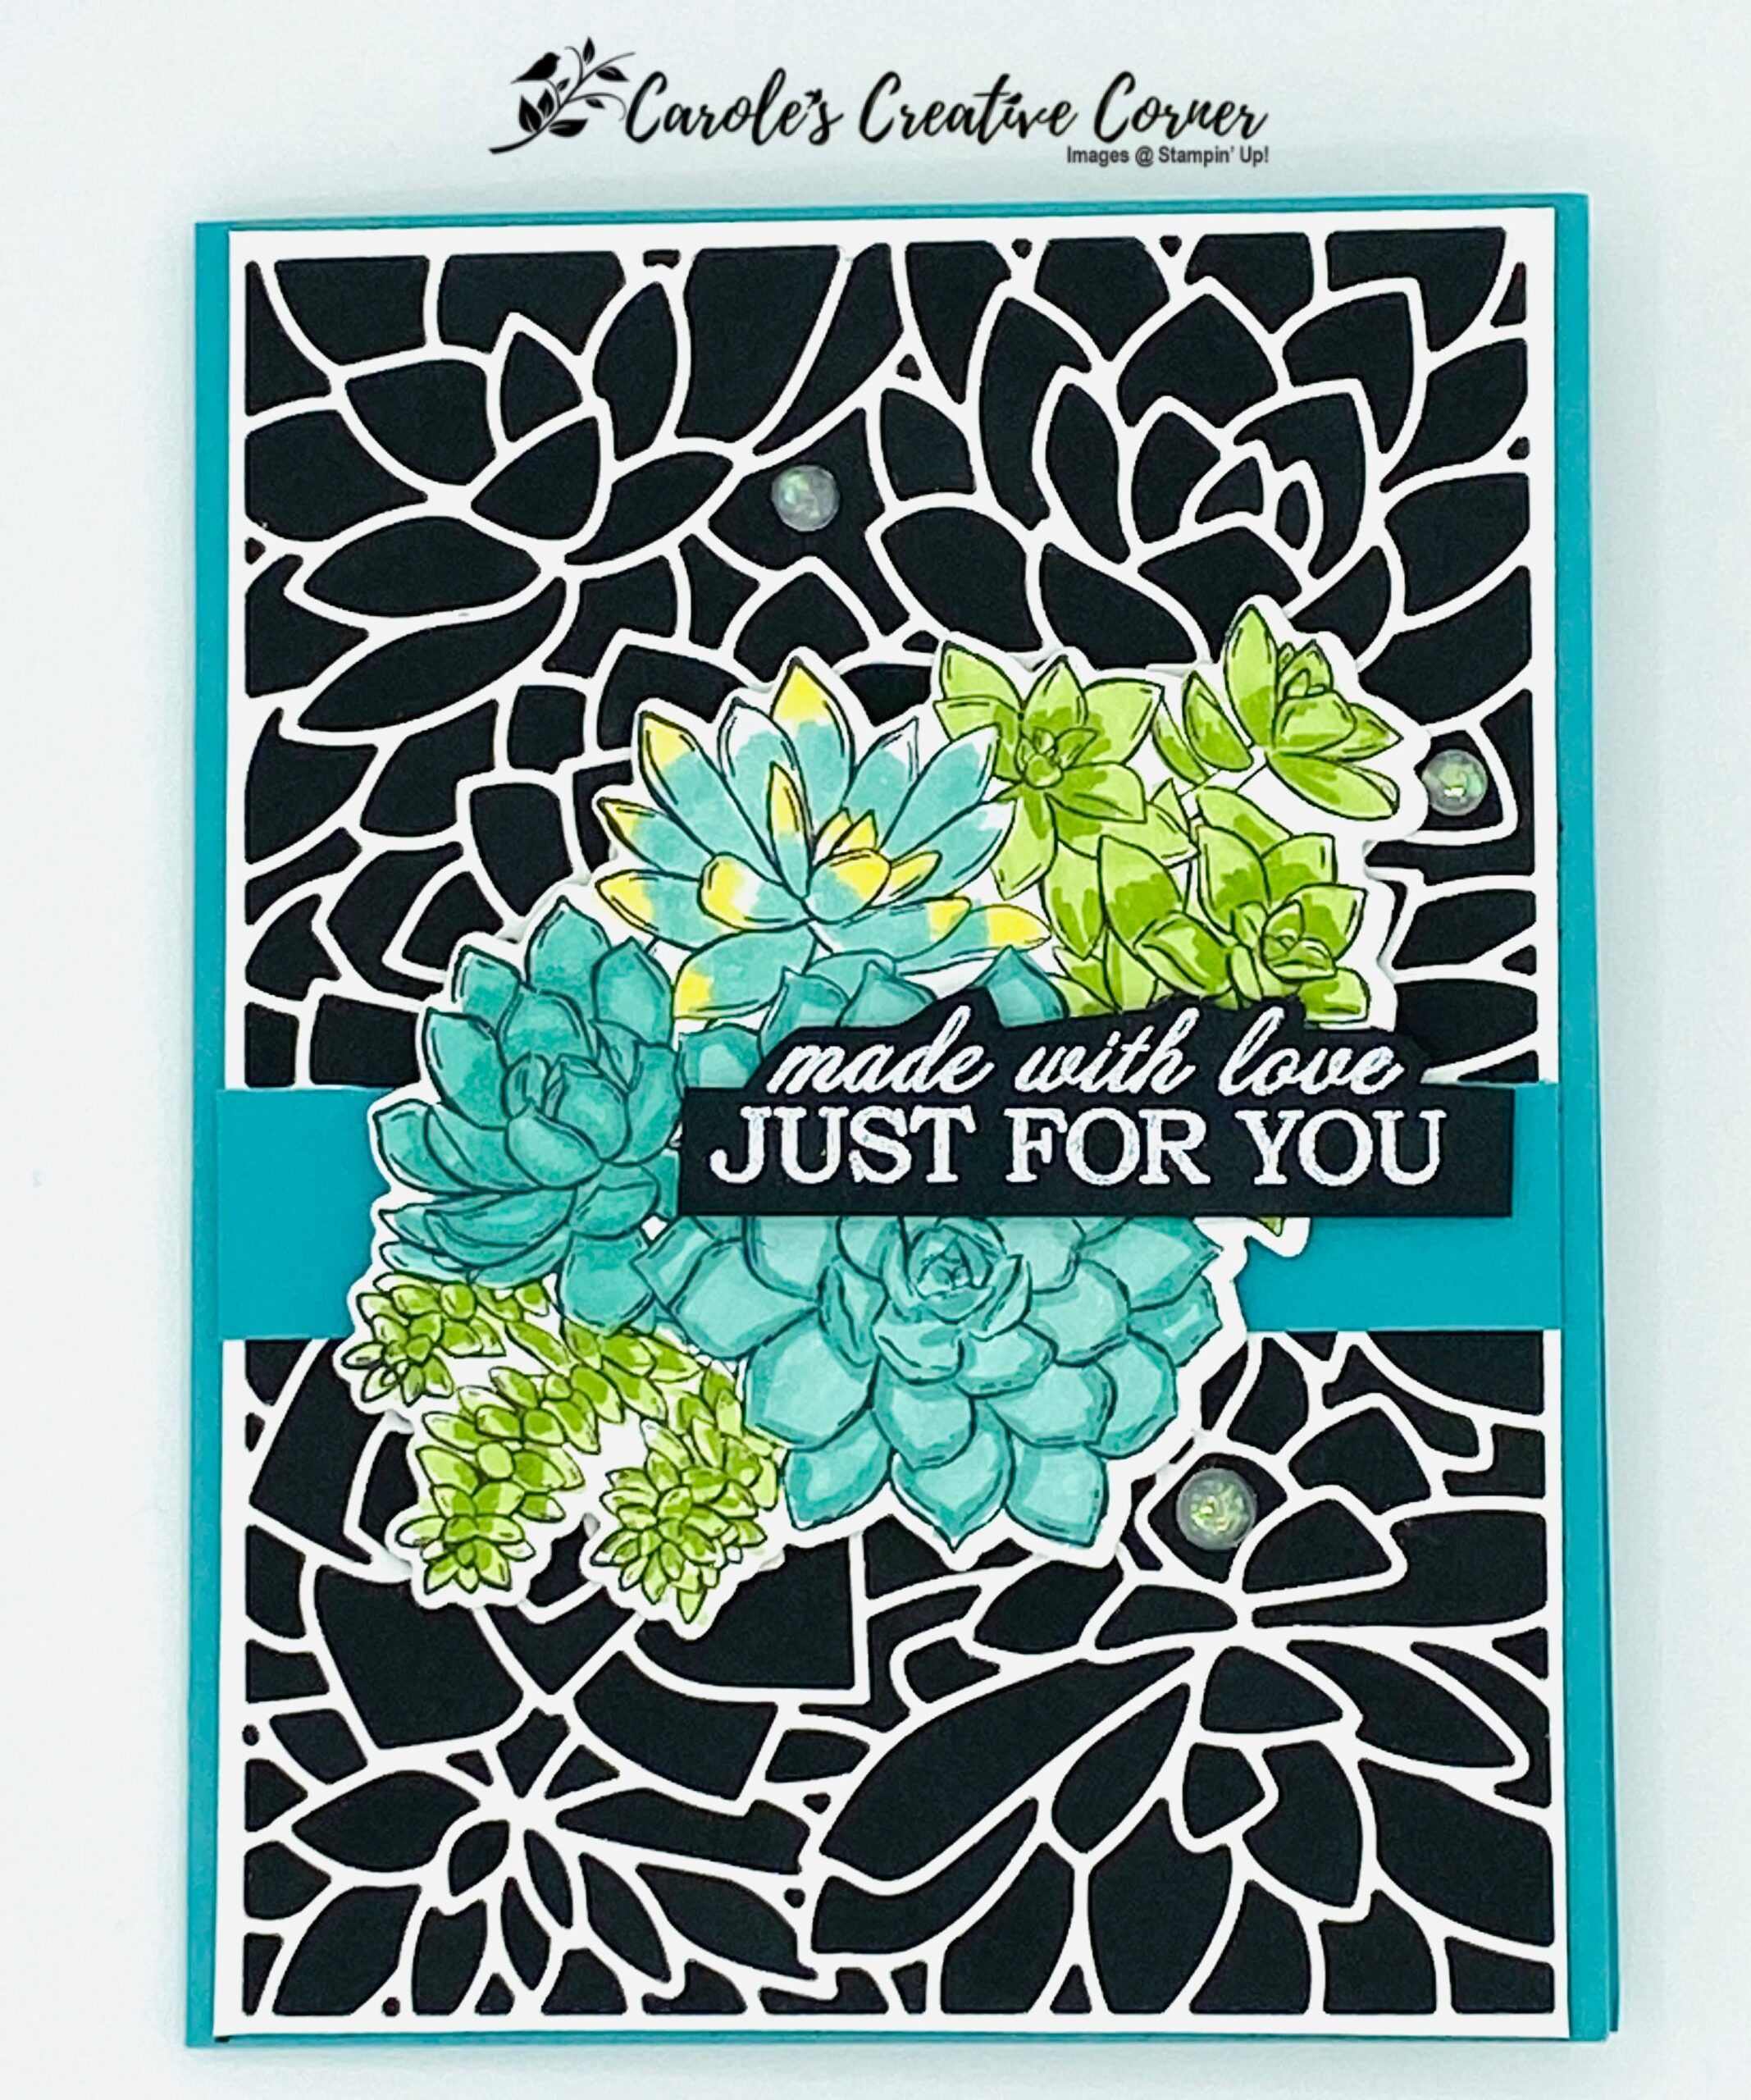
This is an all occasion card using the Simply Succulents bundle. The detailed succulents background die is stunning! This card uses Basic White cardstock for the background die, but imagine what else you can do with this die in different colors and by using blending brushes or sponges to change the color! Try this card for starters then let your imagination run wild!
Click on picture to watch video.
Measurements:
Bermuda Bay cardstock: (1) 5.5″ x 8.5″, scored at 4.25″ on the 8.5″ side; (1) 3/4″ x 4″ Basic White cardstock: (1) 4.25 x 5.5″; piece for succulent stamp, (1) 4″ x 5.25″ for inside Basic Black cardstock: (1) 1″ x 3″ ; (1) 4.25″ x 5.5″
Directions for Simply Succulents card:
Stamp the succulent bouquet stamp on Basic White cardstock with Memento ink and die cut. Die cut the background succulent die on the 4.25″ x 5.5″ piece of Basic White cardstock. Use blends pens to color the bouquet. Stamp the sentiment on the 1″ x 3″ Basic Black cardstock with Versamark and emboss with white embossing powder and fussy cut around the words. (Sentiment for this card is from Quite Curvy stamp set.)
Adhere the succulents background die cut to the 4.25″ x 5.5″ piece of Basic Black cardstock. Trim the succulents background die to 4″ in portrait mode so there is a slight white border remaining on each side of the die cut. Adhere the background die cut to the front of the Bermuda Bay card base. Apply the strip of Bermuda Bay to the front of the card. Apply the succulent bouquet to the front of the card with dimensionals and then apply the sentiment to the front of the card with dimensionals. Wink of Stella is a nice addition to this bouquet and add opal rounds for an accent. Adhere the Basic White piece to the inside of the card.
I love the Pretty Perennials stamp set inspired by Dena Rekow and am so glad I own it before it retires. (You can too if you order by May 3rd). This card uses the Pretty Perennials set and a technique that uses 4 rectangle/square shapes to form the background. A simple but lovely technique that can be used for any card with any designer paper you have on hand. Read on to learn how to make this card.
Click on picture to watch video.
Measurements:
Balmy Blue cardstock: 8.5″ x 5.5″ for card base, scored at 4.25″ along the 8.5″ side Basic White: (1) 3 3/8″ x 4 3/8″; (1) 4″ x 5 1/4″; white pieces for 3 flowers, leaves and label for sentiment Subtles Designer Series Paper: (2) 1 1/2″ squares; (2) 1.5″ x 2.5″ rectangles So Saffron cardstock: piece for the word Happy
Directions:
Stamp large flower on Basic White cardstock using Balmy Blue ink, the medium flower on Basic White cardstock using Highland Heather ink, and the small flower on Basic White cardstock using So Saffron ink. Stamp the centers of the flowers using Tuxedo Black Memento ink. Also stamp 2 green leaves on Basic White cardstock using Pear Pizzaz ink. Then die cut all the flowers and leaves. Stamp the word ‘happy’ using Tuxedo Black Memento ink on So Saffron cardstock and fussy cut. Die cut the white label using the smallest rectangle from the Stitch So Sweetly die set and stamp the word ‘birthday’ on the label.
Arrange and adhere the 4 pieces of designer series paper on the smallest white piece of cardstock so the edges are even around the edges and on the inside. Add dimensionals to the back of the white cardstock and adhere and center to card front.
Next, place the Balmy Blue flower and the Highland Heather flower on the card using dimensionals. Adhere the leaves and the yellow flower using adhesive. Adhere the word happy to the front of the card, noting that the part of the word that is on the Balmy Blue flower is adhered using adhesive, and the right side of the word will be adhered using dimensionals. Add the birthday label to the front of card with dimensionals.
Stamp on the Basic White cardstock for the inside of the card the flowers and the sentiment.
I’m so excited to be a part of the Creative Inking Blog hop with these amazing demonstrators. This is the first time I have participated in a blog hop and I’m looking forward to sharing my stamping experience, projects, and tips with you so that you may you be inspired to create! Read on to learn why Always in My Heart is my favorite bundle from the 2021 January-June Mini Catalog.
The first bundle I used from the 2021 Jan-June Mini Catalog was Always in My Heart. The floral heart die cut definitely made a statement with me as I thought about how many card occasions I could use it for. The floral heart die is beautiful on its own; additional accessories are not always necessary. Hearts can be used for any occasion and that is why its tops on my list for ‘must have’ stamping supplies! And I love using hearts, everywhere! It’s all about sending the love.
The other ‘must have’ from this set is the banner die. When you cut the die, the score lines are made at the same time so you know exactly where to fold the banner to give it a 3D look. Because polymer stamps are bendable, I knew that I could make use of more sayings beyond this sentiments in the bundle, by bending the sentiment on the block to fit the banner. Just think of the options!
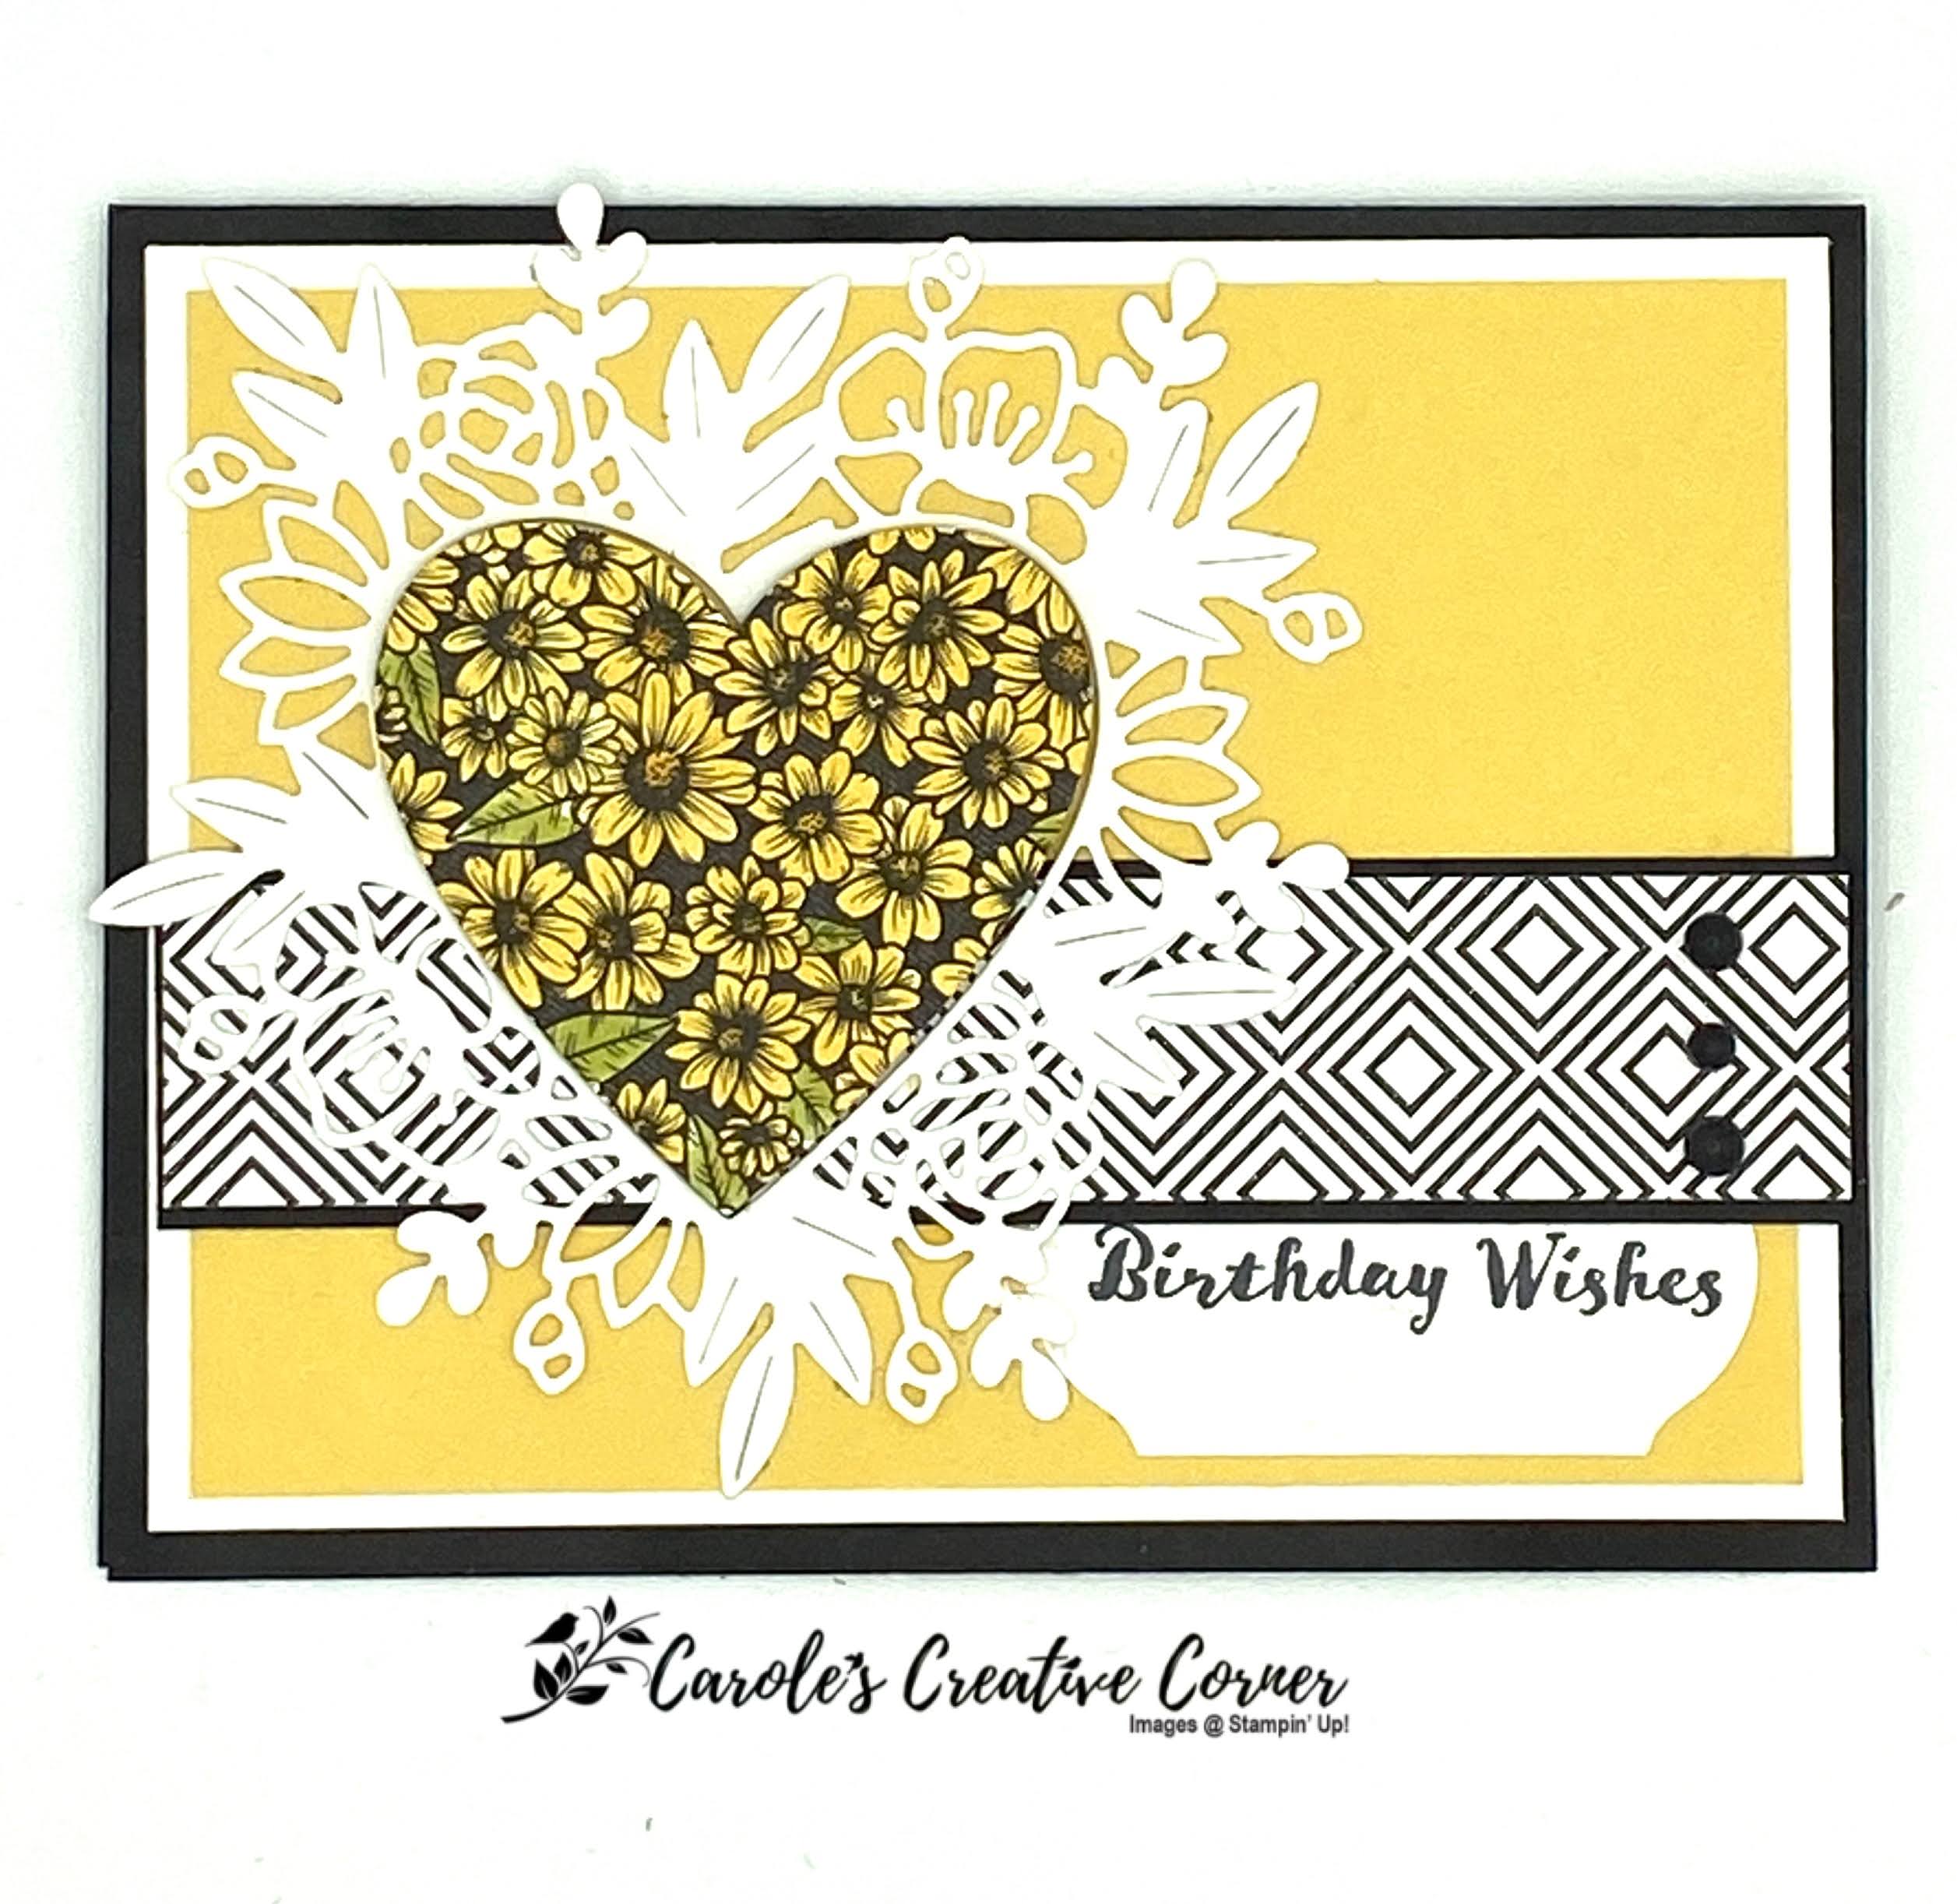
Although I started out making Valentines with this bundle, the below card is an example of how easily the bundle can be used to make a birthday card.
This card uses the True Love designer series paper (DSP) for the heart and the border. You don’t have to cut out the entire floral heart to get the heart piece only. To die cut the just the heart, use a 2.5″ square of the DSP and place over the heart part of the die and run through your Cut and Emboss machine. This is a great way to save paper!
I love black and white patterned paper for many reasons, one of them being that you can change the paper to any color to match your project just by coloring on it! For this card, I colored the True Love DSP with So Saffron and Old Olive dark blends pens. I’m amazed at the results because it looks like I bought it that way! The heart was adhered using dimensionals to give it a 3D look.
Figure 2: Color the True Love DSP with your blends pens.
I demonstrated this bundle for an event and made a visual of the die sets (see Figure 3). ****Check this blog space on February 24th to get the link to my demonstration using the Forever and Always Suite of products or subscribe to my YouTube Channel HERE.)****
The bundle comes with 16 amazing dies. Besides the floral heart die and banner die, there are 2 border dies and duplicates for the flowers and leaves that match the flowers in the stamp set. Having duplicates is a nice time saver. In addition, it has 1 die that cuts out 3 flowers at the same time and those flowers fit on the floral heart! The set also has 1 die that cuts out 4 leaves at the same time. I’m happy when there are multiples of small dies because of the time it saves!
Figure 3: Floral Heart Dies
Here are some more examples using this bundle–let me know in the comments if you would like more information on any of the below cards. If you don’t need more info, but want to leave a comment, I would love to hear from you!
Example of coloring the True Love DSP
Example using just the Floral Die and stamp from the stamp set
Example using Floral Heart Die and Border die
Example using Floral Heart Dies, Stamp set, and Flower die cut
Flirty Flamingo Floral Heart and sentiment from stamp set
Inspired by Kylie Bertucchi
Thanks for stopping by. Click the image below to see what Susan Lehrer has created.
Thanks for stopping by. Click the image below to see what Barb Mullikin has created.
Click picture to JOIN now
Only 8 more days left for FREE SAB Items!
Click picture to SHOP now
Click picture to shop the NEW Hey Chick dies and bundles
Measurements:
Basic Black Cardstock: 5.5″ x 8.5″, scored at 4.25″ along the 8.5″ side; (1) 1 1/8″ x 5.25″; Basic White card stock: 4″ x 5.25″; (1) piece for label; 4.25″ x 4.5″ for floral heart die; (1) 4″ x 5.25″ for inside; So Saffron card stock: 3.75″ x 5″ True Love DSP: 2.5″ x 2.5″ for heart; 1″ x 5.25″
The Pretty Perennials Million Dollar stamp set by demonstrator Dena Rekow is one of my favorites for the very reason she created it…it’s just so happy. There are plenty of people who can use cheering up these days. Send this colorful card and make their day!
Measurements:
True Love DSP: 3.75″ x 4.25″ Basic Black card stock: 4.25″ x 11″, scored at 5.5″ along 11″ side; 1.75″ x 4.25″ Coastal Cabana card stock: piece for die cut flower; 1/2″ x 2.5″ for sentiment Mango Melody card stock: piece for die cut flower Flirty Flamingo card stock: piece for die cut flower Granny Apple Green card stock: piece for 2 die cut stems with leaves Basic White card stock: piece for 3 die cut flower; 4″ x 5.25″
Directions:
Cut the cardstock and all the stamps and make all the die cuts. Stamp flowers in 3 different colors (Mango Melody, Coastal Cabana, and Flirty Flamingo) and die cut. Die cut all the flower overlays and flower centers, one in each color, and 2 stems in Granny Apple Green, as shown in Figure 1.
Figure 1: Die Cuts for Pretty Perennial Card
Stamp the 4″ x 5.25″ white cardstock with the 3 different color flowers, overlapping them slightly. Heat emboss the 1.25″ x 4.25 piece of black card stock, using the Happy stamp, with white embossing powder. Stamp the sentiment on Coastal Cabana 1/2″ piece on the right side and use the Pick a Banner punch to punch a banner at the left end.
To assemble the card, adhere the DSP on the card front on the upper card front. Next adhere the Happy words underneath the DSP. Now you are ready to arrange the flowers on the card front. Adhere the die cut flower overlays on top of the stamped flower, according to their colors. Use glue dots to adhere the flower centers to the die cut overlay then arrange on front of card. Cut the leaves from the stems so you have enough to lay underneath the flowers. Now you’re ready to adhere the banner sentiment and add pearls to the flower centers. Ahhhh, such a bright and festive card.
Here are some alternatives using different patterns from the True Love DSP:
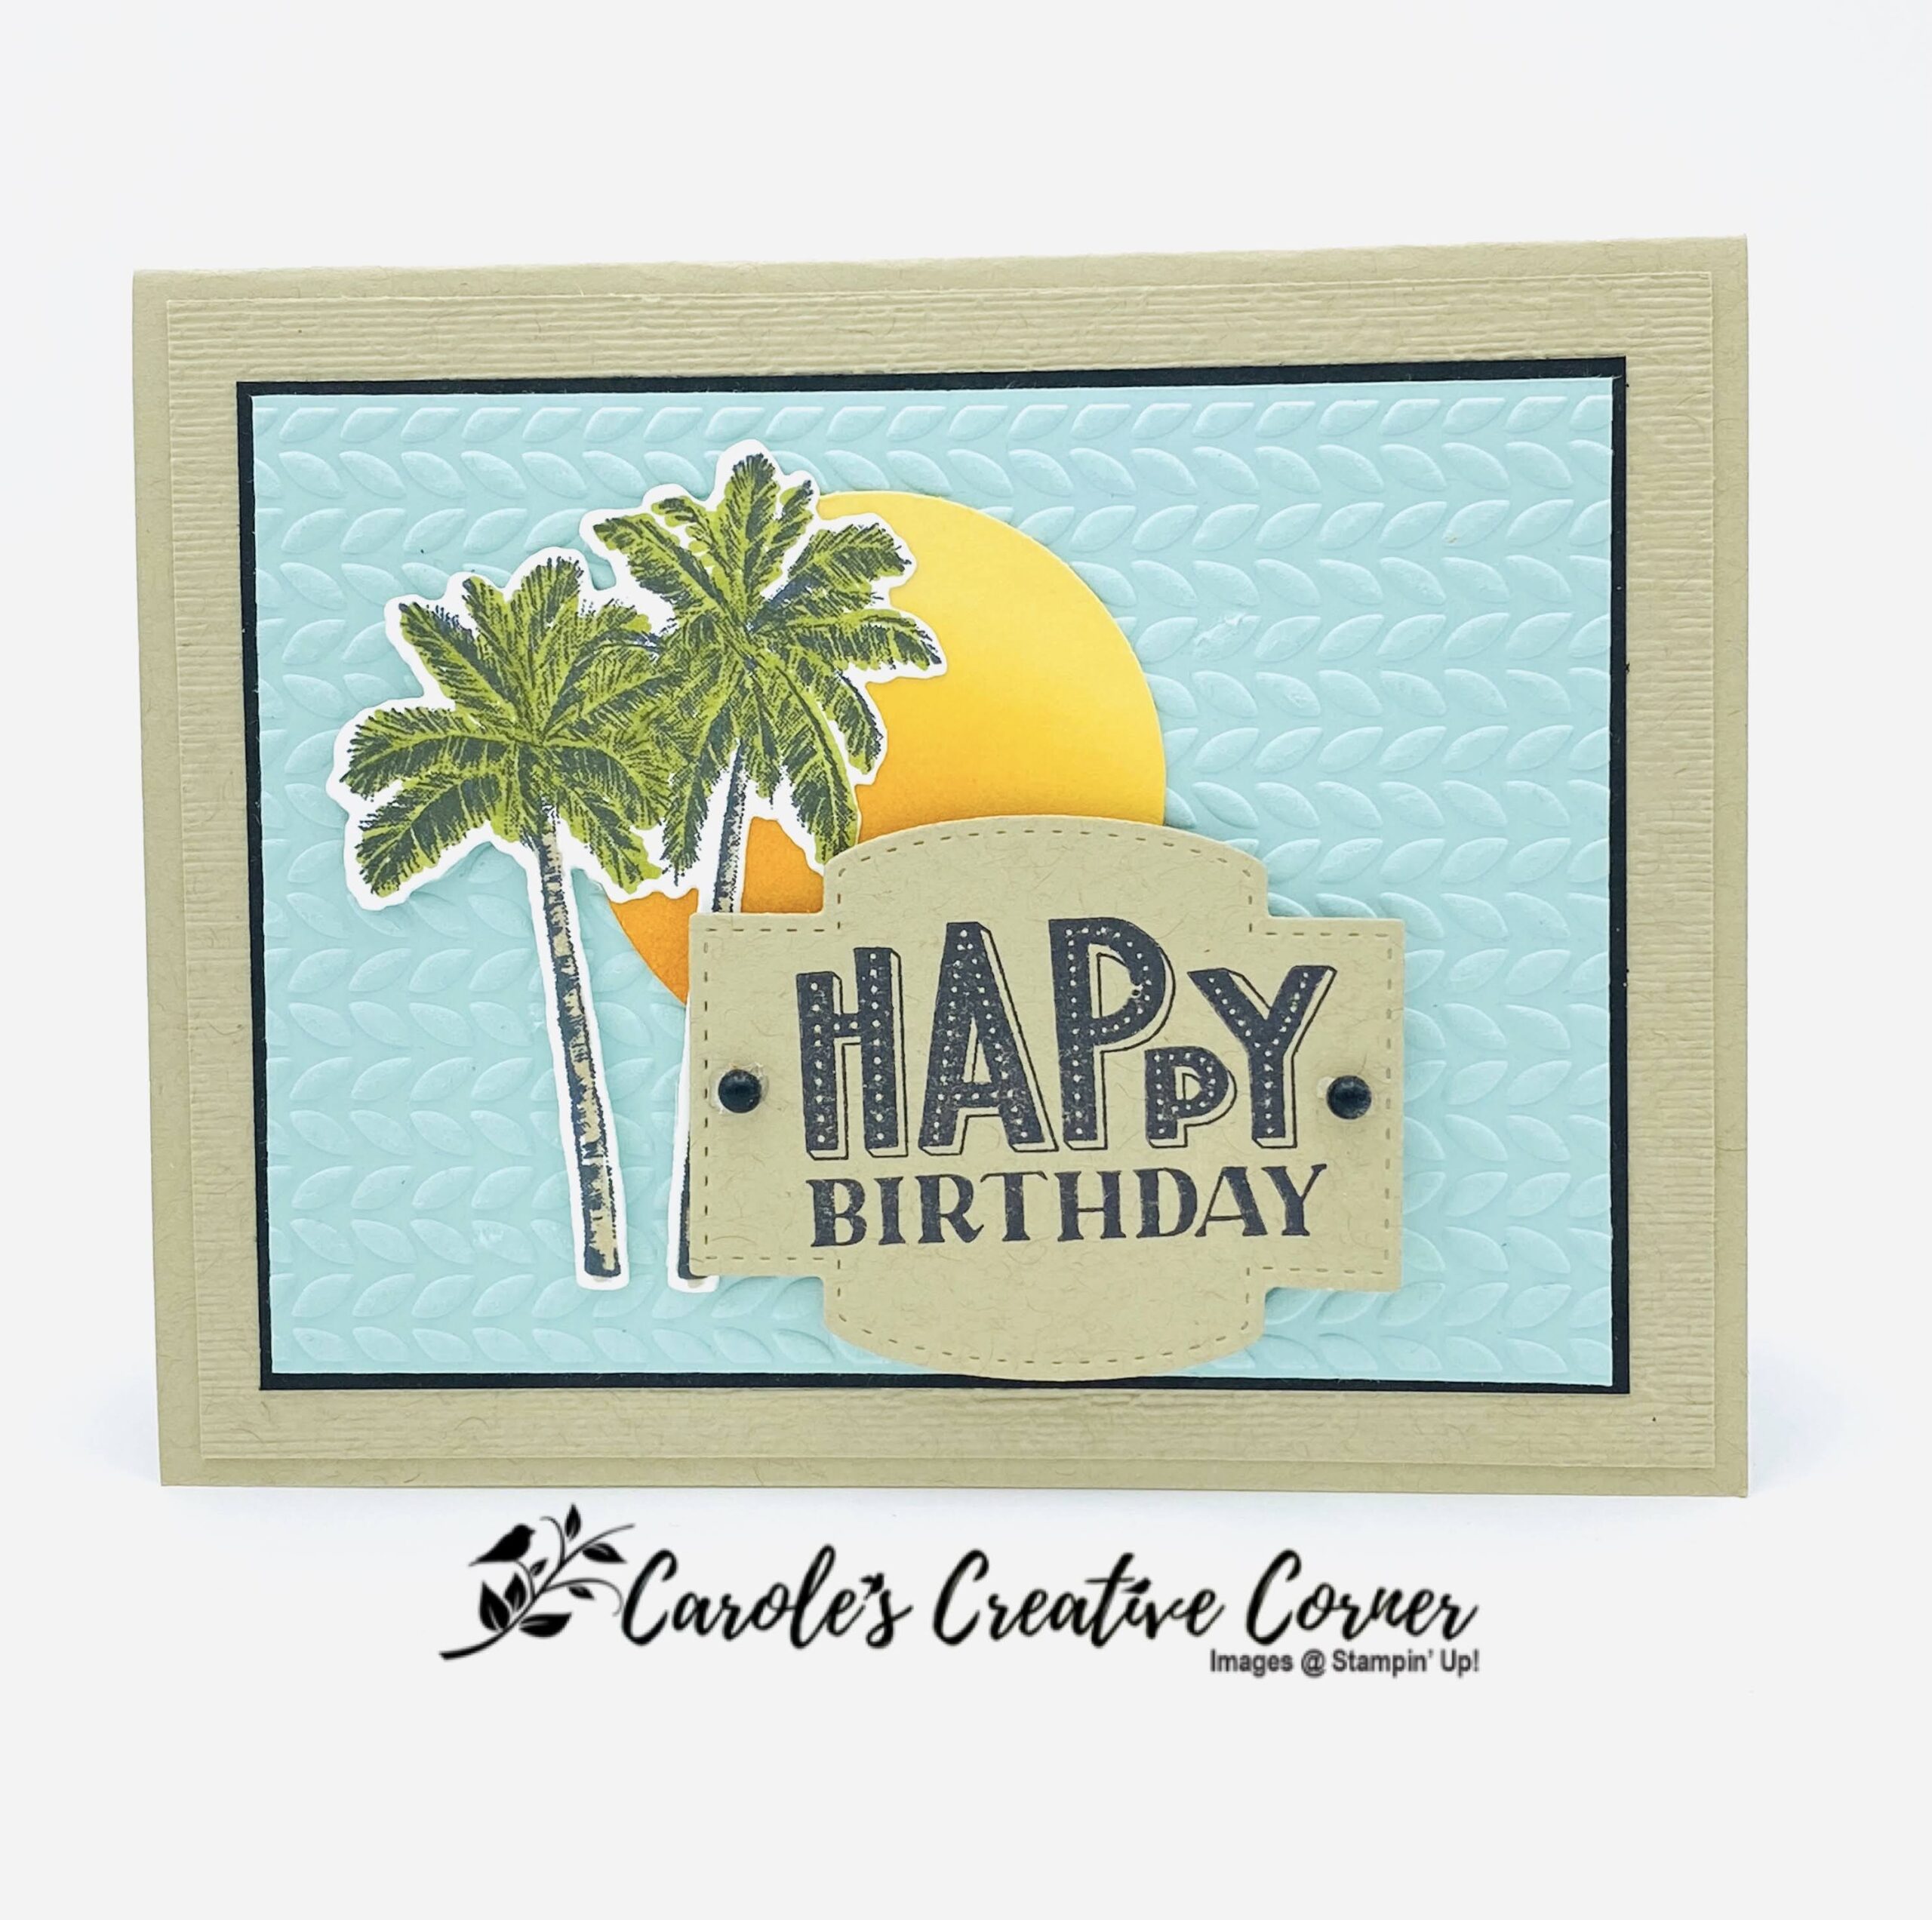
We always need masculine cards and here is an easy layered card featuring the Timeless Tropical stamp set. The Happy Birthday sentiment is from the You Are Amazing stamp set in the 2021 Jan-June mini catalog and I love it because its different and funky–perfect for a masculine card. This card also features the blending technique using our blending brushes to create the gradient colors for the sun.
Measurements:
Crumb Cake Card Stock: 5.5″ x 8.5″, scored at 4.25″ along the 8.5″ side, (1) 4″ x 5.25″, piece for label Basic Black card stock: 3.5″ x 4.75″ Pool Party card stock: 3 3/8″ x 4 5/8″ So Saffron card stock: piece for 2″ circle Thick Basic White card stock: piece for palm trees
Directions:
Cut all the card stock. There are 2 embossed layers on this card. Emboss the 4″ x 5.25″ Crumb Cake card stock with the Subtles embossing folder. The Pool Party card stock is embossed with the Greenery embossing folder. To create the sun, punch out a circle using the 2″ circle punch then use your blending brush dipped into the Pumpkin Pie ink pad and then apply ink to sun in a circular motion. The more times you ink the darker the color. Such a pretty effect!
I used the Stamparatus on this project for the palm tree. It was easy to create a template for the palm tree. Just die cut a palm tree from a spare piece of thick basic white cardstock and place on Stamparatus base (this is your template). Take the palm tree stamp (with label facing up) and line it up so it is centered into the template then drop the plate of the Stamparatus onto the stamp. Now you’re ready to stamp. Put the palm tree die cut into the template, ink the palm tree stamp, and you’re ready to stamp the image onto the die cut. This technique is so useful for making sure your image is lined up perfectly on the die cut. Once your image is stamped, color in with the Old Olive dark blends pen and the Crumb Cake dark blends pen.
For the sentiment, stamp on Crumb Cake card stock and then line up your die so the words are centered inside the die or use the Stamparatus and template technique that was used above for the palm tree, whichever you find easiest! The reason I used the Stamparatus for the sentiment is so that it would be centered but also, since it is a bold image, I could stamp multiple times to make sure the image was a nice deep black.
Assembly:
Now you’re ready to begin to assemble your card. Layer the embossed Crumb Cake onto the card base and then center and adhere the black cardstock on top. Next center and adhere the Pool Party onto the black. Arrange your 3 focal pieces how you would like on your card. I layered the palm trees on top of the sun and adhered the label using dimensionals. A couple of matte black dots to the label finishes this card.
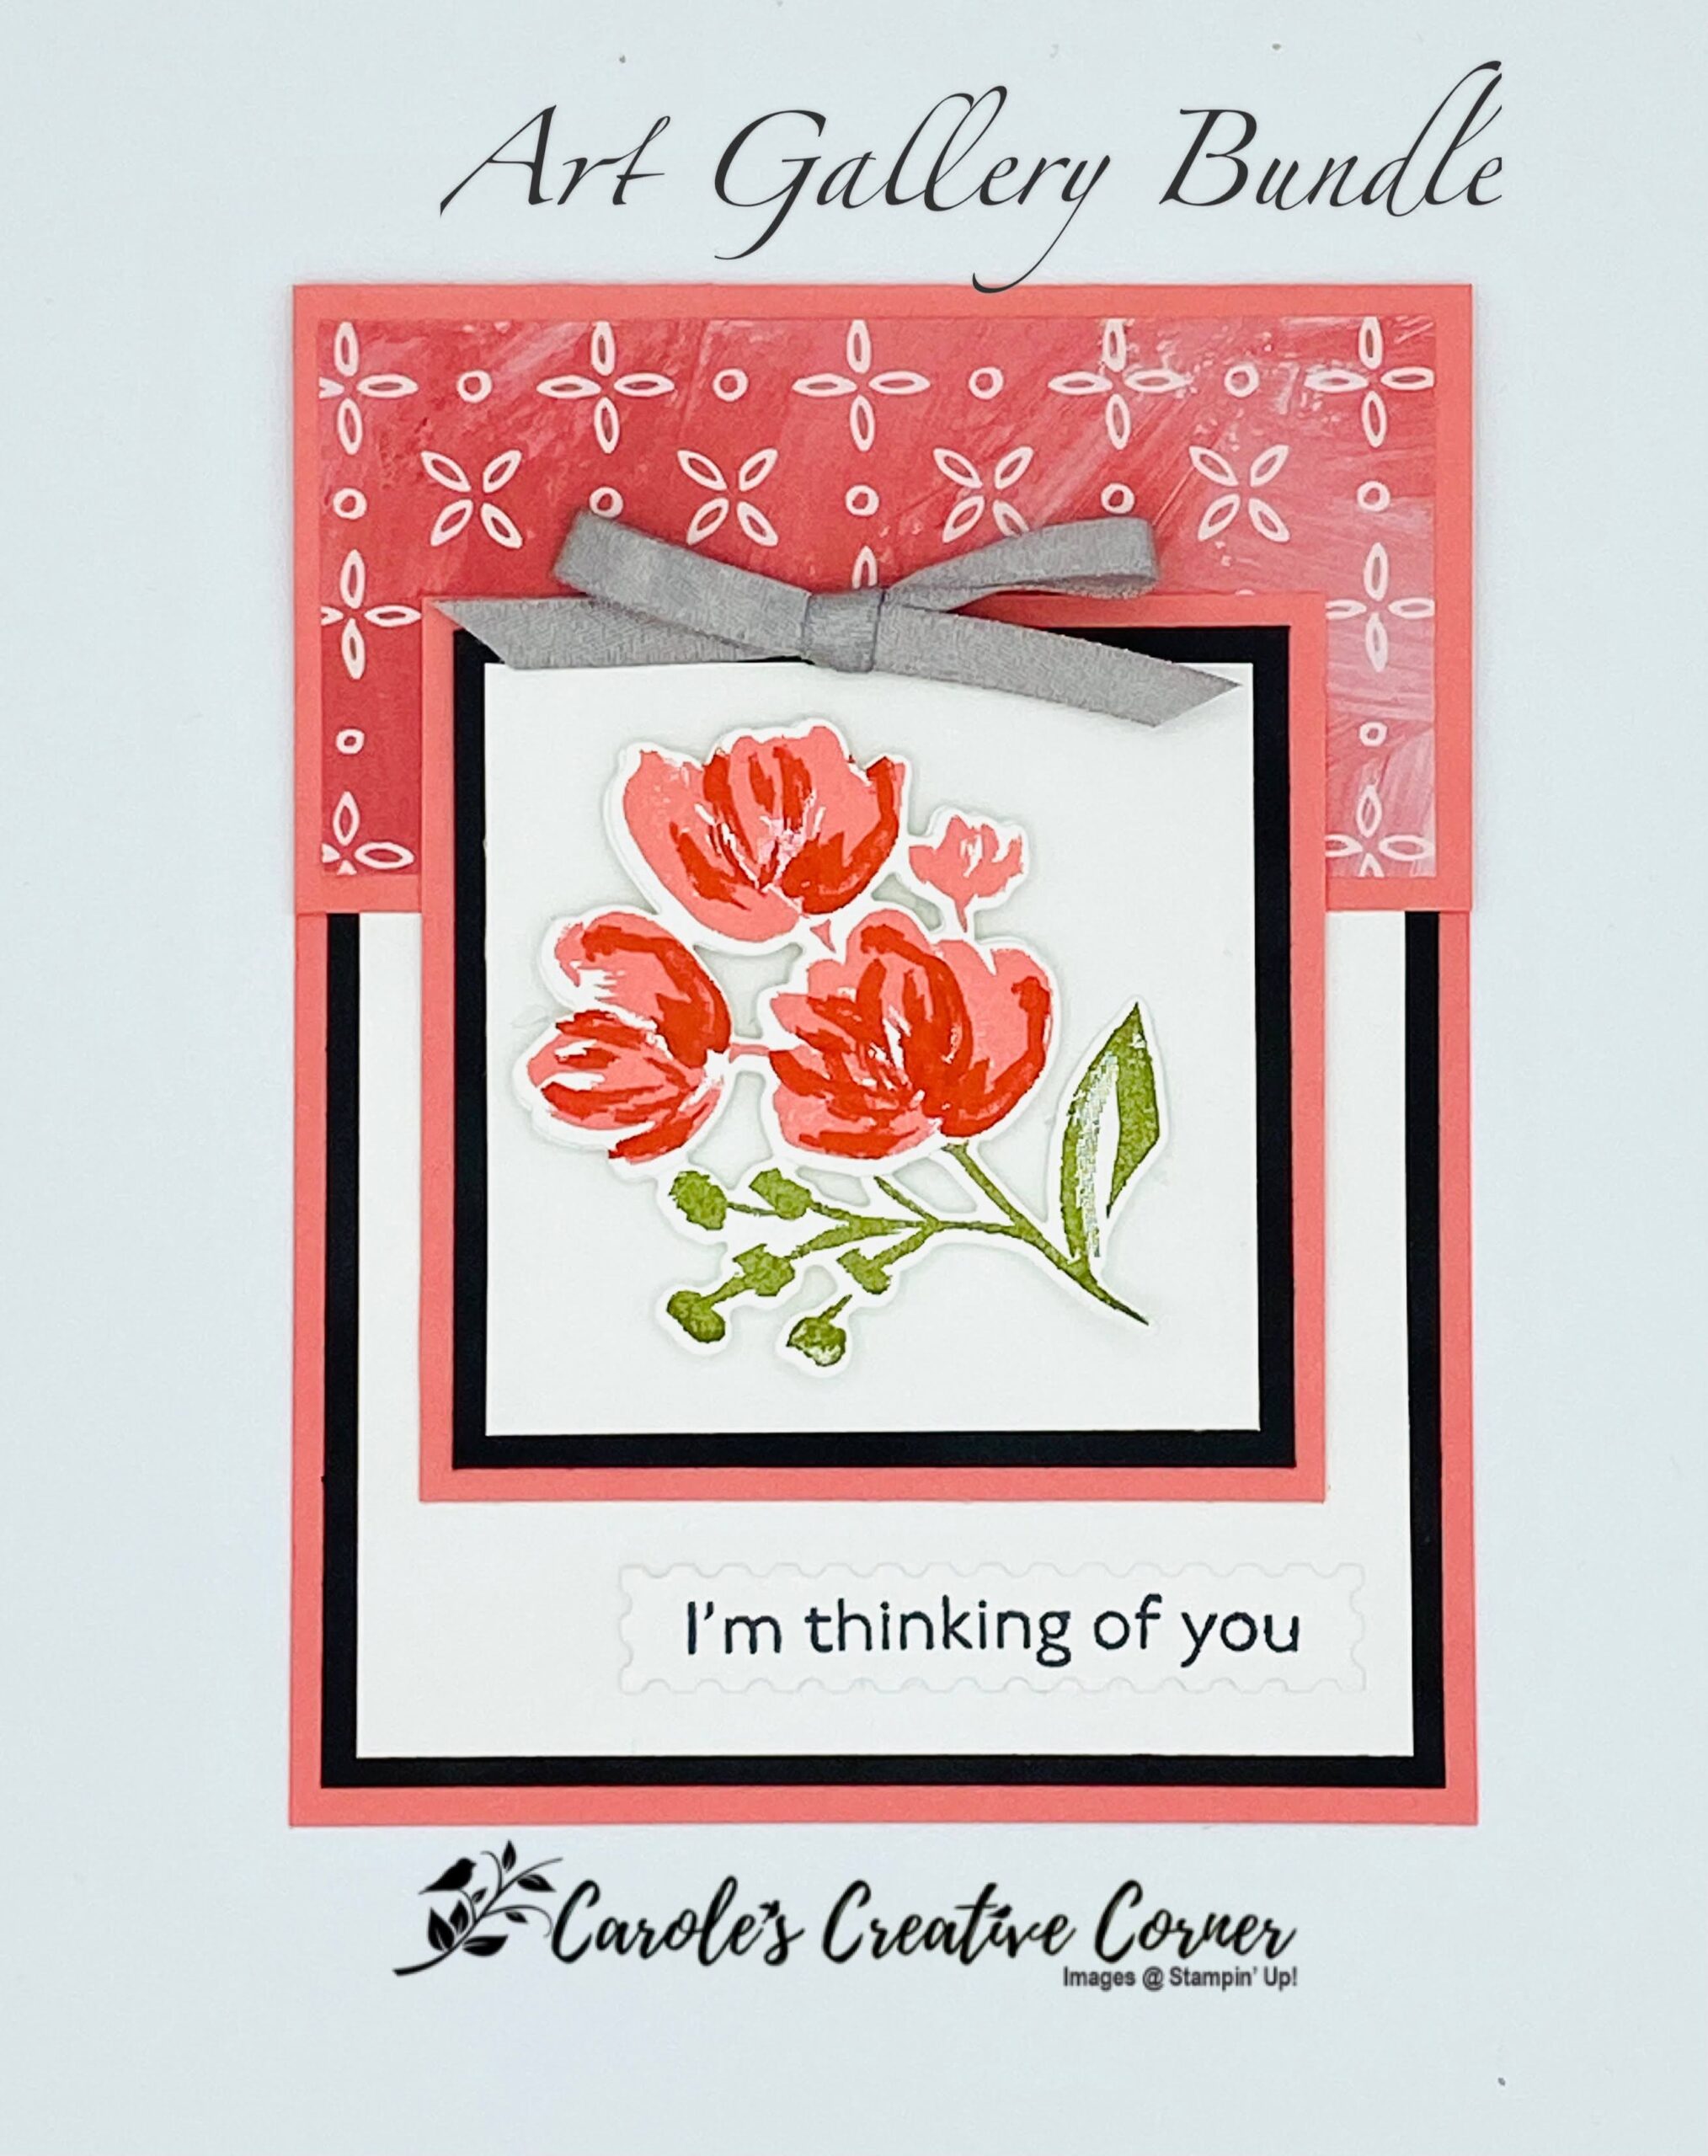
The Art Gallery bundle is one of my favorites because it of it’s modern watercolor look. The 2-step stamping for the flowers allows you to combine so many colors together–Flirty Flamingo and Poppy Parade is one of my favorites. Today’s card is a simple layout with beautiful results. Read on to learn how to make this card.
Measurements:
Fine Art Floral Designer Series Paper (DSP): 1″ x 5.25″ Calypso Coral card stock: piece for 3 1/8″ scallop; 5.5″ x 7.5″ scored at 4.25″ along the 7.5″ side Basic White card stock: piece for 2 5/8″ circle, (2) 3 x 5.25″, 3.5 x 3/4″ for sentiment Mossy Meadow trim: 8″
Directions:
When starting a project, I usually like to start my project by cutting the card stock, then die cutting and stamping all the parts and pieces. You will want to emboss one of the 3 x 5.25″ white pieces using the Painted Textures embossing folder for the front of the card. Die cut the outer scalloped circle and inner white circle. Next, begin to stamp your images. A tip for making sure your sentiment is straight: I like to stamp first and then line up my label die so the sentiment is centered and straight inside the die. The sentiment was stamped in Mossy Meadow ink.
To make the flower, stamp the base image in Flirty Flamingo and then stamp the second flower image over the first using Poppy Parade ink. Stamp the leaves using Mossy Meadow ink. On the second piece of 3″ x 5.25″ white cardstock for the inside, stamp the small flower image in Flirty Flamingo and then the little flower on top with Poppy Parade. I love this accent image!
Now you are ready to assemble the card. First, adhere the embossed white cardstock to the front of the card, centering it on the front flap. Next, adhere the circle flower image to the scalloped circle and apply to the front of the card using dimensionals, ensuring your dimensionals are not on the far right of the circle where it is off the front flap. Place the sentiment onto the front of the card using mini dimensionals. Add bow to the flower.
For the inside of the card, adhere the 1″ x 5.25″ piece of DSP to the right inside of the card so that it is evenly spaced on 3 edges. Line up and adhere the white piece of cardstock next to the DSP.
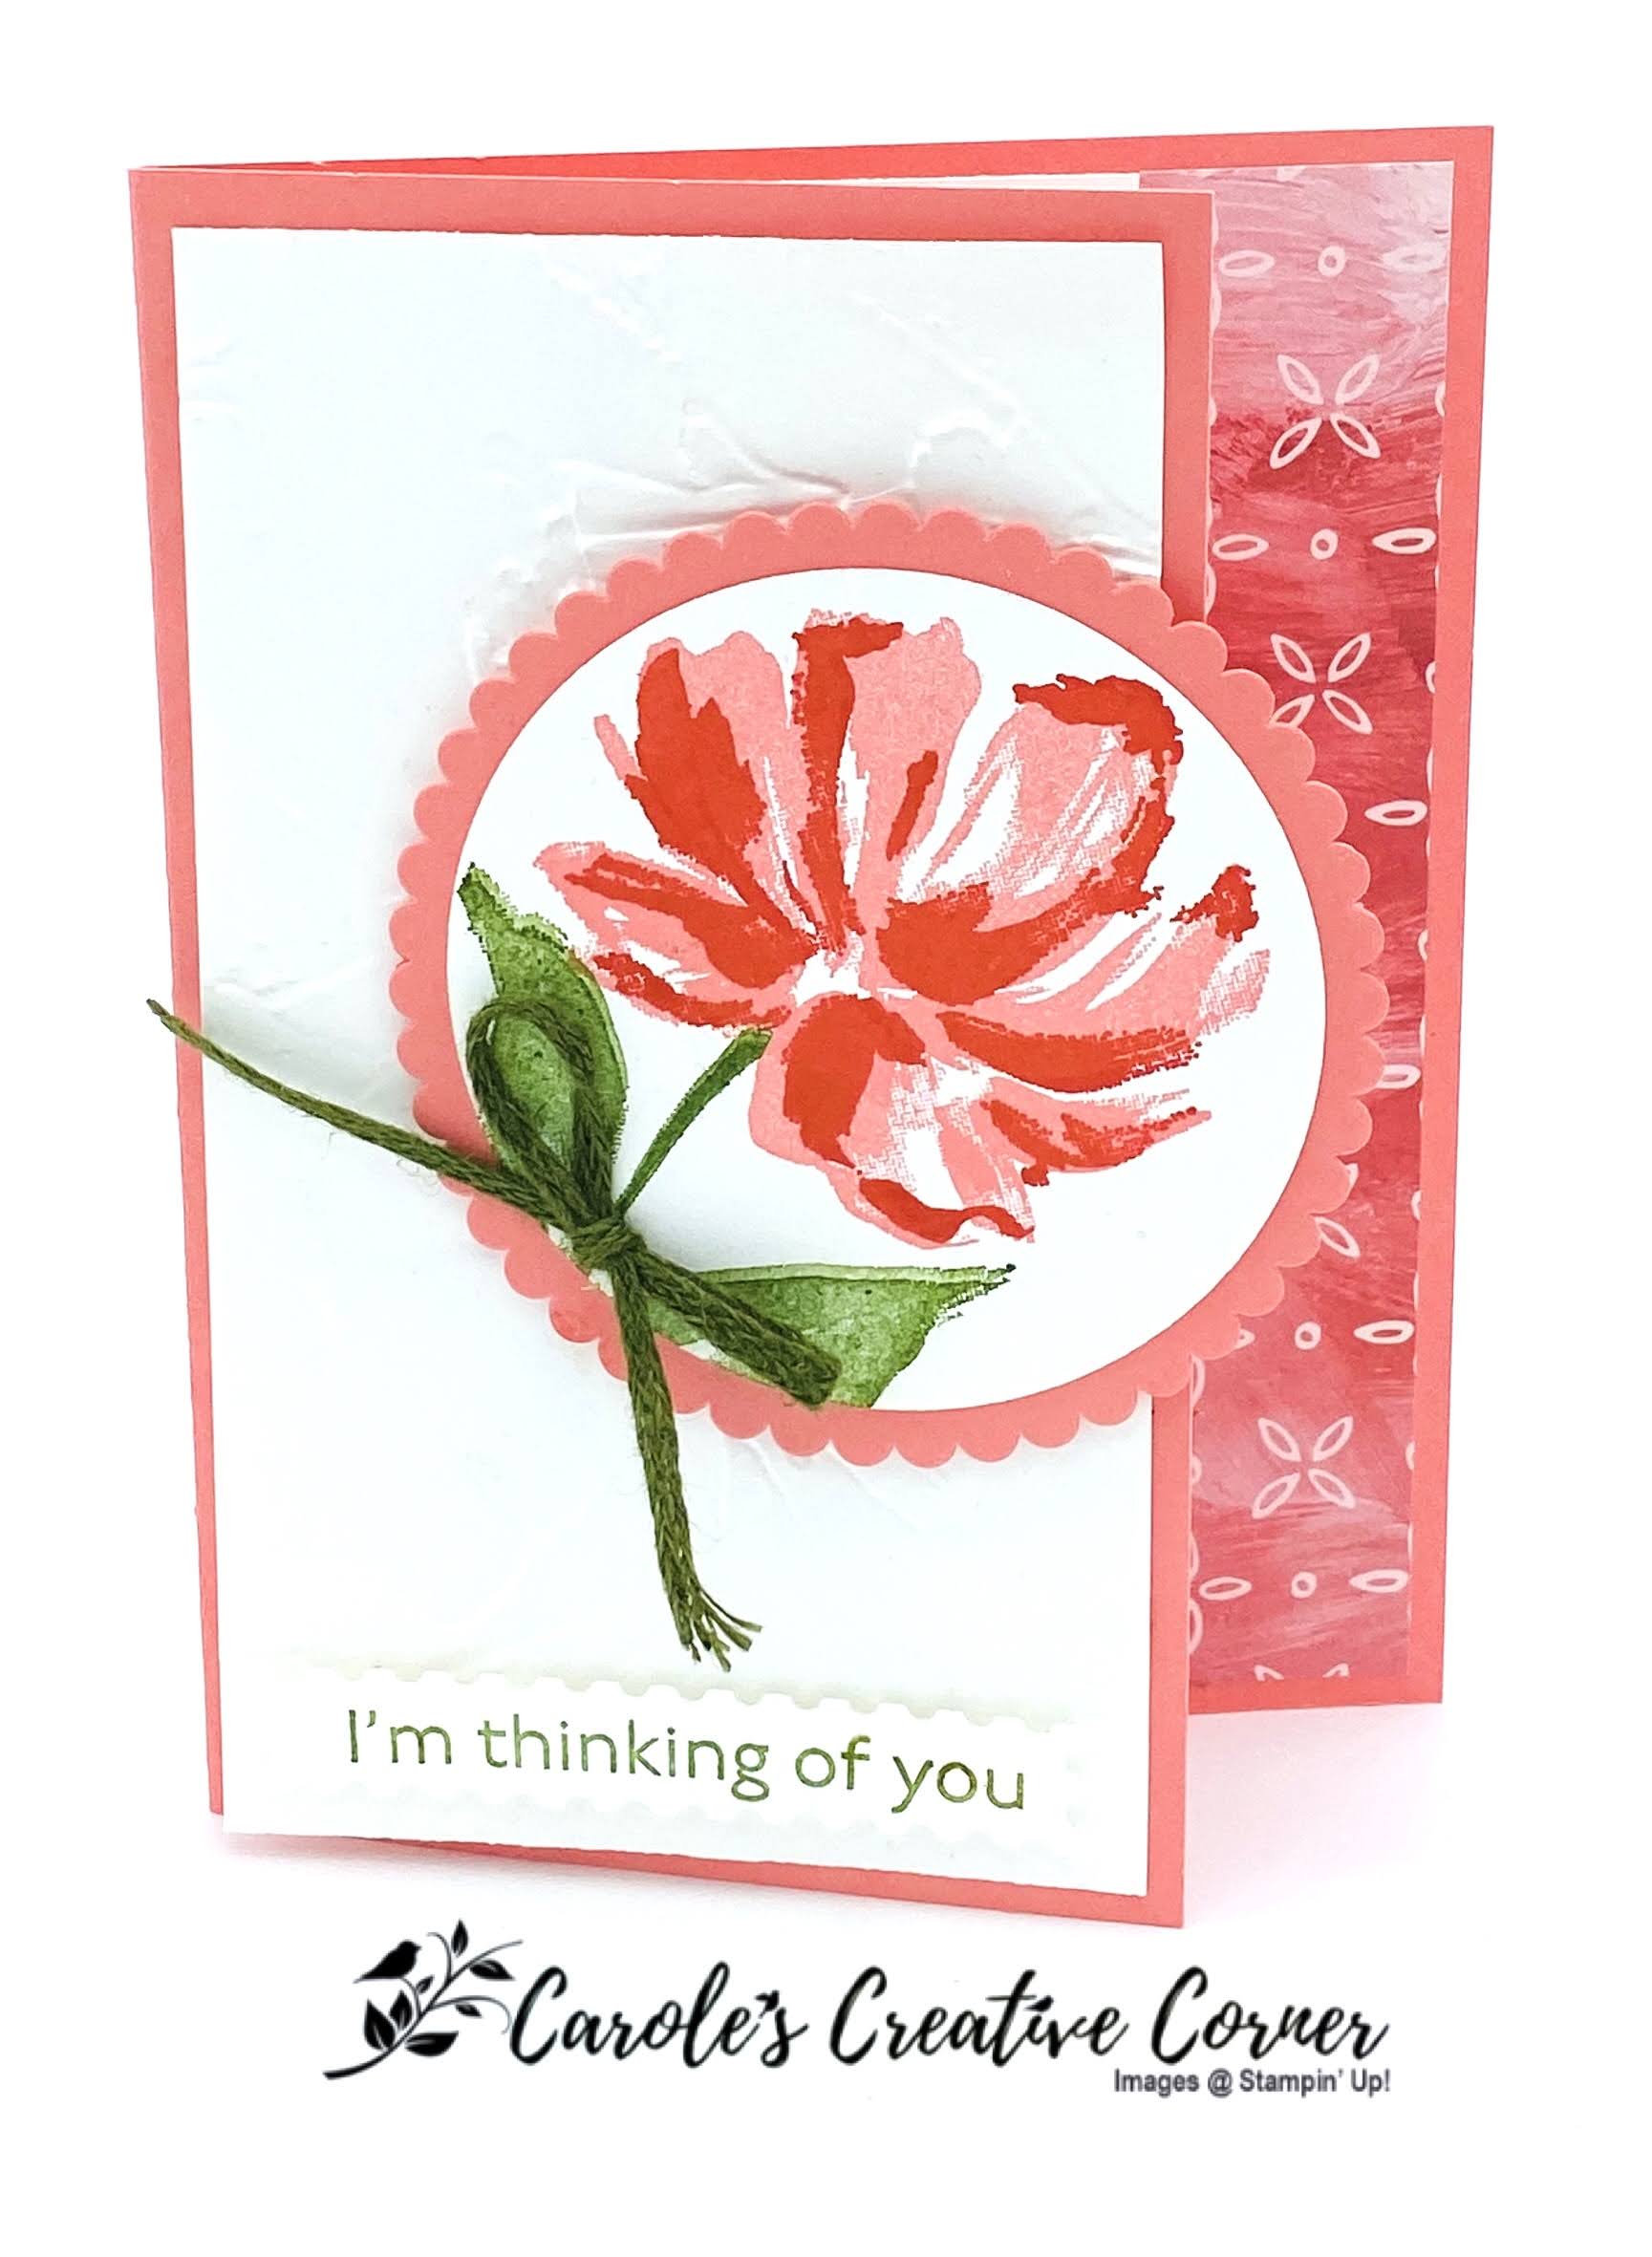
Make this pretty card using the Art Gallery Bundle. The flowers from this set are modern with a watercolor look–I love them! It was my first card created with the yearning for spring, which hit me at the beginning of February. I made it into a Thinking of You card, because then I can use it for almost any occasion I need. It would make a nice birthday card with a birthday sentiment inside. I also love this easy layout –it’s a layout that shows off the bordered layer look and has clean lines with lots of contrasting color.
This card is my go-to layout because it is easy to layer papers and get such a clean look with multiple colors. First layer the inside of the card, then on the flap and then the squares. Once the squares have been layered, then I stamped the floral image in Mossy Meadow and die cut. I then stamped another floral image in Flirty Flamingo and then stamped the small flower over the flowers in Poppy Parade. After die cutting this floral, I layered it on top of the Mossy Meadow image with dimensionals and layered on the front of the square. Then I adhered the top part of the square to the card front. The sentiment was stamped in Tuxedo Black Memento ink and die cut with the label from the die set. Lastly, the bow was added to finish the card.
Measurements for Art Gallery Bundle:
Flirty Flamingo Cardstock: 4.25″ x 7 3/4″, scored at 5.5″ along the 7 3/4″ side; (1) 3.25″ x 3.25″ Basic Black Cardstock: (1) 4″ x 5.25″; (1) 3″ x 3″ Basic White Cardstock: (1) 3.75″ x 5″, (1) 2.75″ x 2.75″; piece for 2 floral diecuts, piece for sentiment Fine Art Floral DSP: 2″ x 4″ Gray Granite 1/4″ Ribbon: 8″
Supplies:
Click Picture for more information
Stamp happy chickens for almost any occasion with the limited-time Hey Chick and Hey Birthday Chick Bundles. Click picture to see bundles and order products.
Sign up by Feb 10th for Feb Bouquet of Hope Paper Pumpkin. Click picture to sign up!
Here is a festive Art Gallery Z-fold Layer card that has a different take on the traditional z-fold. I used the Art Gallery Stamp Set and coordinating dies and the Field and Flowers Designer Paper, which is one of the free Sale-a-Bration picks with a $50 purchase.
Measurements:
Misty Moonlight Cardstock
4-1/4” x 9-3/4” scored parallel to short side at 3-1/4″ and 6-1/2”
4-1/4″ x 5-1/2″
Basic White Cardstock
Two pieces that are 3″ x 4″
Scrap for die-cutting sentiment piece, flower and stem die cut
Basic Black
4.25″ x 5.5″
Fields and Flowers Designer Paper
4″ x 5-1/4″
2-3/4″ x 3-3/4″
Directions:
Fold the Misty Moonlight layer at the scores to form a z-fold layer.
Add the white layer to the front and inside of the z-fold.
Attach the smaller designer paper layer to the front white layer.
Attach the larger designer paper layer to the large black layer. Center and adhere the z-fold layer.
Ink up the “Thinking of You” sentiment with black Memento ink on the scrap white piece and die cut it.
Stamp the flower in Misty Moonlight and the leaves in Shaded Spruce and die cut both.
Adhere the flower, stem and sentiment to card front using dimensionals.
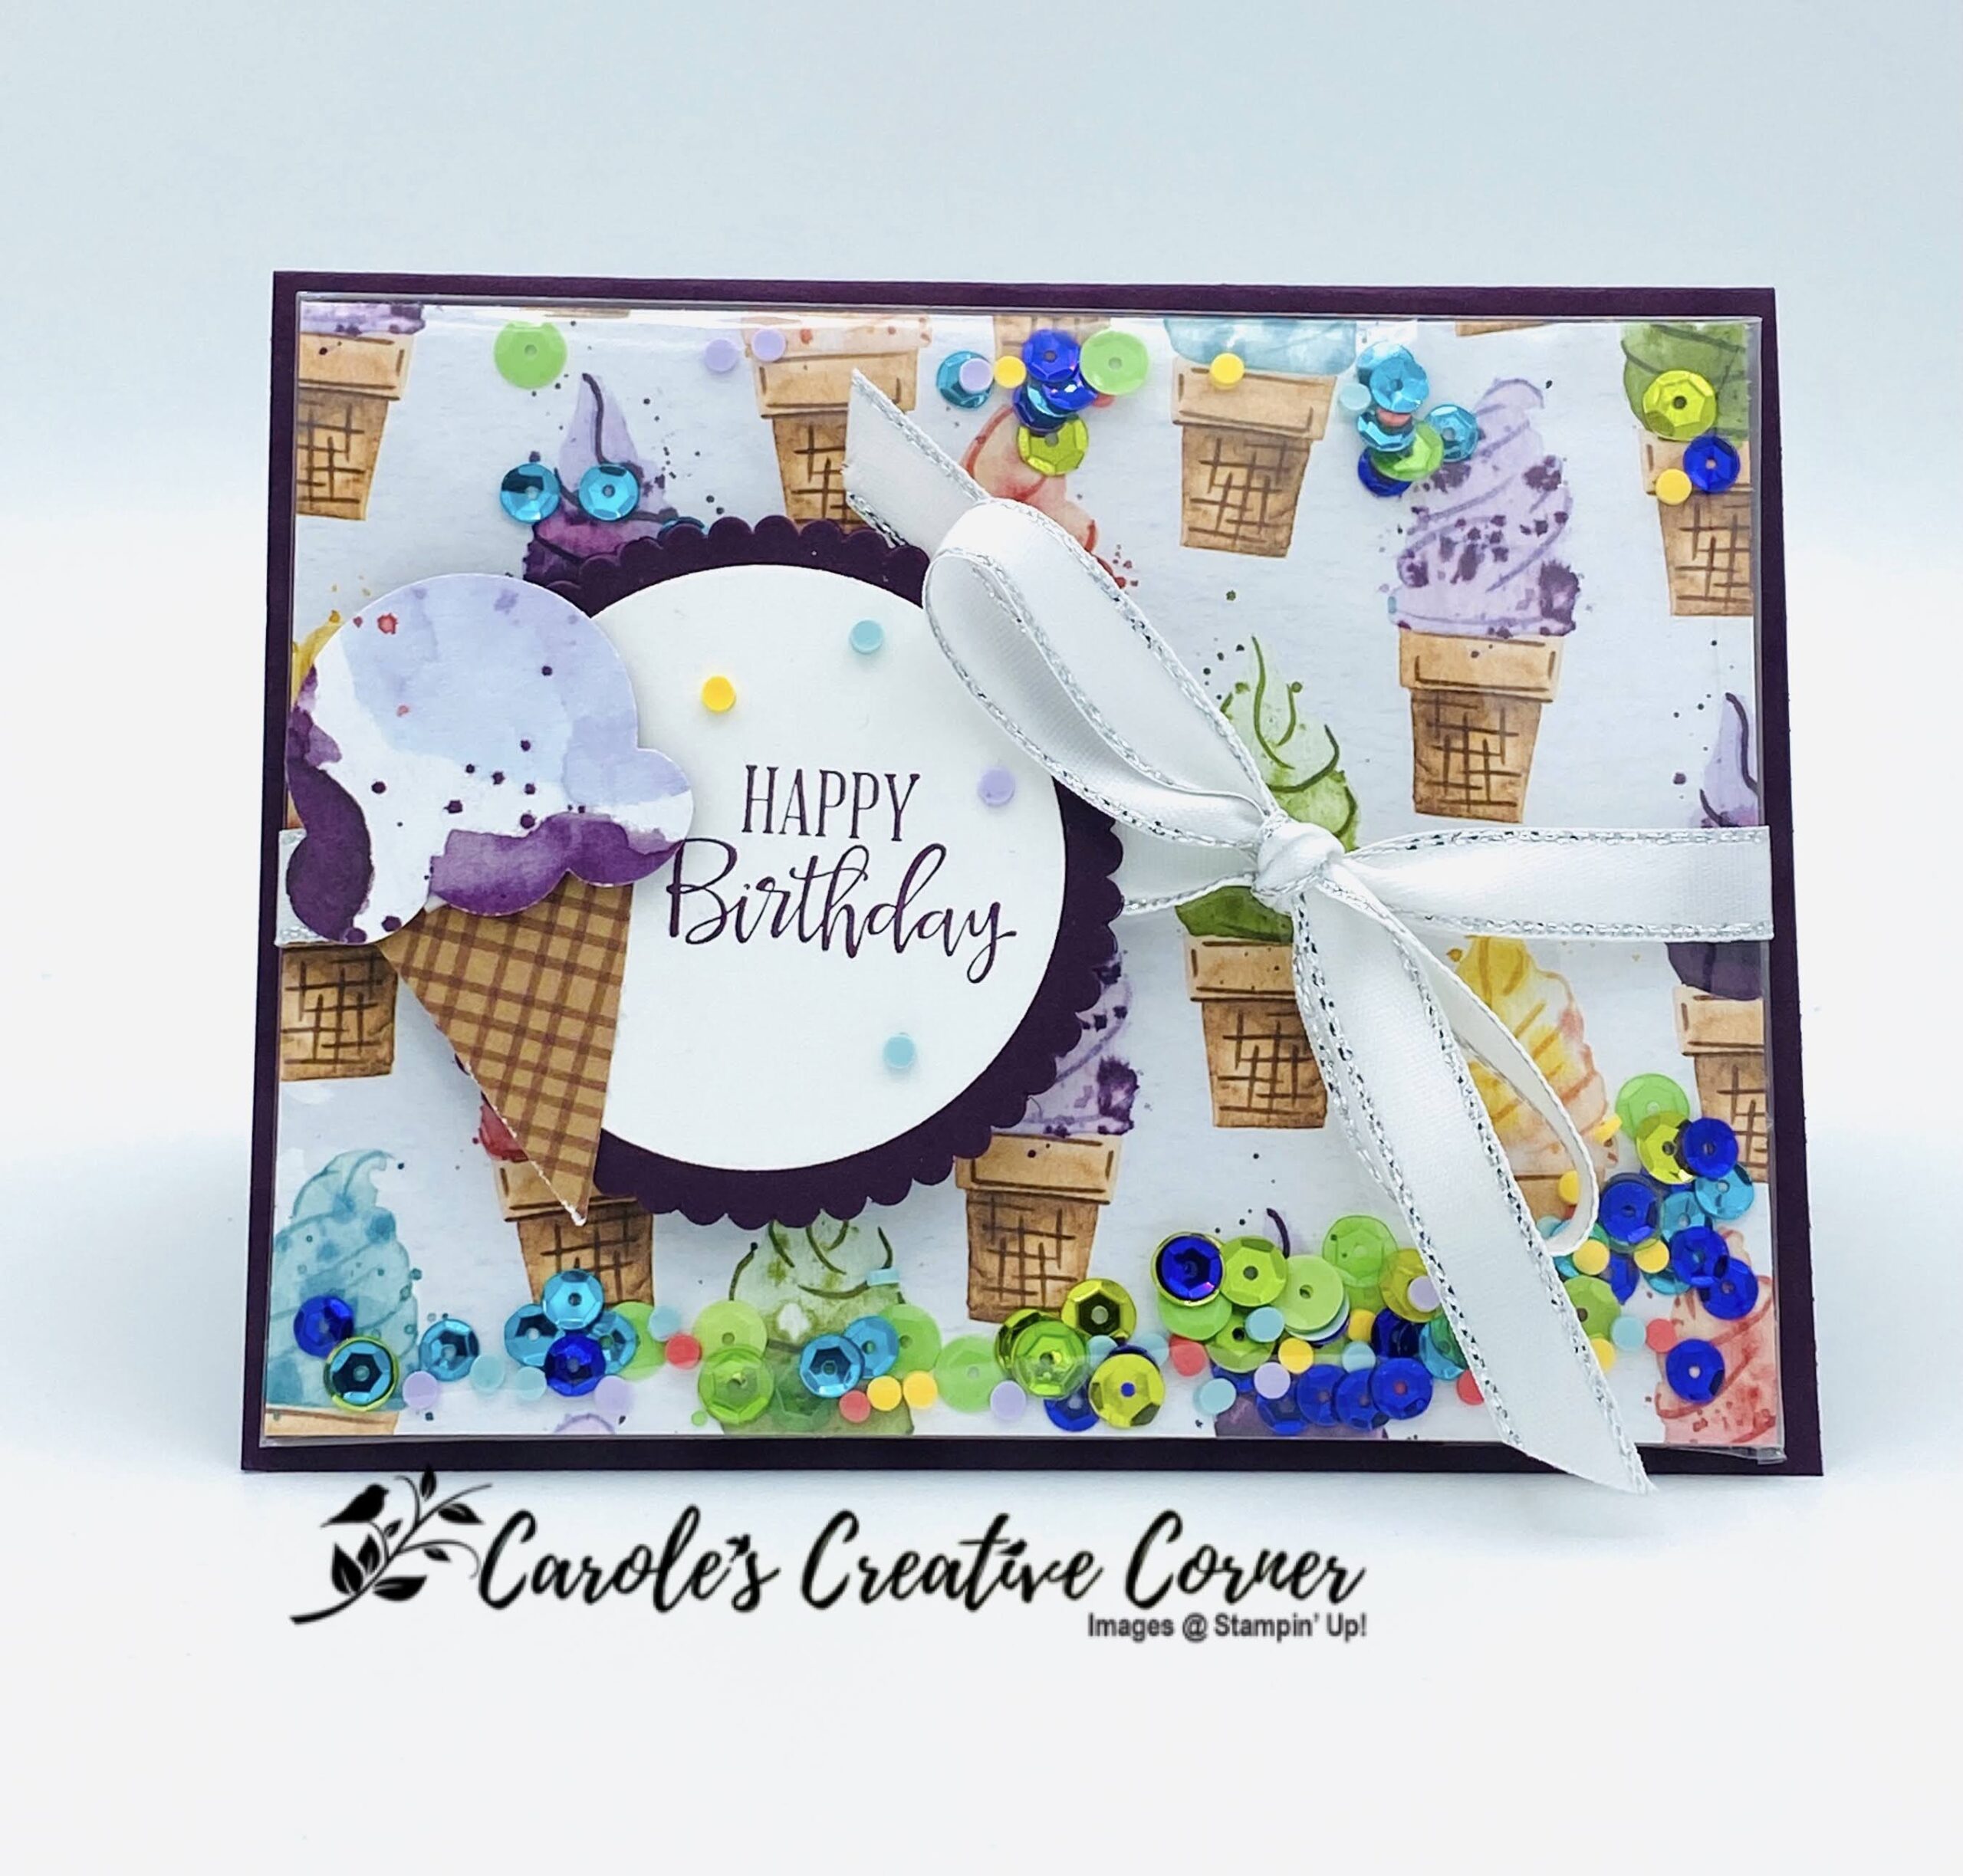
The Sweet Ice Cream Faker Shaker card is perfect for creating a festive card for the lucky birthday person. It’s pretty easy once you know how. Learn how to impress your recipient with this fun and festive interactive card!
Measurements:
Blackberry Bliss card stock: 5.5″ x 8.5″, scored at 4.25″ along the 8.5″ side, 2.5″ x 2.5″ for scalloped circle Ice Cream Corner Designer Series Paper (DSP): 4″ x 5.25″; punch ice cream scoop and cone from the DSP Basic White card stock: 4″ x 5.25″, 2.25″ x 2.25″ for circle Metallic Edge Ribbon: 25″
To make this card, I placed the DSP with the side I wanted facing on the outside of the card facing the envelope flap, and put it in the 5 3/4″ x 4 3/8″ clear envelope. Then I folded the envelope toward the back along the 5.25″ inch side of the cardstock, as close to the cardstock as possible. Apply scotch tape along the fold to hold it in place from edge to edge (see Figure 1)
Figure 1: Tape along fold from edge to edge.
Then I added about 5 pinches of my favorite sequins to the envelope front (the side with the pattern to face the front of the card). Then I took off the seal for the envelop and closed the envelope tight against the cardstock.
Figure 2: Add 5 pinches of sequins
Next I wrapped the ribbon around the envelope and tied a bow to the right hand side of the card. Next I used Tear & Tape on the the back of the envelope and adhered to the front of the cardstock. Next I adhered with dimensionals the sentiment on the Basic White circle to the front of the card with a coordinating scalloped circle, leaving room to the left to add the punched ice cream cone. I added a few of the ice cream corner sprinkles to the front of white circle. Then the front is done and ohh so festive!
All that remains is the inside of the card. The stamp set provides so many fun stamps to decorate with. Here I used just the ice cream scoop and the cone, however the stamp set offers so much more. The stamp set has sprinkles, melted ice cream accents, popsicles and adorable coordinating sentiments. “You melt My Heart” is one of my favorites. I hope you enjoy this stamp set as much as I do!
Supplies for Sweet Ice Cream Faker Shaker card:
Would you like to get a 20% discount on everything you order? Sale-A-Bration is the perfect time to join. During this time (January & February), you can choose your $125 Starter Kit for only $99. Plus, you’ll get a FREE exclusive BONUS gift from the upcoming catalog — an assortment of 6″X 6″ stacks of Designer Series Paper, 200 sheets!
Did you know that the majority of Stampin’ Up! Demonstrators are hobby demonstrators? They appreciate Stampin’ Up! products, like you do, and enjoy the 20% discount. The addition of the stacks of 6X6 Designer Paper during Sale-A-Bration is an added incentive, giving the kit a $182.50 value. I’d love for you to join my Stamps-A-Lot Sweethearts Team, click on the picture below to join: