Here is a festive Art Gallery Z-fold Layer card that has a different take on the traditional z-fold. I used the Art Gallery Stamp Set and coordinating dies and the Field and Flowers Designer Paper, which is one of the free Sale-a-Bration picks with a $50 purchase.
Measurements:
Misty Moonlight Cardstock
4-1/4” x 9-3/4” scored parallel to short side at 3-1/4″ and 6-1/2”
4-1/4″ x 5-1/2″
Basic White Cardstock
Two pieces that are 3″ x 4″
Scrap for die-cutting sentiment piece, flower and stem die cut
Basic Black
4.25″ x 5.5″
Fields and Flowers Designer Paper
4″ x 5-1/4″
2-3/4″ x 3-3/4″
Directions:
Fold the Misty Moonlight layer at the scores to form a z-fold layer.
Add the white layer to the front and inside of the z-fold.
Attach the smaller designer paper layer to the front white layer.
Attach the larger designer paper layer to the large black layer. Center and adhere the z-fold layer.
Ink up the “Thinking of You” sentiment with black Memento ink on the scrap white piece and die cut it.
Stamp the flower in Misty Moonlight and the leaves in Shaded Spruce and die cut both.
Adhere the flower, stem and sentiment to card front using dimensionals.
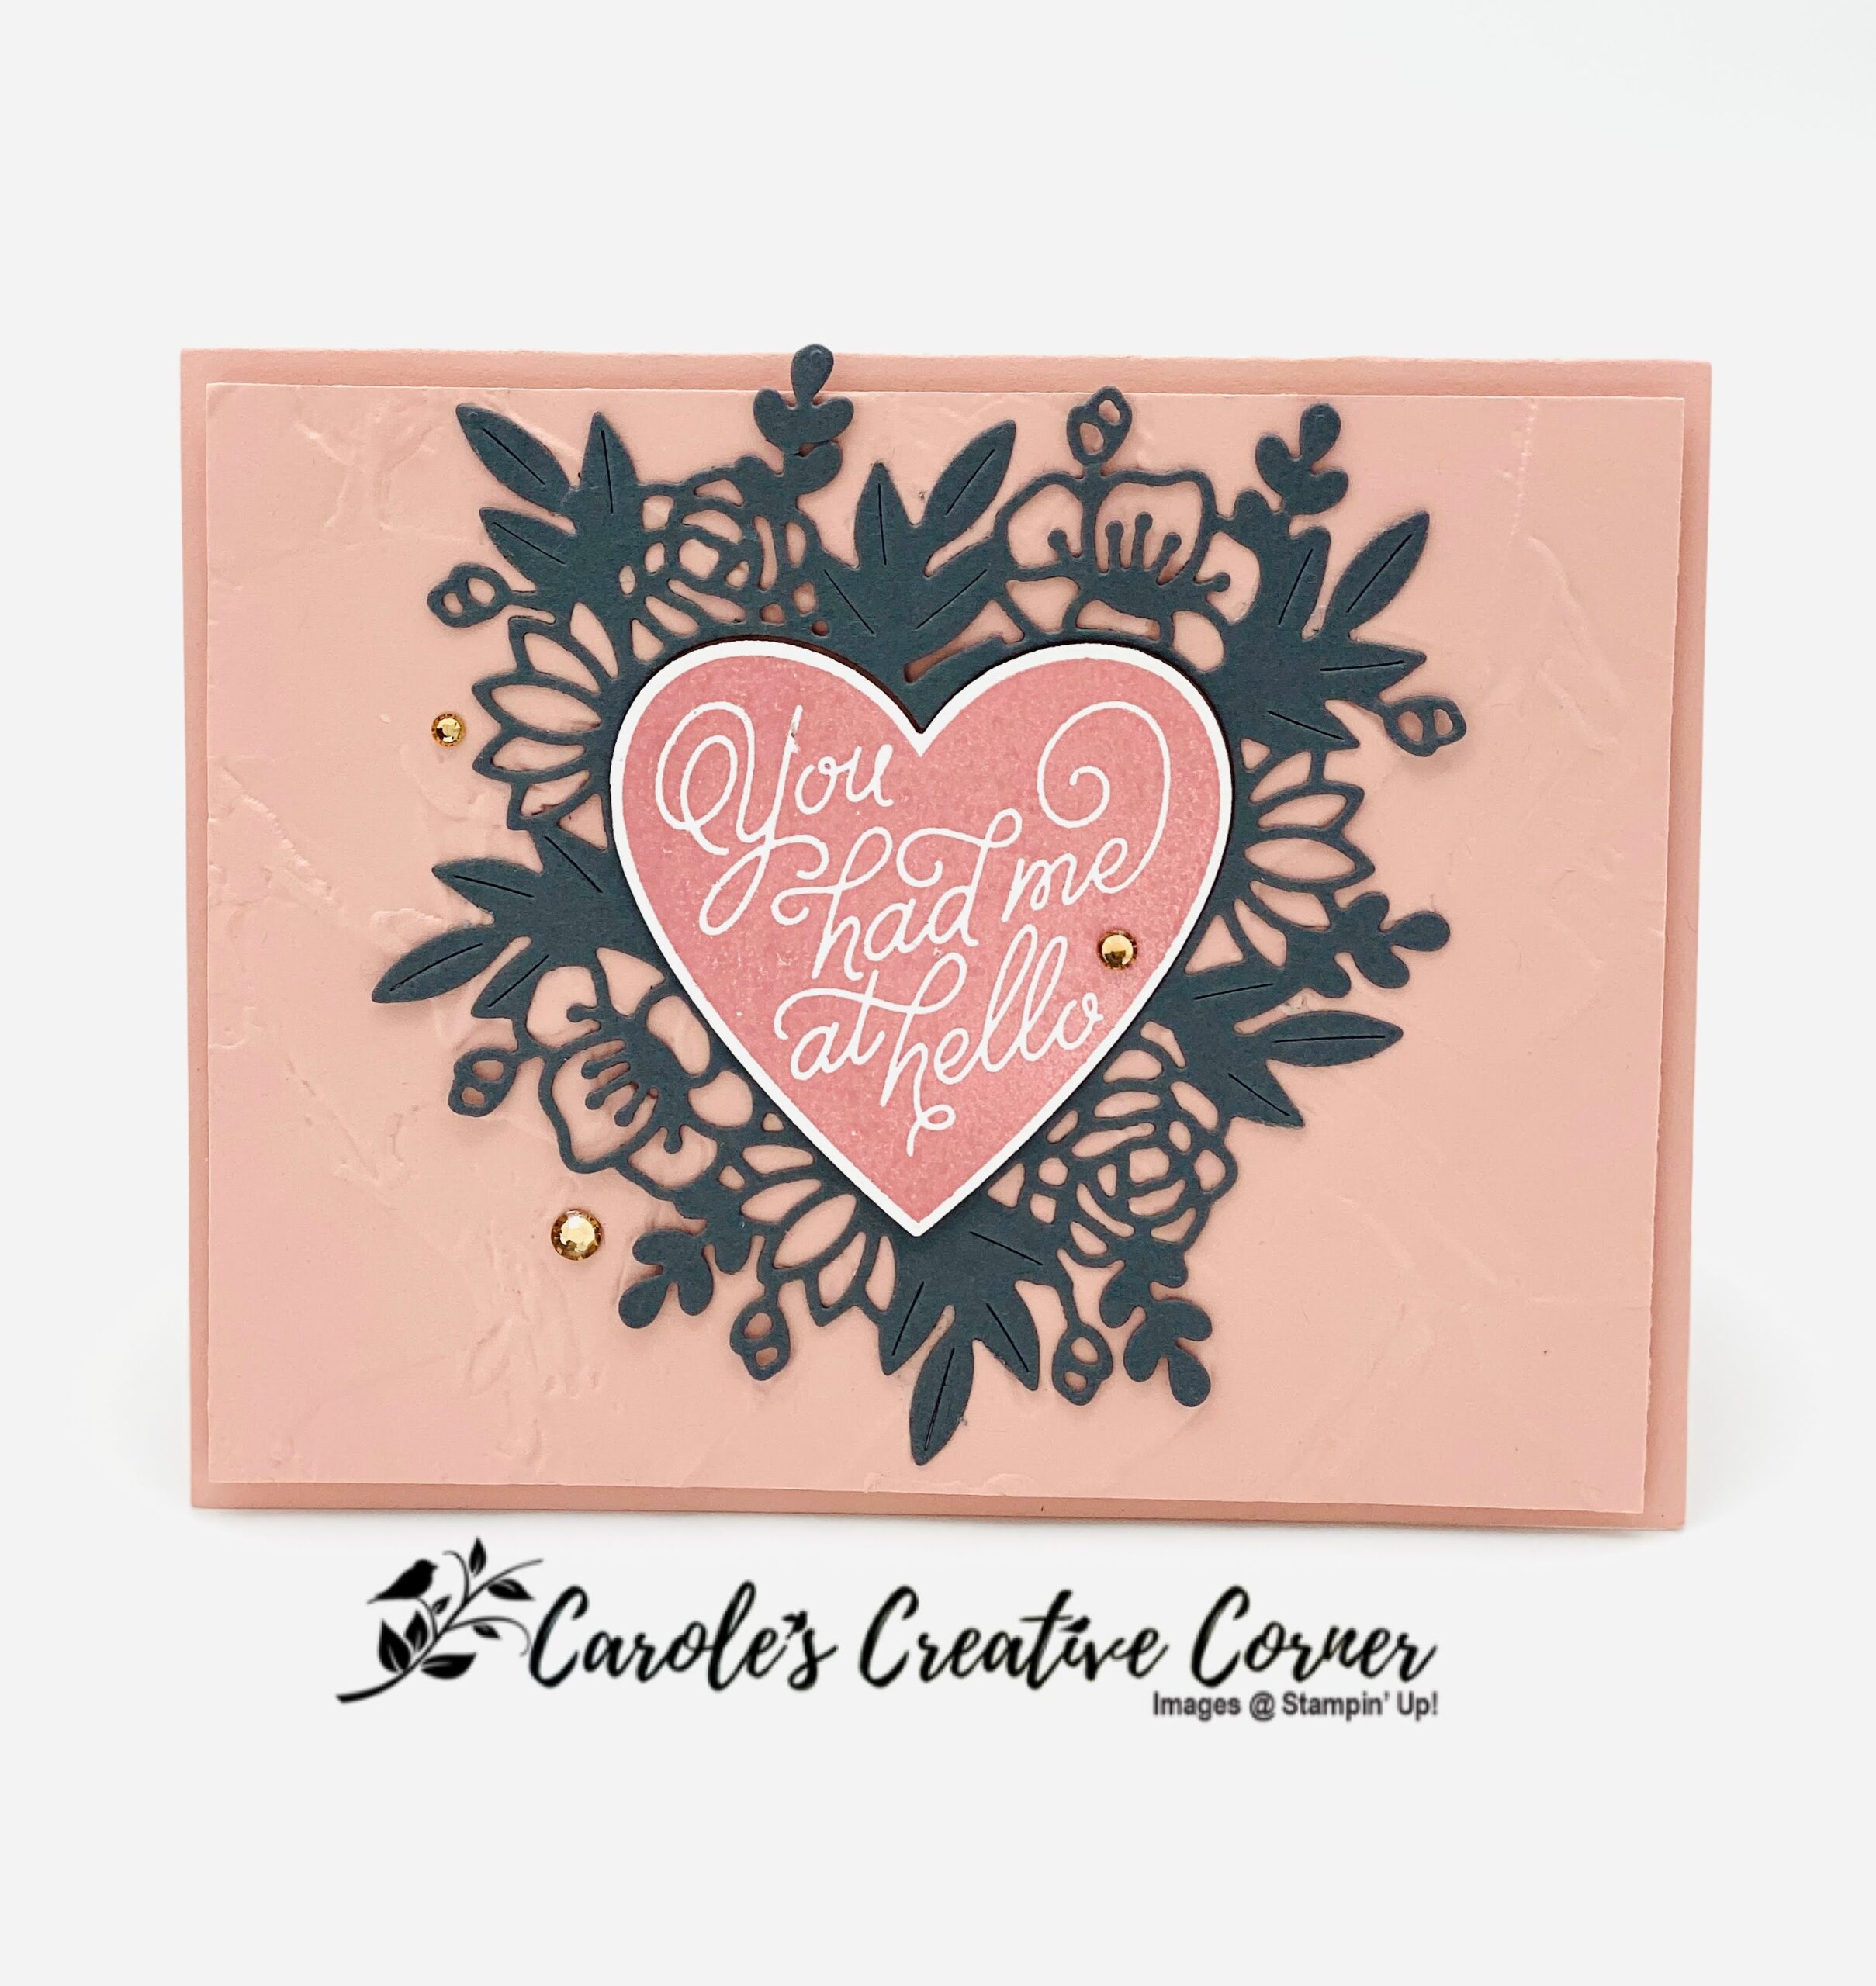
This Always in My Heart card using the Always in My Heart bundle is so pretty with such little work! If you have to make a quick and easy card this may be your go to design. There are so many ways to use the this suite and bundle–be sure to watch my YouTube video which will be posted on 2/24/21 to get all the details on the different ways you can use this suite of products.
The floral die in the set does all the work on this card. I have found that even though the die is detailed, it cuts so easily and comes out of the die without any ripping and no need for a precision plate. Did you notice that it also makes marks in the leaves so that they look 3D? Just think of all the color combinations and paper types you can use with this die, and your possibilities become endless. Read on to see how easy this card is to create.
Measurements:
Petal Pink card stock: 5.5″ x 8.5″, scored at 4.25″ on the 8.5″ side, (1) 4″ x 5.25″ Basic White card stock: 2.5″ x 2.5″ for heart Basic Gray card stock: 4″ x 4.5″ for floral
Directions:
After die cutting the floral heart in Gray Granite, I used the die again to cut only a heart in Basic White card stock. I stamped the ‘You had me at Hello” heart stamp in Blushing Bride ink onto the white heart. (Remember this is where you can change the card to any occasion you want just by changing the sentiment in on the center heart!) After running the 4″ x 5.25″ piece of Petal Pink cardstock through the Stampin’ Cut and Emboss machine using the Painted Texture embossing folder, the card is ready to be assembled.
I used dimensionals to layer the embossed piece of Petal Pink card stock onto the card base. I then adhered the Basic Gray floral heart to the front of the card. I applied adhesive only to the bunches of leaves and not every surface of the die, as that it’s not needed and it gives more depth to the die to have some of the pieces floating. Next, I applied the stamped white heart to the center of the floral die cut using dimenstionals. Then I added different sizes of the champagne rhinestones to give the card some sparkle.
Stamping the inside of the card adds a nice touch to the card. In this example, I used the flower stamp from Forever and Always stamp set to give some decoration to the inside using Tuxedo Black Memento ink.
Would you like to get a 20% discount on everything you order? Sale-A-Bration is the perfect time to join. During this time (January & February), you can choose your $125 Starter Kit for only $99. Plus, you’ll get a FREE exclusive BONUS gift from the upcoming catalog — an assortment of 6″X 6″ stacks of Designer Series Paper, 200 sheets!
Did you know that the majority of Stampin’ Up! Demonstrators are hobby demonstrators? They appreciate Stampin’ Up! products, like you do, and enjoy the 20% discount. The addition of the stacks of 6X6 Designer Paper during Sale-A-Bration is an added incentive, giving the kit a $182.50 value. I’d love for you to join my Stamps-A-Lot Sweethearts Team, click on the picture below to join:
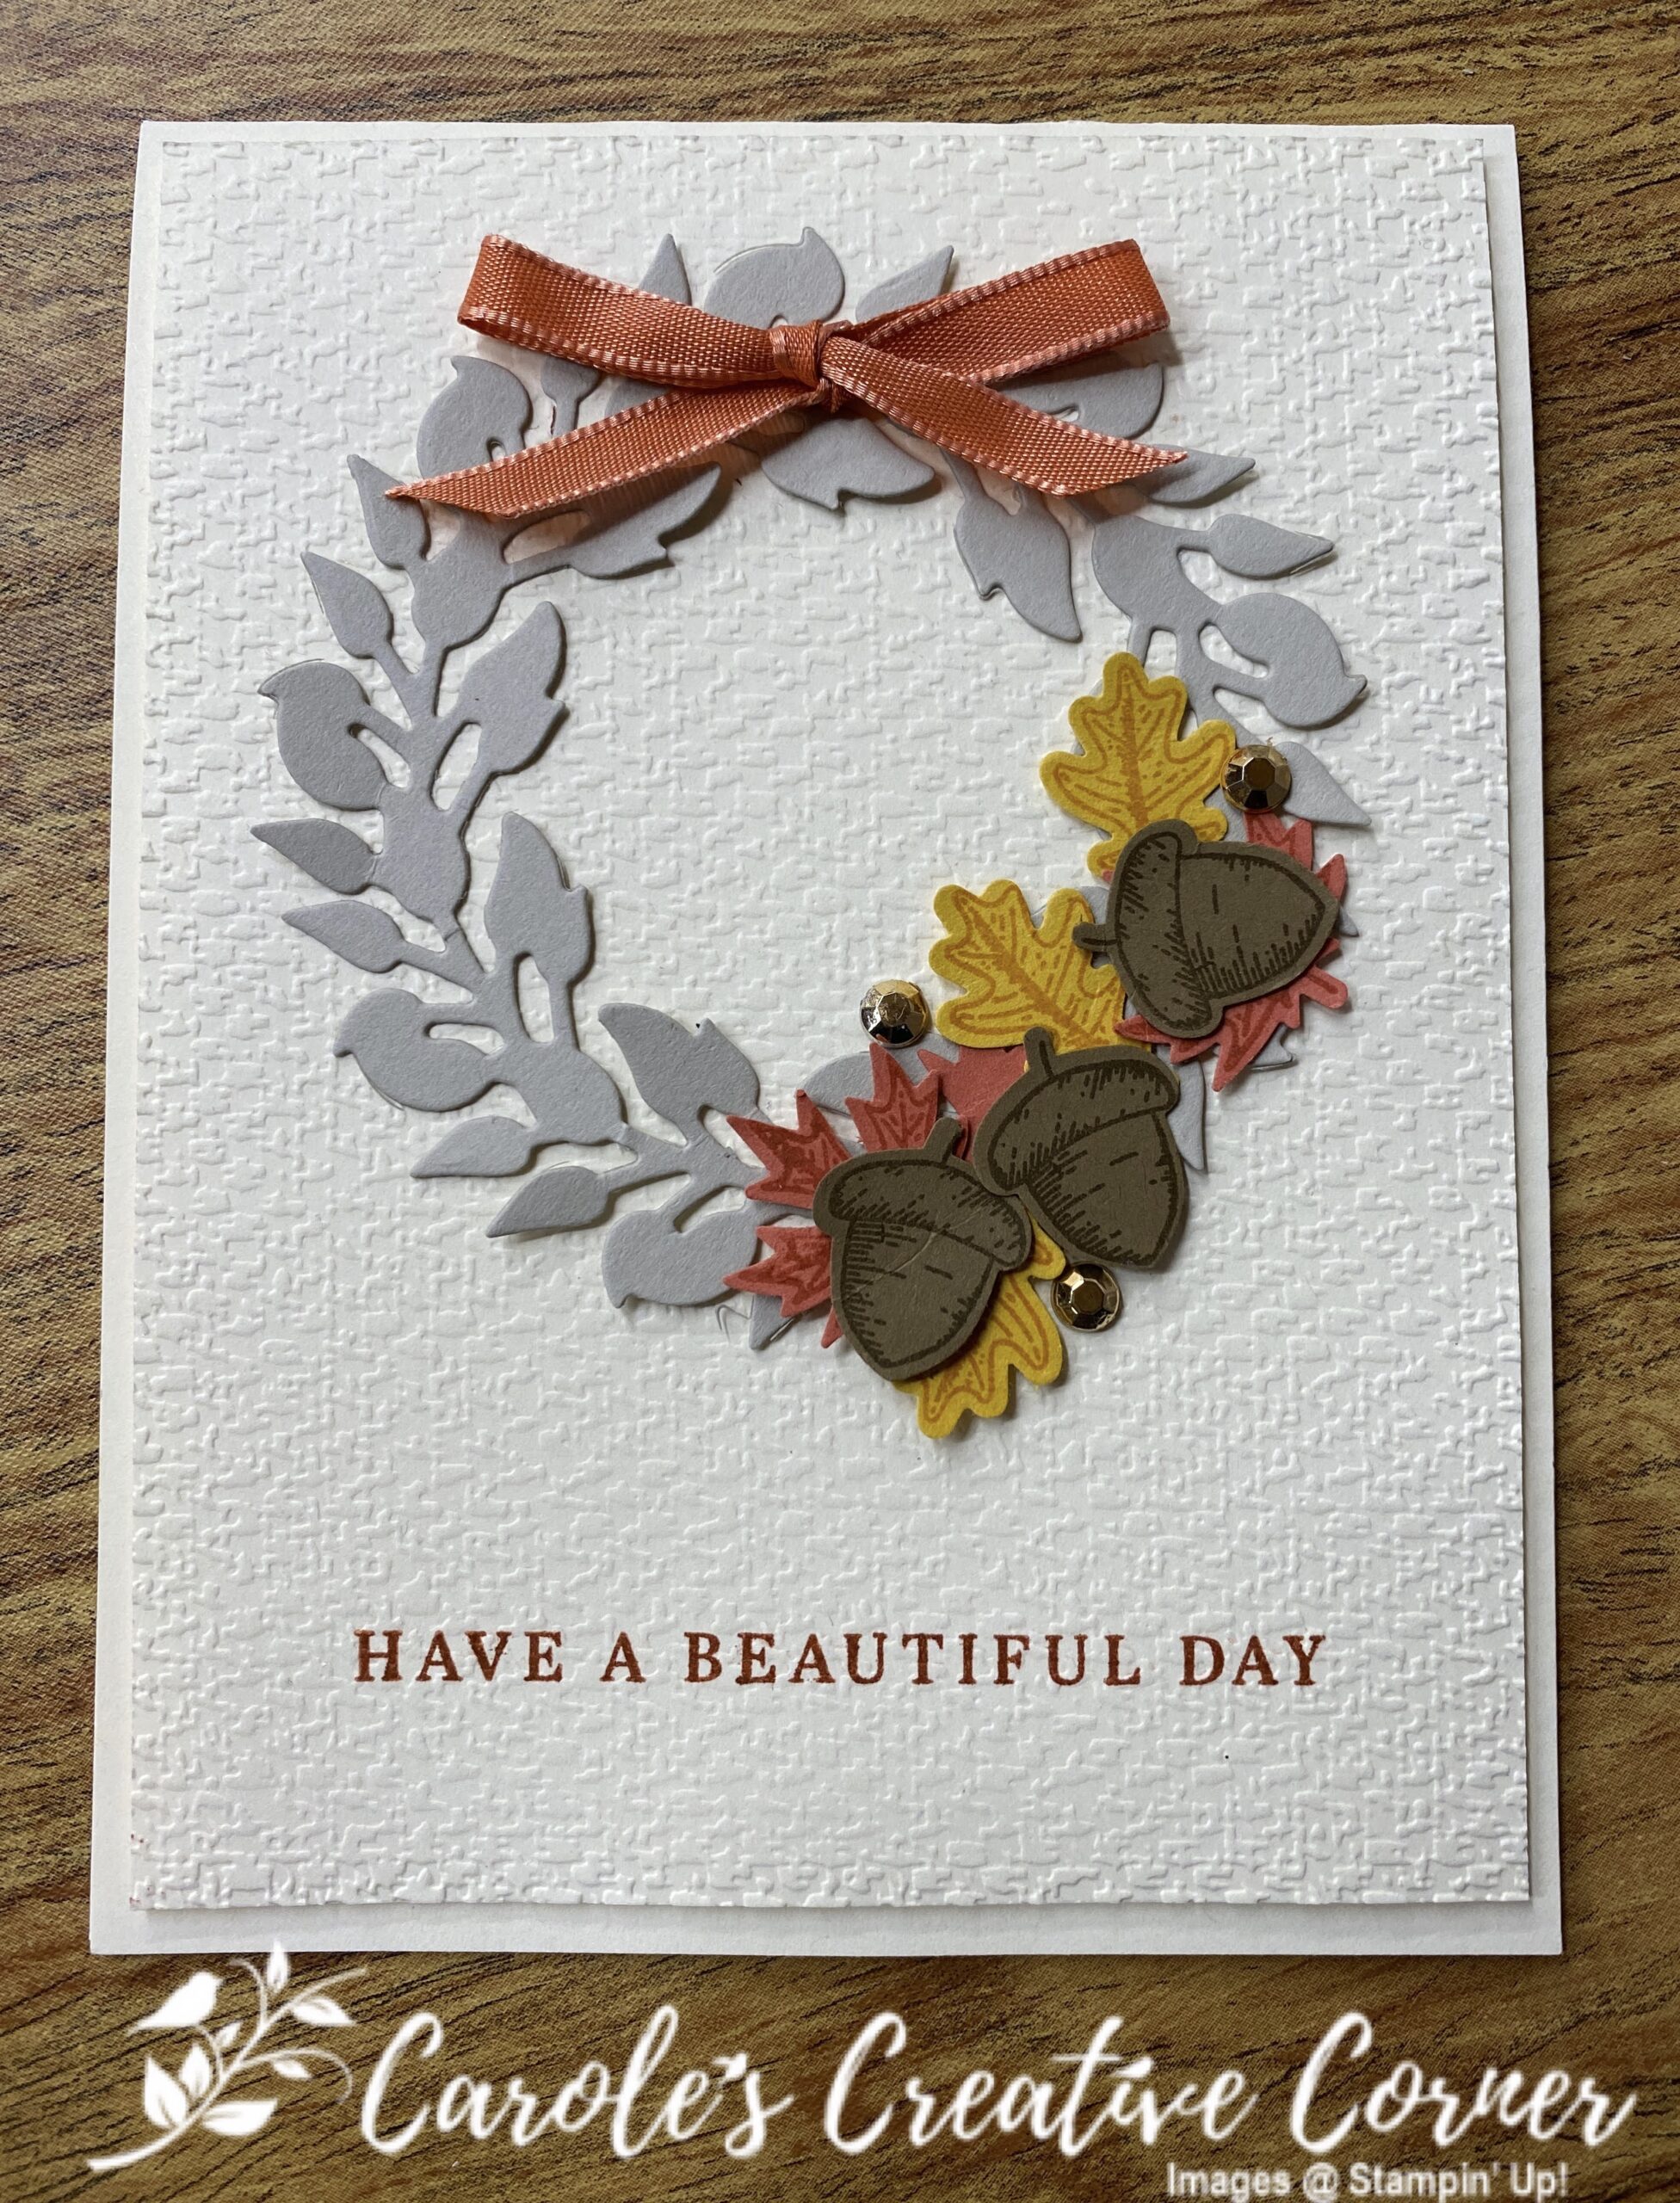
The fall beautiful colors are showing now and its a great time to pull out those fall colors on our cards. This card uses the Beautiful Autumn bundle and the All-Around wreath dies on Very Vanilla card stock, which really shows of the wonderful fall colors.
Measurements for Beautiful Autumn Card
Very Vanilla cards stock: 4.25″ x 11″, scored at 5.5″ on the 11″ side, (2) 4″x5.25″ Smokey Slate card stock: 3.5″ x 3.5″ for wreath Soft Suede card stock: piece for 4 acorns Crushed Curry card stock: piece for 4 leaves Terracotta Tile card stock: piece for 4 leaves
After die cutting the wreath, the assembly starts with the Very Vanilla card front that has been stamped with the sentiment in Cajun Craze ink and then embossed with the Tasteful Texture embossing folder. Place dimensionals on the backside of the embossed Very Vanilla card front and adhere to the front of the card. The wreath is adhered next to the front of the card.
Stamp the leaves using Crushed Curry, Terracotta Tile, and then the acorns in Soft Suede ink and then punch them. Next decorate the wreath with the collection of leaves, acorns and adhere with glue dots. Add the gold gilded gems. Adhere the Terracotta Tile ribbon to top of wreath.
Adhere the other Very Vanilla card stock to inside of card and decorate with additional leaves and acorns.
Supplies:
See the Beautuiful Autumn bundle on the Stampin’ Up You tube: CLICK HERE
New demonstrators who submit their Independent Demonstrator Agreement (IDA) before 1 September or after 30 September will not be eligible for this promotion.
In addition to the regular starter kit (for $99 USD, new recruits choose $125 USD-worth of products) new recruit will also receive enough cardstock pieces to make 16 cards, a pack of Rhinestone Basic Jewels, the So Much Love stamp set, and the Queen Anne’s Lace stamp set—all for their first event.
8 packs of precut cardstock of the coastal cabana pack will be provided, and 8 packs of precut cardstock of the Granny Apple Green pack, for a total of 16 cards (packs include envelopes). The new recruit can choose what samples to replicate and how to distribute the packs to their customers.
You can see more details about joining and about our team here on my blog here. You can also see more information about the benefits of becoming a Stampin’ Up! Demonstrator here.
That is such a great deal!! If you’ve been considering joining, September will be a great time to jump in! Drop me an email [email protected].
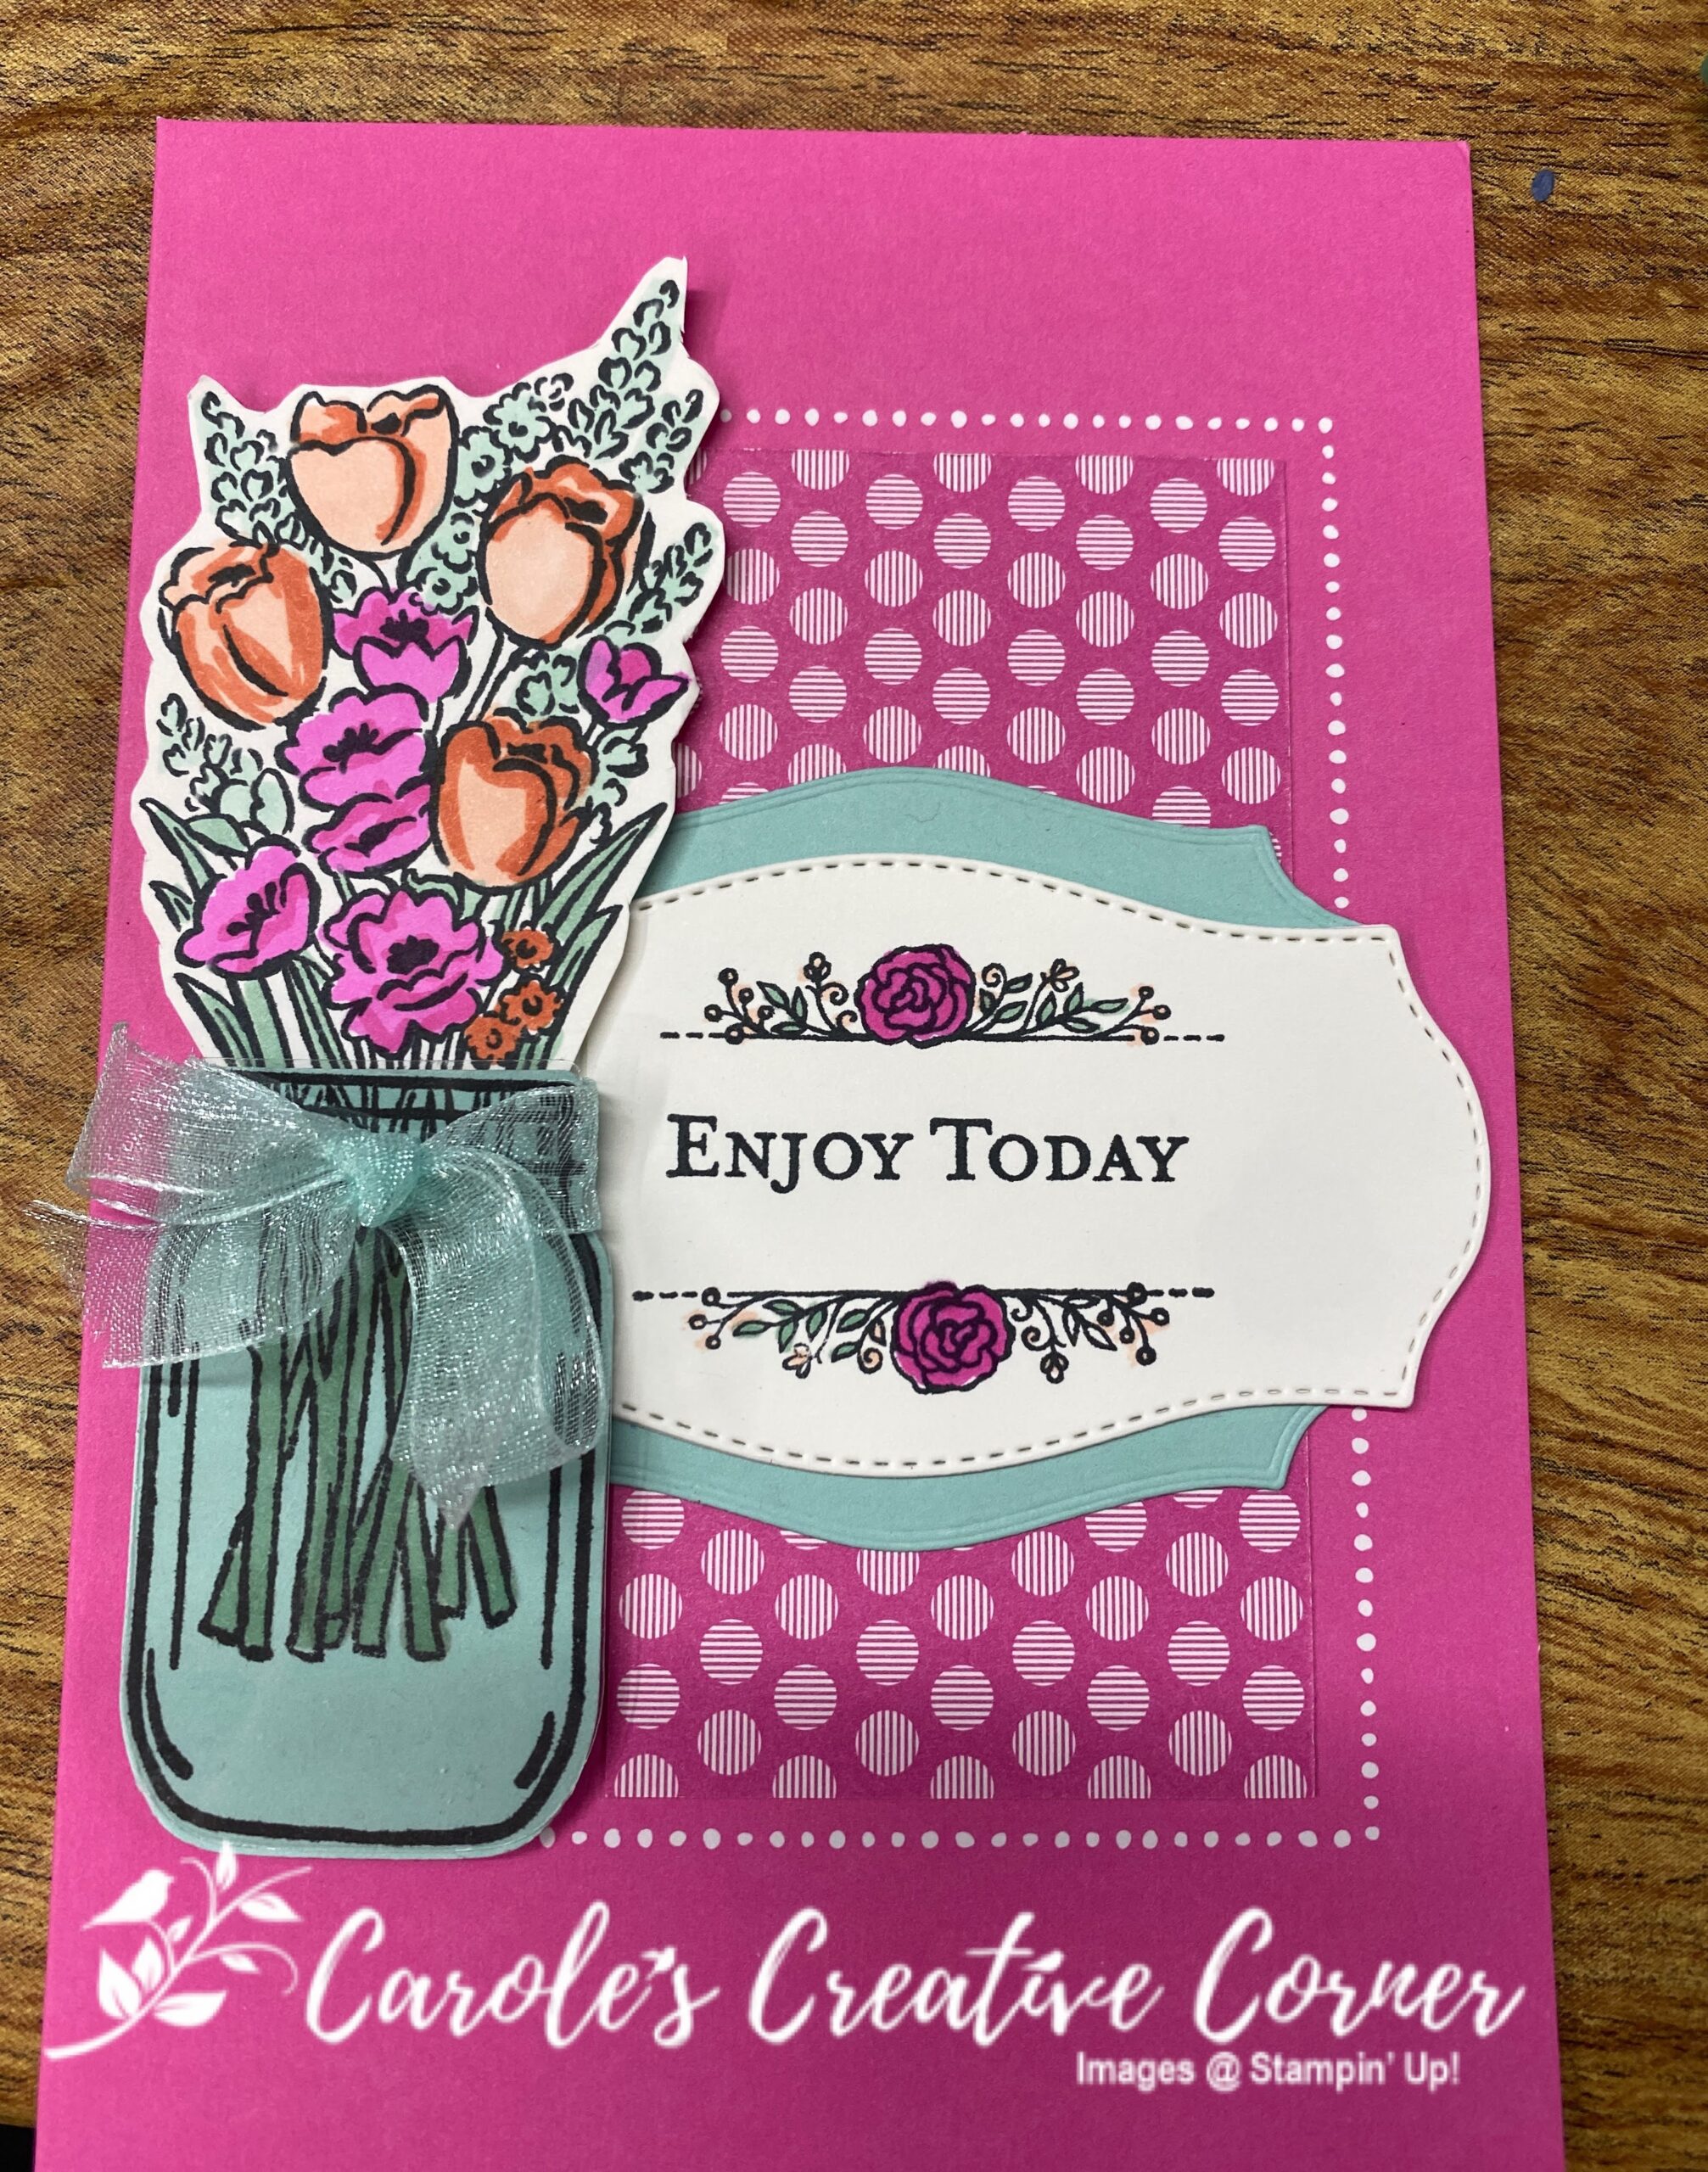
Pool Party cardstock: piece for the jar and the label Whisper White cardstock: piece for flowers and sentiment 2020-2022 In-Color 6×6 Designer Series Paper: 2″ x 4″
Directions:
Die cut and stamp the following:
Stamp the flowers from Jar of Flowers on Whisper White with Memento ink.
Die cut white label and die cut Pool Party label.
Stamp jar with memento ink onto Pool Party cardstock. Stamp stems with memento ink onto jar. Punch out Jar.
Punch a jar out of window acetate.
Use blends to color in flowers and stems from the Jar and accents on the sentiment,
Align the sentiment and accent piece (from Meant to Be stamp set) on Stamparatus.
Adhere patterned paper inside dotted lines and on the right side on Magenta Madness card base.
Adhere white label to the pool party label and adhere to the card base.
Wrap ribbon around jar so bow is in the front. Adhere the jar to the front of the card wth dimensionals.
Adhere flowers slightly under jar top to front of card with dimensionals.
Supplies Used for Jar of Flowers:
Bonus Days are here! For every $50 in Stampin’ Up products you purchase (before shipping and tax), you earn a $5 bonus coupon to use on products in August! Shop here to earn your coupon(s)!
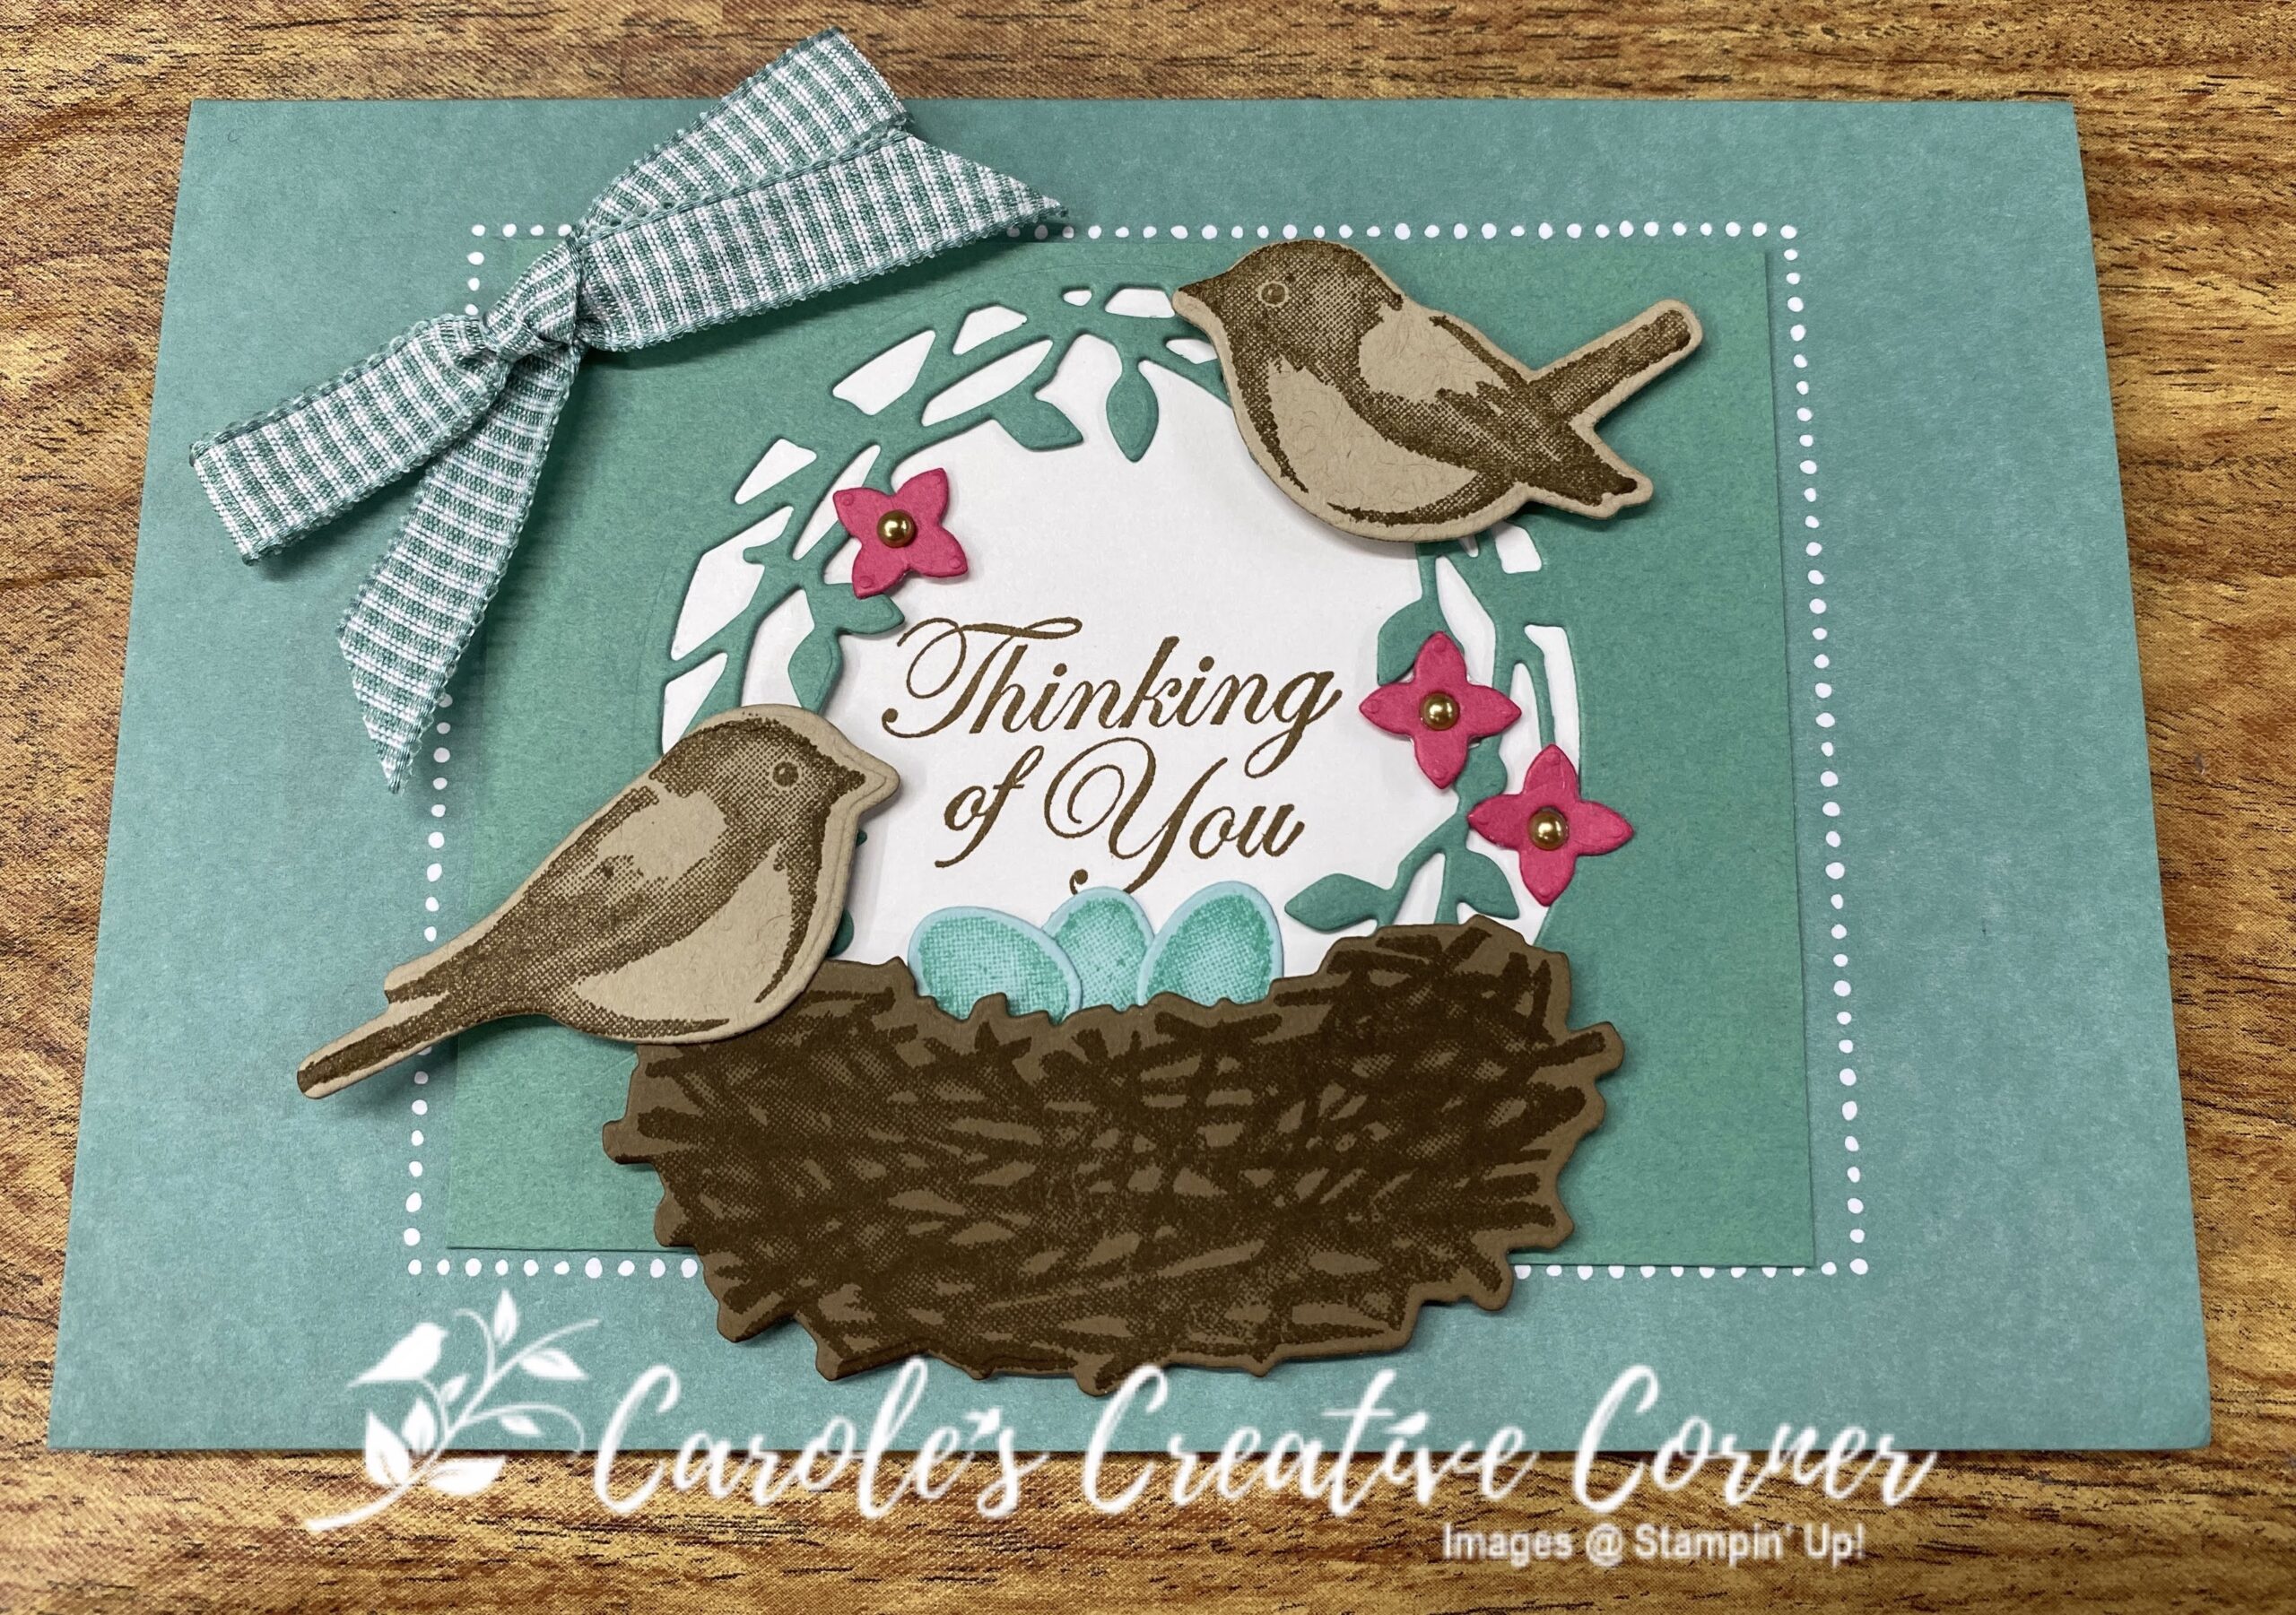
I love birds so naturally I had to own Birds and Branches bundle by Stampin Up. This card was easy to make using the Flowers for all Seasons Memories and More cards and envelopes. This card pack has 2 of each of the 2020-2022 in colors cards and coordinating colored envelopes, making it so easy to have matching envelopes. Just stamp and die cut for this card and adhere to the card base!
Just Jade cardstock: (1) 3″ x 4″ Crumb cake cardstock: piece for 2 birds Soft Suede cardstock: piece for nest Melon Mambo cardstock: piece for flowers Pool Party cardstock: for eggs Whisper White cardstock: 3″ x 3.25″
Directions:
Stamp and Die cut the following:
Stamp nest in Soft Suede ink on Soft Suede cardstock and die cut.
Stamp birds in Soft Suede ink of Crumb Cake cardstock and die cut.
Stamp eggs in Coastal Cabana ink on Pool Party cardstock and die cut.
Die cut circle of branches on 3″ x 4″ Just Jade cardstock.
Die cut flowers from Melon Mambo paper.
Center white paper behind Just Jade circle cutout and stamp sentiment in Soft Suede on Whisper White (see Figure 1)
Figure 1
Adhere eggs below sentiment. Adhere nest with dimensionals. Add birds to card with dimensionals. Adhere flowers to card and add gold pearl centers.
Tie bow and adhere with glue dot.
Supplies for Birds and Branches:
Bonus Days are here! For every $50 in Stampin’ Up products you purchase (before shipping and tax), you earn a $5 bonus coupon to use on products in August! Shop here to earn your coupon(s)!
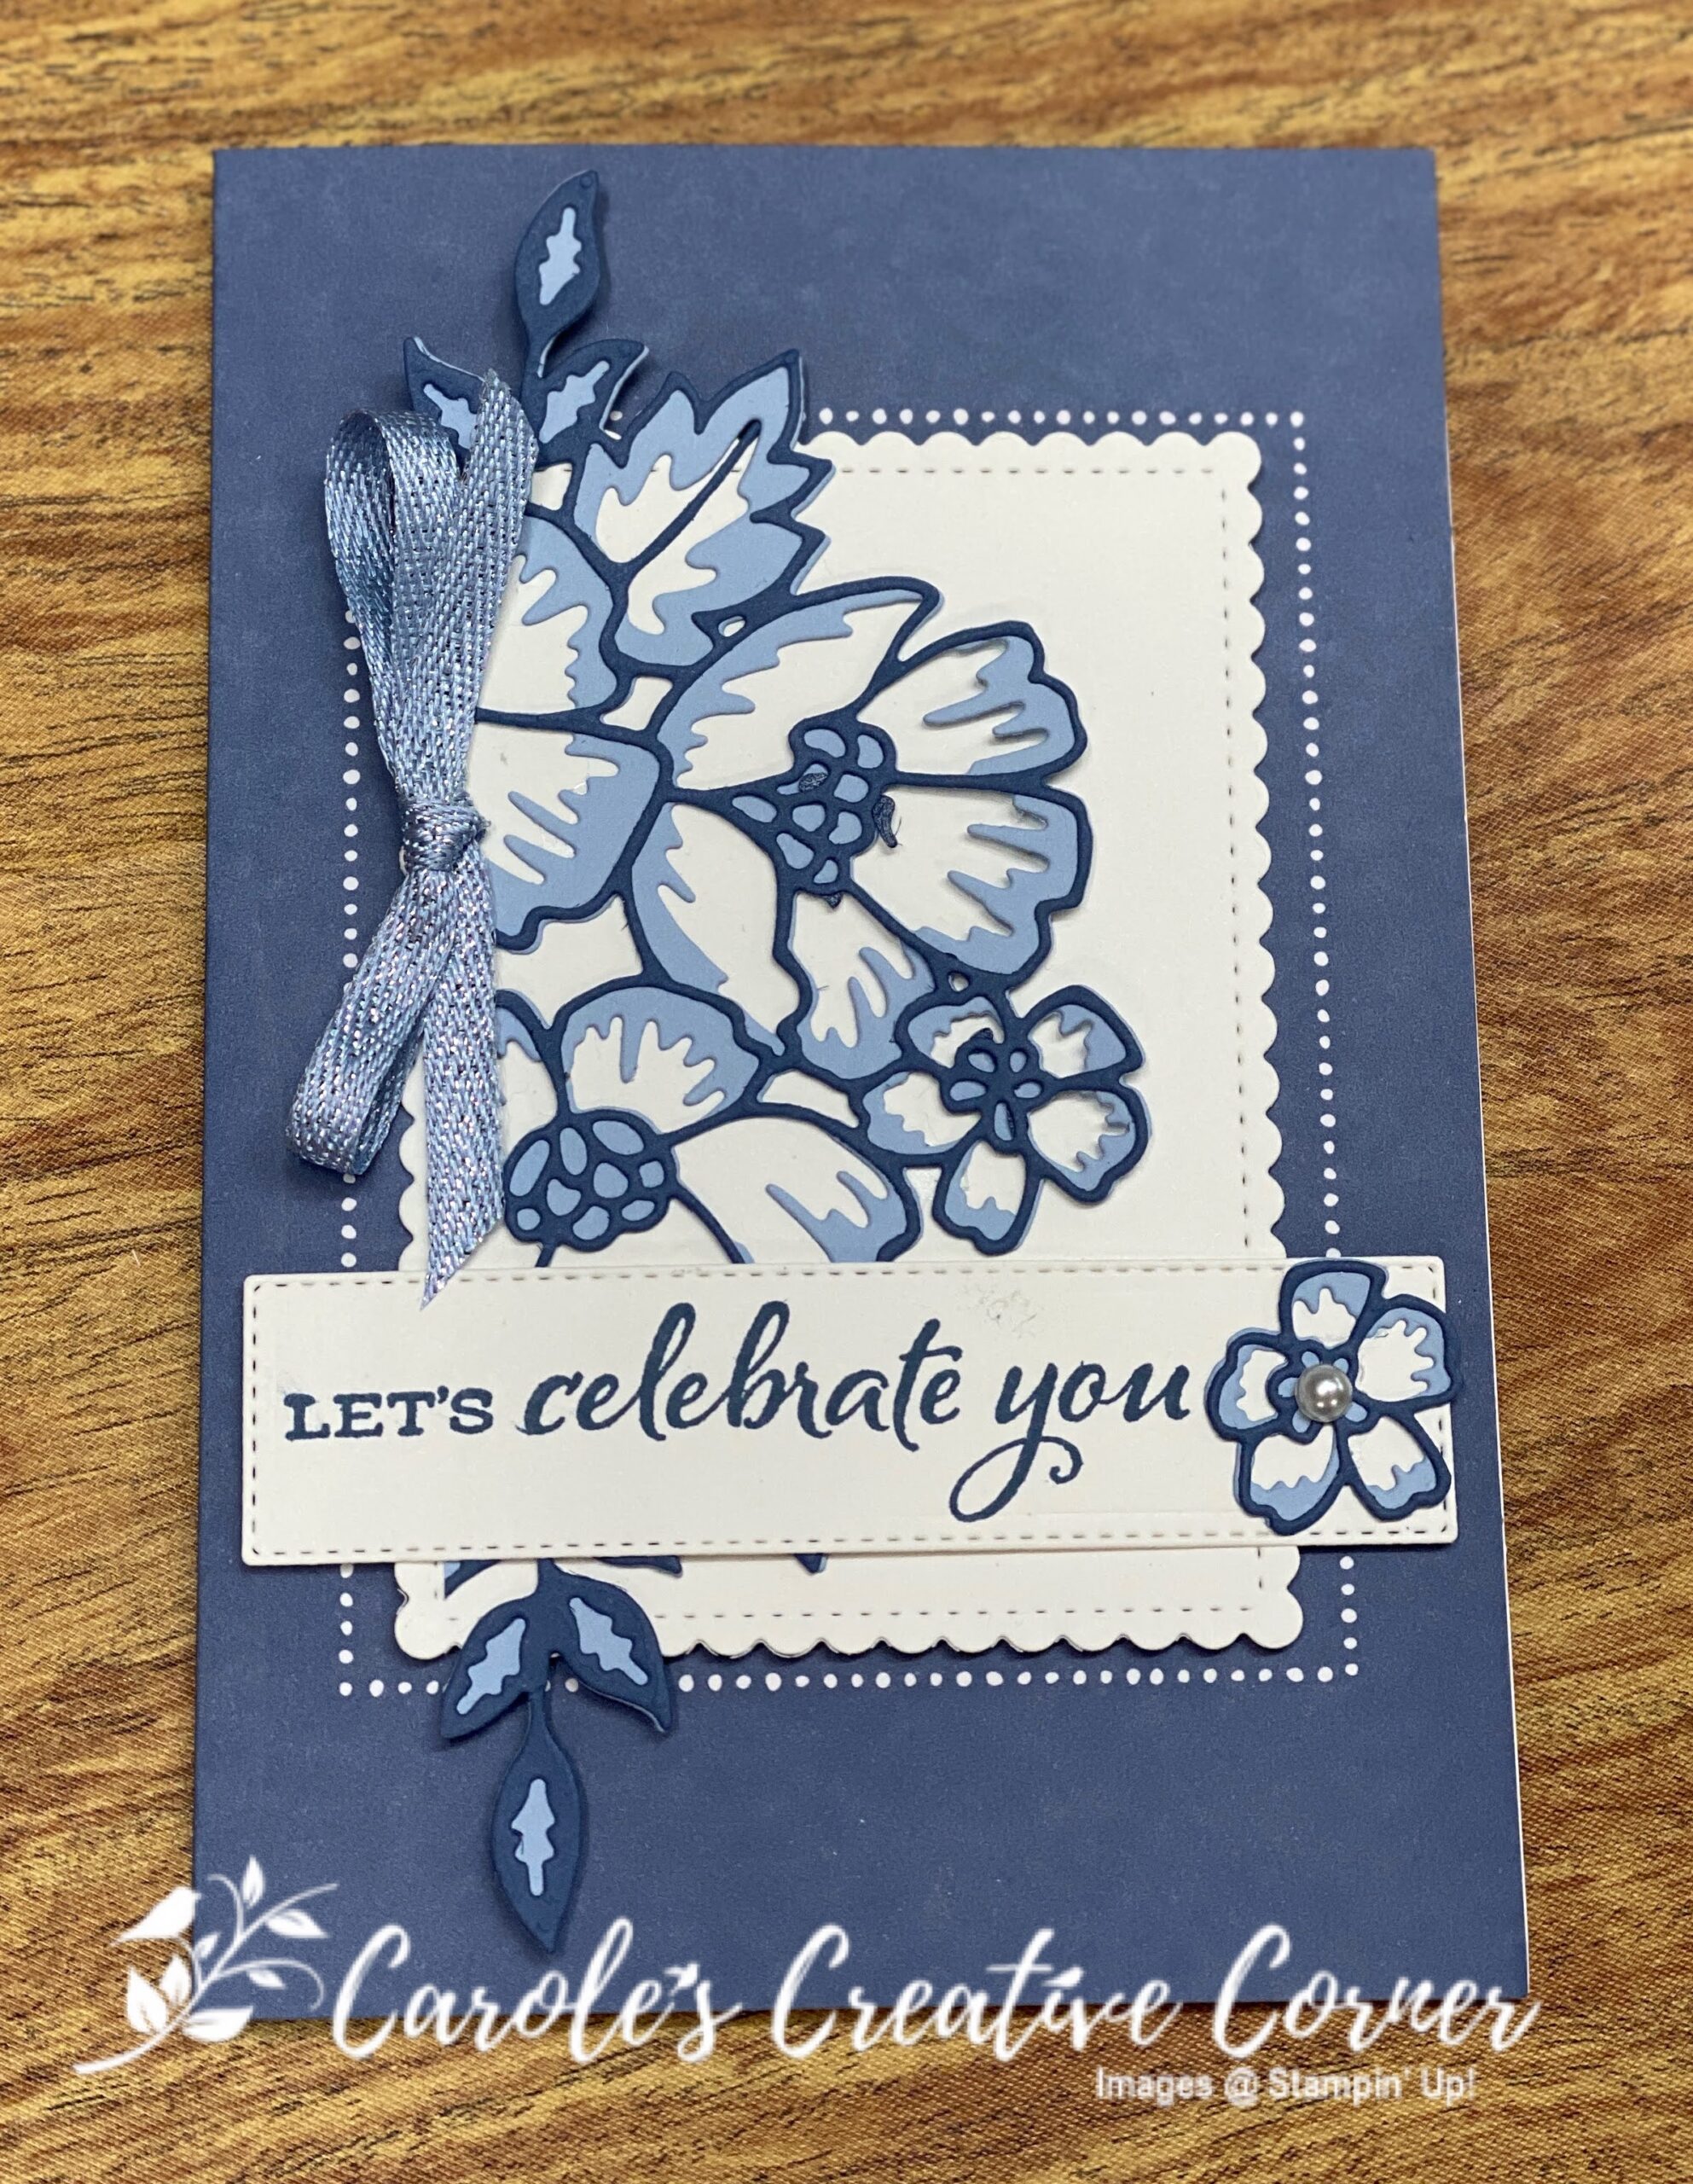
With the Misty Moonlight card and envelope from the Flowers for All Seasons Memories and More Cards and Envelopes and the Blossoms in Bloom bundle, you can create this beautiful card. Seaside Spray card stock pairs so nicely with Misty Moonlight card stock. Read on to see how to make this card and then send to your favorite person.
Misty Moonlight Cardstock: (1) 4.25″ x 5.5″, piece for outline of small flower Seaside Spray cardstock: (1) 4.25″ x 5.5″; small piece for small flower Whisper White cardstock: (1) 4″ x 5.25″, (1) 1.25″ x 4.25″ for sentiment
Directions:
Die cut the following:
Outline of Blossoms & Bloom die from Misty Moonlight cardstock and the outline of the small flower. TIP: Use adhesive sheets on the back of Misty Moonlight cardstock before die cutting; this will make it easy to adhere outline die cut to the Blossoms and Bloom base cardstock. (see Figure 1)
Base of Blossoms & Bloom die from Seaside Spray cardstock and the base of the small flower. (See Figure 1)
Using the largest scalloped rectangle from from Stitched So Sweetly, die cut rectangle from Whisper White cardstock. Also use the stitched rectangle from the Ornate Layers dies from Whisper White cardstock for the sentiment.
Figure 1
Take adhesive backing off the back of the Misty Moonlight outline die cut. Punch out any die pieces that remain before adhering with the Take a Pick tool. Adhere the Misty Moonlight outline to the front of the Seaside Spray Blossoms and Bloom base. Take a long blade scissors and cut diagonally from the bottom right leaf to the upper left leaf, as shown by the dotted line in Figure 2. Each half will be used to make one card.
Figure 2
Take the backing off the Misty Moonlight outline for the small flower and adhere to the Seaside Spray flower base.
Adhere the white scallop rectangle in the center of the card base, inside the white dotted lines. Adhere 1/2 of the Blossoms and Bloom die cut to the white rectangle frame.
Stamp sentiment on white stitched rectangle in Misty Moonlight ink. Add small flower to right hand side of sentiment. Add pearl center to small flower. Use dimensionals to adhere the sentiment to the card base, as shown in the finished example.
Tie bow with blue ribbon and adhere to card.
Supplies for Blossoms and Bloom card:
Bonus Days are here! For every $50 in Stampin’ Up products you purchase, you earn $5 bonus coupon to use on products in August. Shop here to earn your coupon!
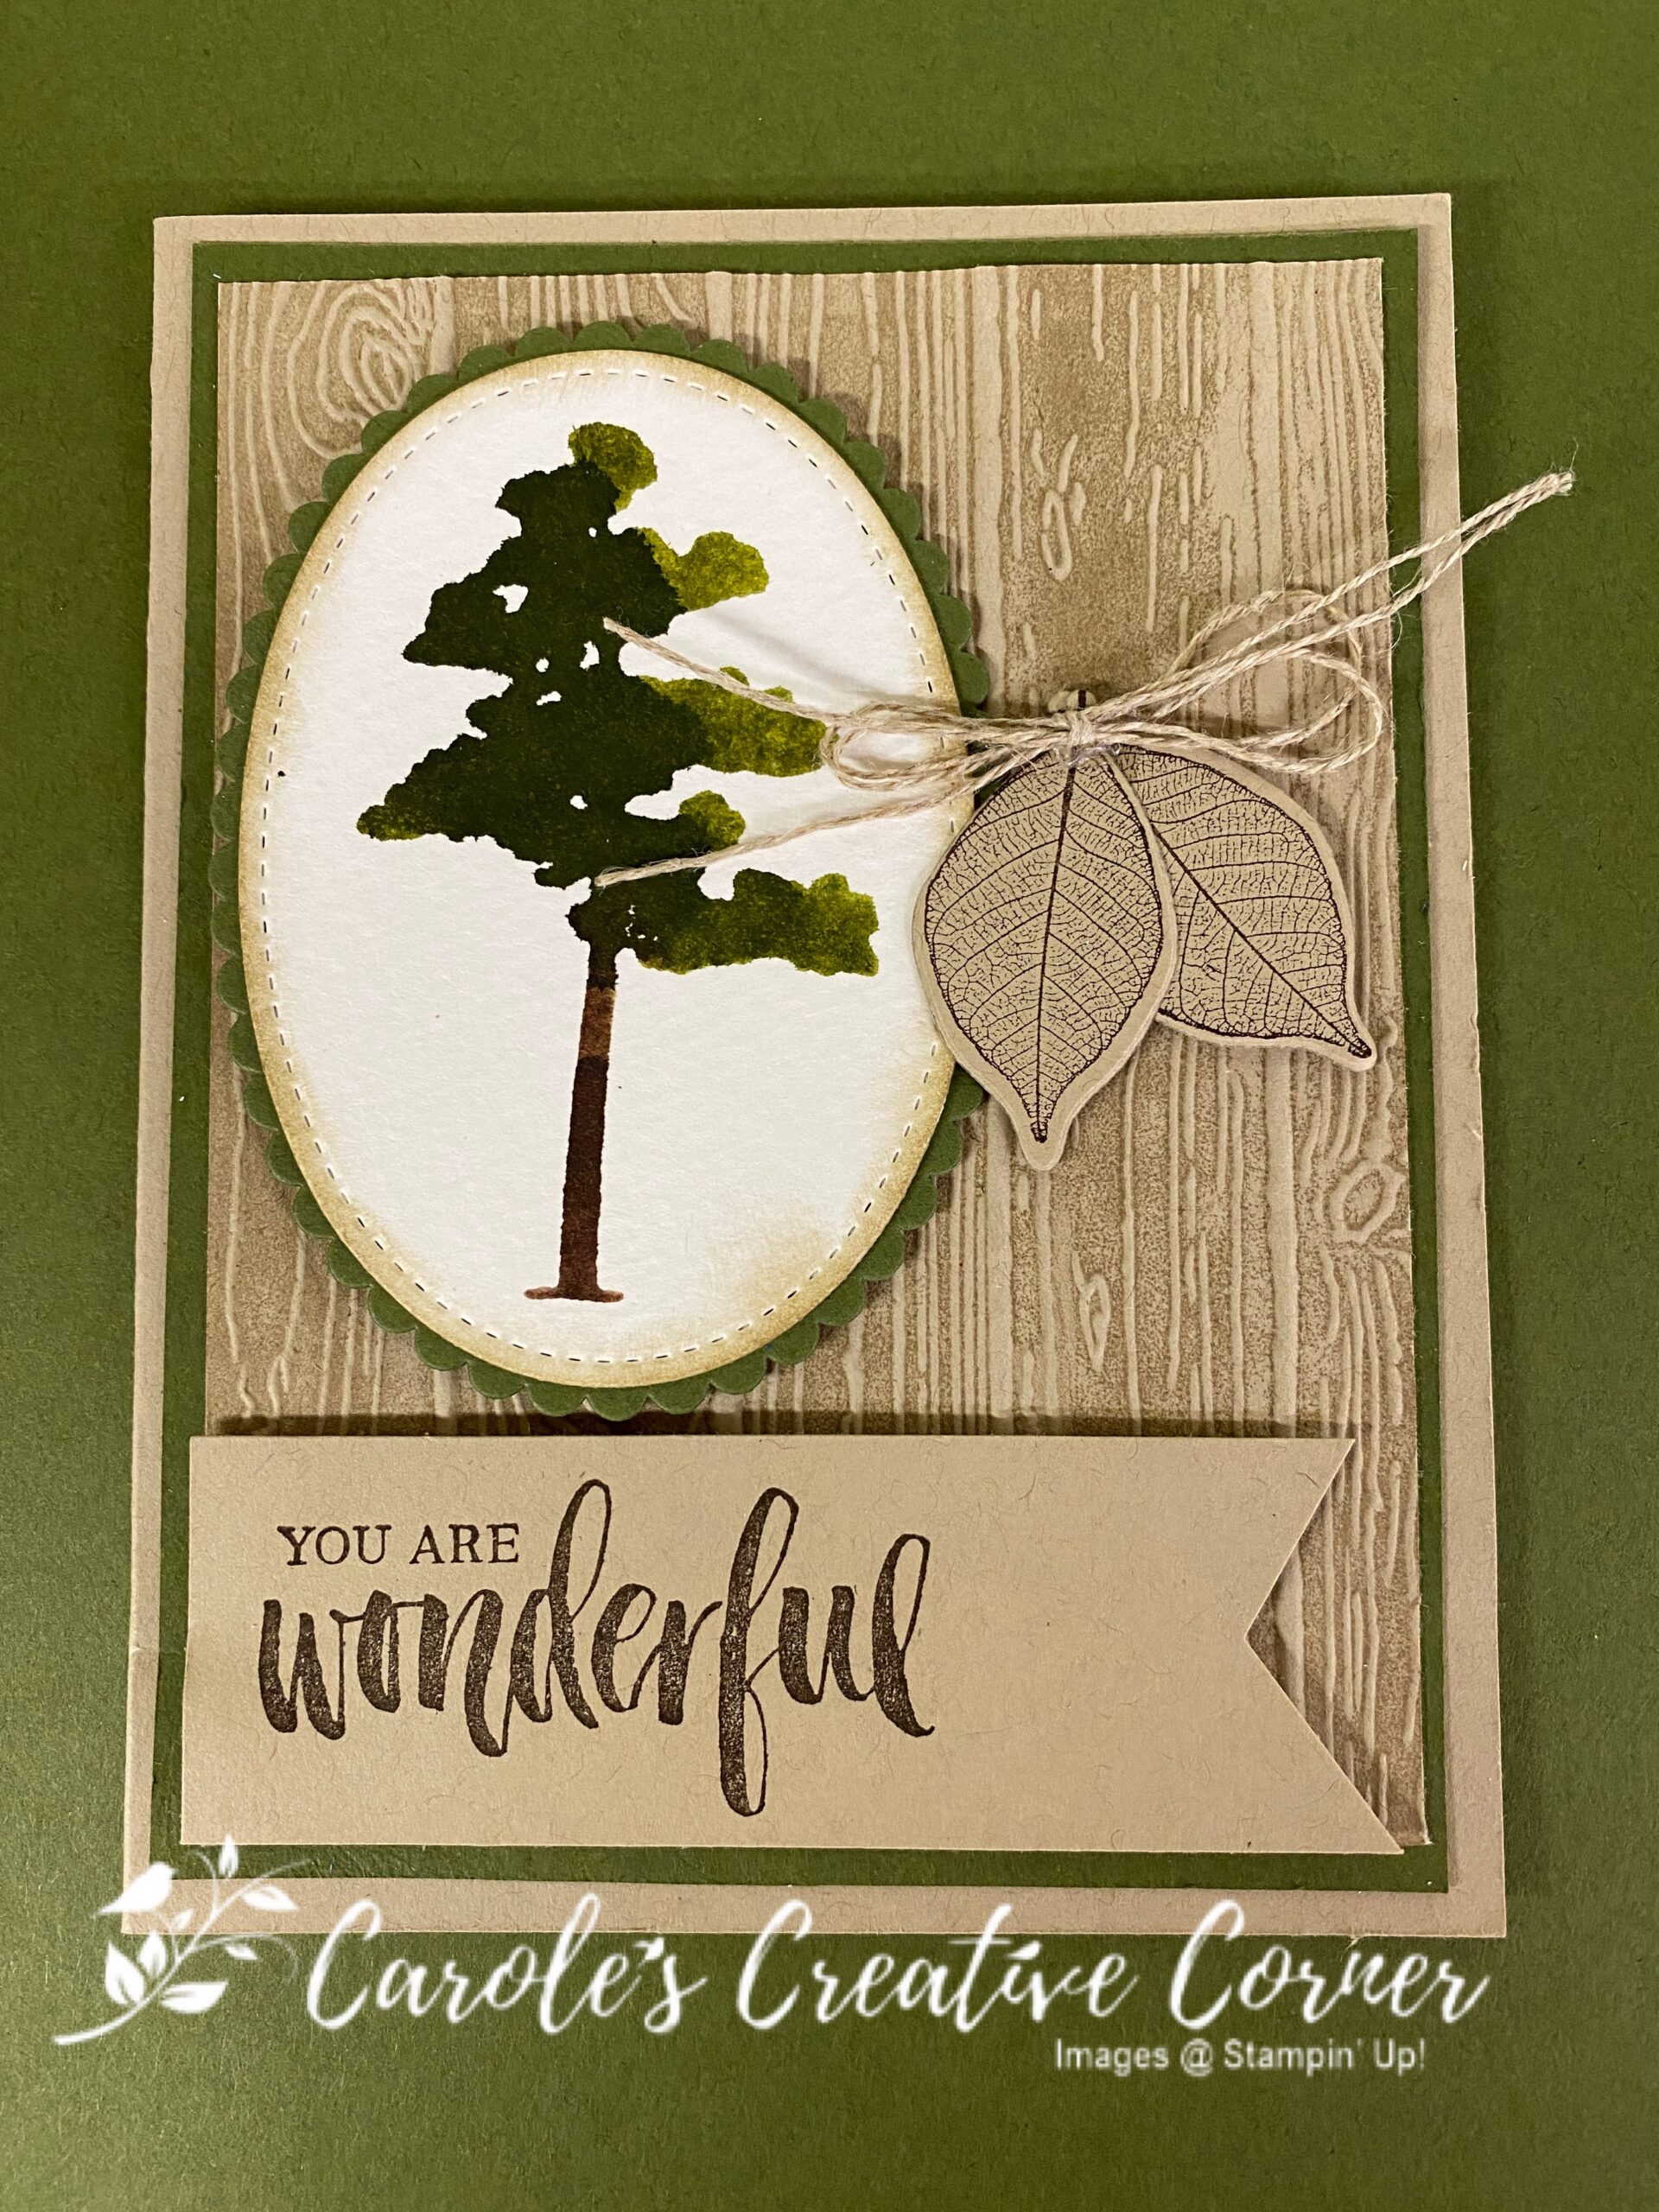
Watercolor is one of my favorite effects, although I cannot do it justice when I try to freehand it. This Rooted in Nature card uses an easy watercolor technique that you can use with any stamp.
Measurements:
Crumb Cake Cardstock: 5.5″ x 8.5″ scored at 4.25″ along the 8.5″ side; (1) 3.75″ x 5″, (1) 1.25″ x 4″, scrap for leaves Mossy Meadow Cardstock: (1) 4″ x 5.25″, (1) piece for scallop Watercolor Paper for stitched oval
Directions:
Fold Crumb Cake card base on score line and burnish.
Adhere Mossy Meadow layer to front of Crumb Cake card base.
Lightly Ink inside of Woodland embossing folder on the inside of the folder with the Stampin’Up Emblem with Crumb Cake ink, just so the raised portions of the embossing folder are inked. Lay 3.75″ x 5″ layer of Crumb Cake cardstock inside the embossing folder on the inked side and run through embossing machine.
Adhere and center the embossed crumb cake layer on top of the Mossy Meadow layer.
Stamp 2 leaves in Early Espresso ink and die cut. Die cut with the largest scalloped oval using Mossy Meadow cardstock. Die cut with the largest stitched oval using the watercolor paper.
Ink the tree in Mossy Meadow ink and spray 2 spritz of water onto the stamp then stamp on the watercolor paper. Let dry.
Use a sponge dauber inked in Crumb Cake ink to apply a soft edge of ink around the edges of the oval watercolor paper.
Adhere oval watercolor paper to Mossy Meadow scallop oval. Use dimensionals to apply the layered ovals to the left upper front of the card.
Use dimensionals on the back of the 2 leaves and arrange on front of card as shown. Apply linen thread bow to top of leaves with glue dot.
Stamp sentiment on the 1.25″ x 4″ piece of Crumb Cake in Early Espresso ink. Use banner punch on right edge. Apply with dimensionals to bottom front of card.
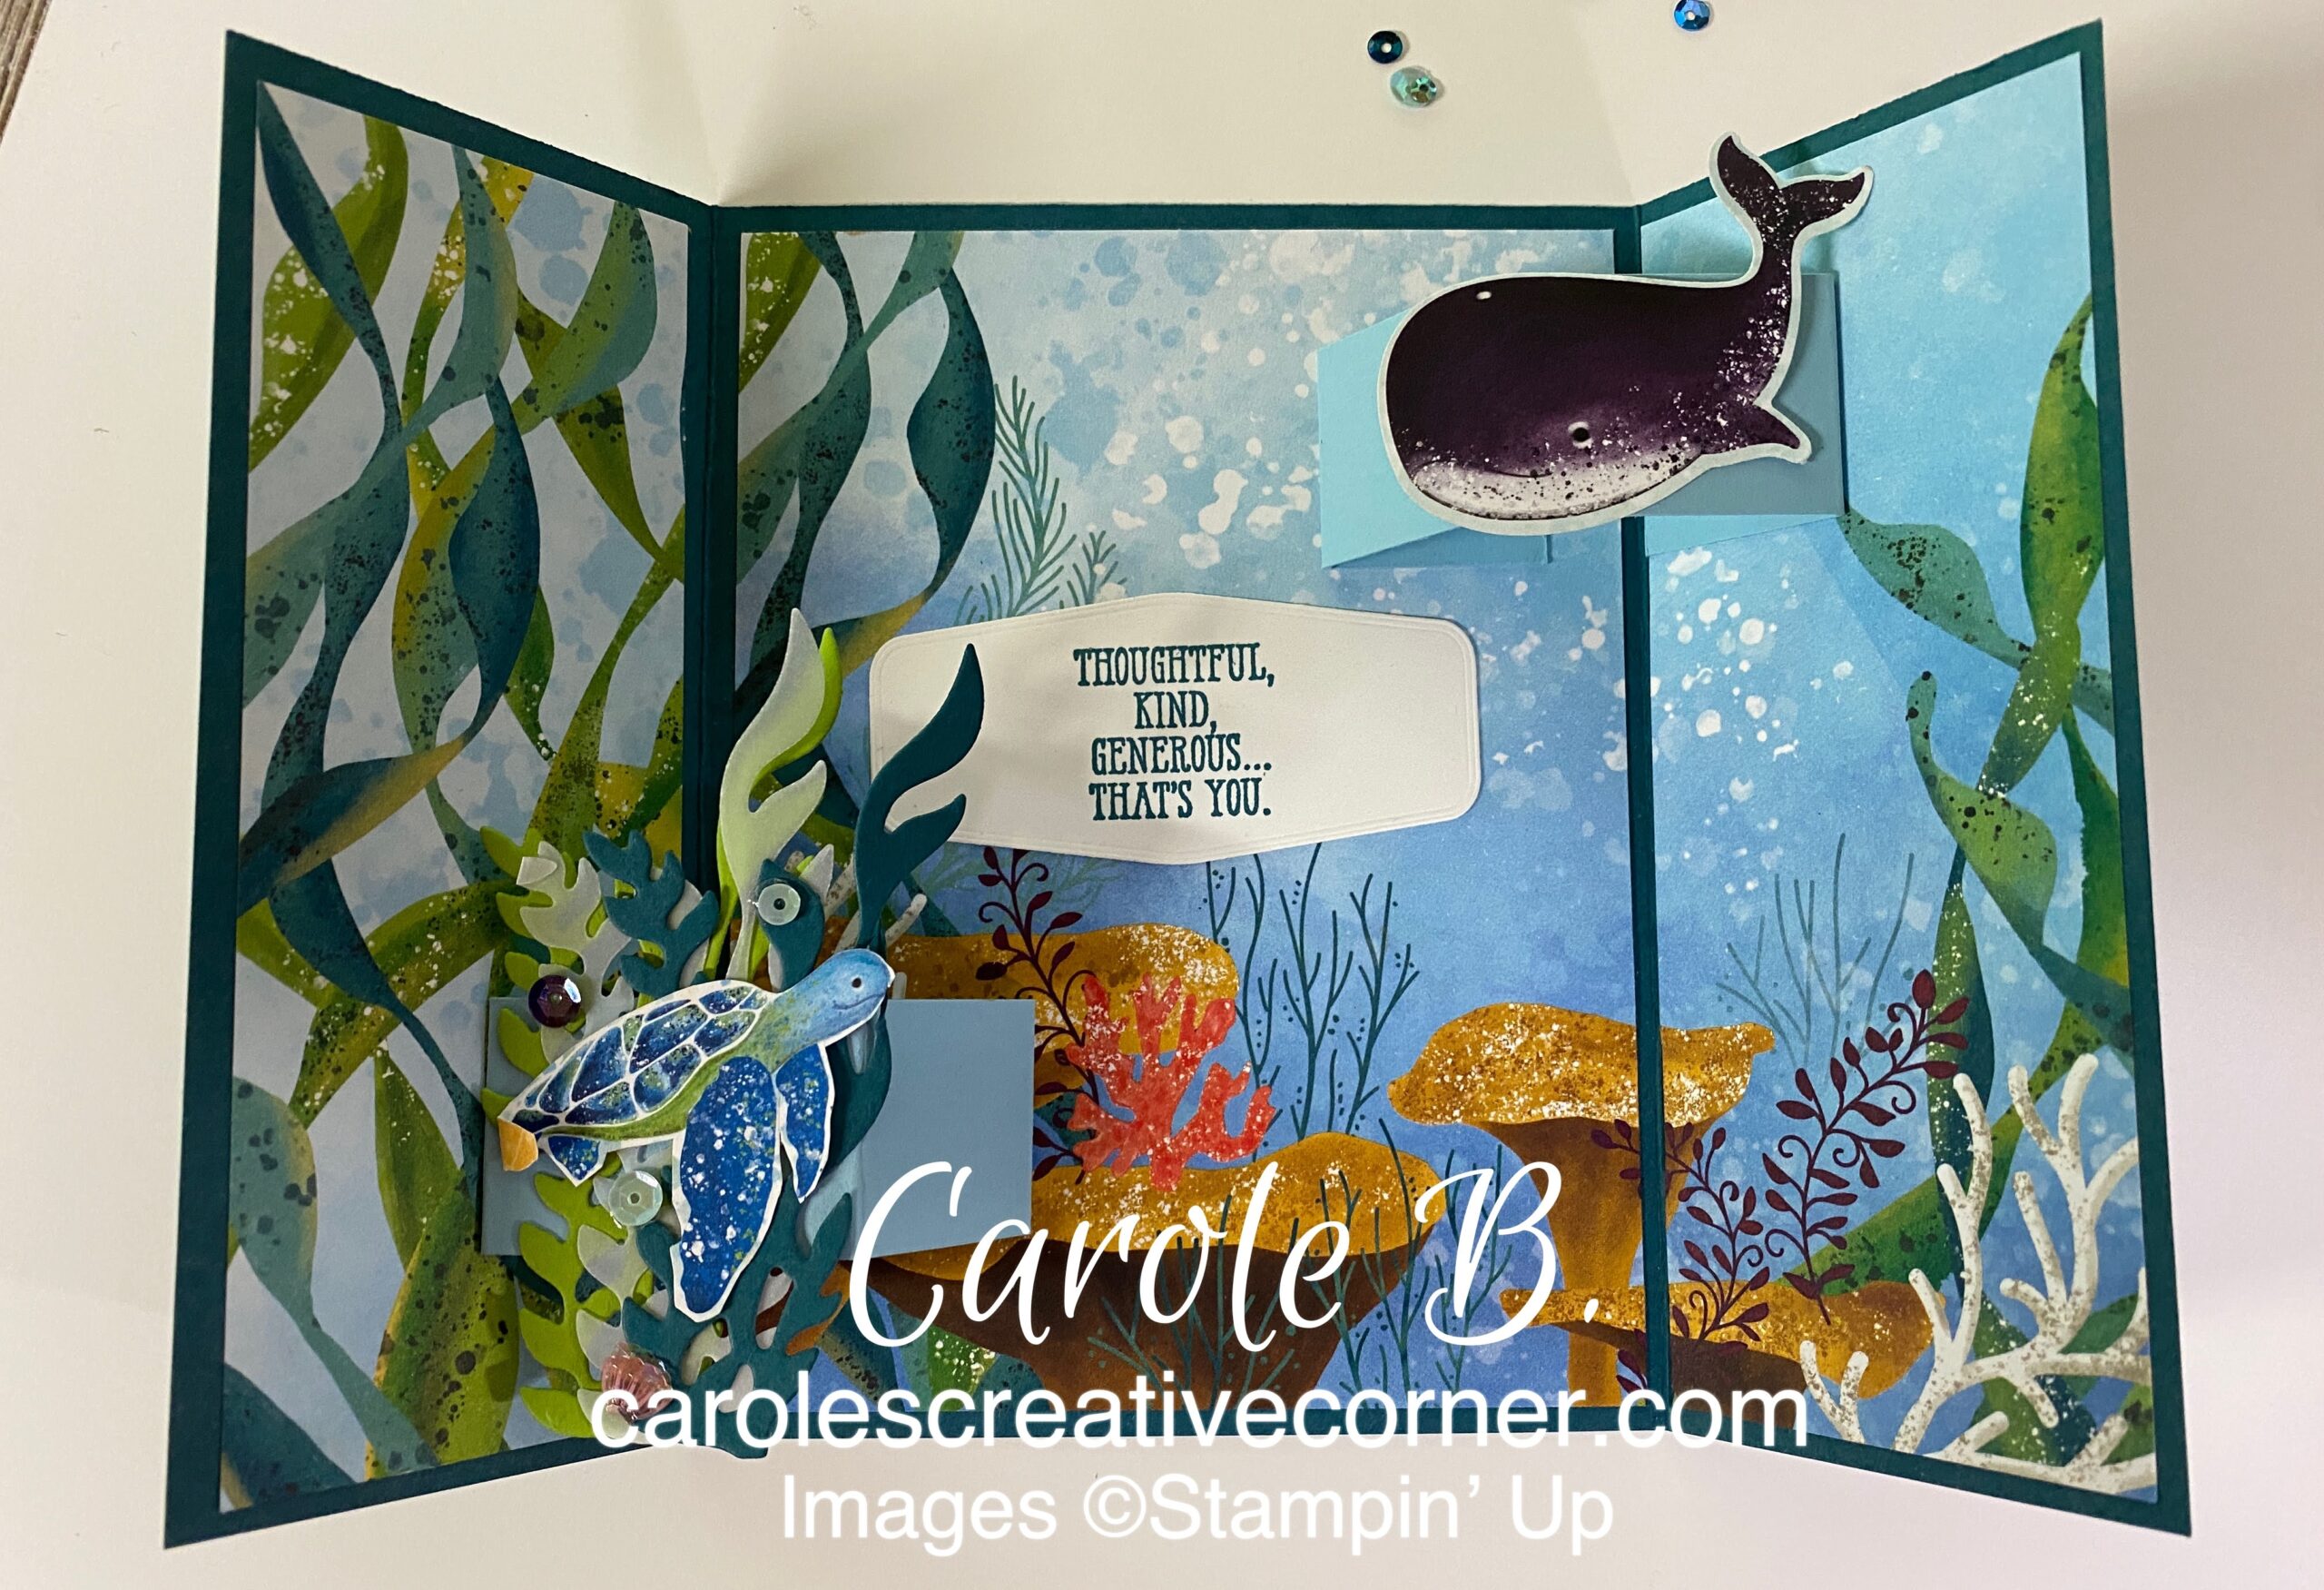
It’s so fun and easy to create an ‘under the sea’ scene with Stampin’ Up’s Whale Done bundle and coordinating paper. When you add the coordinating sequins, it creates a beautiful sparkle to the card. Open the doors of this gatefold card and it reveals some floating under the sea creatures!
Pretty Peacock Base cardstock: 8.5″ x 5.5, scored” at 2 1/8″ and 6 3/8″; cardstock for 2 seaweed die cuts and spout from punch; (1) 10.75″ x 1.25″ scored at 2 1/8″ and 6.5″ along 10.75 edge for belly band Balmy Blue cardstock: (2) 1″x4.5″ scored at 1″, 2.5″, & 3.5″along the 4.5″ edge for arms, (1) piece for label Whisper White cardstock: (2) pieces for greeting label Whale of a Time Designer Series Paper: (3) 2″ x 5.25″ of the seaweed print; (1) 4″x5.25″ and (1) 2″x5.25″ cut consecutively from one of the scenic patterns Granny Apple Green for seaweed die cut Vellum for seaweed die cut
Directions:
Fold card base on score lines so that doors form on the front of the card.
Adhere the seaweed patterned designer series paper to door fronts.
Adhere the designer series paper to the inside, with the 4″x5.25″ scene in the center panel.
Fold the 2 Balmy Blue 1″x4.25″ strips in the same direction along all the score lines. Fold each end toward center and and apply adhesive (tear and tape is recommended) See Figure 1 example.
Figure 1: Example of how to fold the arms and apply tear and tape.
Apply Balmy Blue arms to inside of card where desired. This card shows one arm in the lower left and one in the upper right. To do this, take off tear and tape adhesive on the end by the longest section of the arm strip. This end will be applied to the inside panel next to the score line. (See Figure 2.) Take tear and tape of the other end and apply to center panel of card base by lying arm flat (so 2 scored sections show on the top) and the taped end tucked under and tape facing card base. Repeat for second arm.
Figure 2: Example of how to apply the arm
Decorate arms. Fussy cut a turtle from the designer series paper. You can punch a whale from the designer series paper, as shown in this card, or stamp one in pretty peacock and then punch out using whale punch. Die cut 6 seaweed: 2 each from vellum, 2 from Granny Apple Green cardstock, and 2 from Pretty Peacock cardstock. Adhere 3 seaweed to the lower arm and adhere the turtle on top. Adhere sequins as desired. My video showed applying the sequins with a glue dot and using the Take Your Pick tool to position on card. Adhere the whale to the upper right arm.
Belly band: Burnish scored lines of belly band, and wrap band around card so ends overlap in the front of the card and small end is on top. Adhere belly band ends together. Die cut a Balmy Blue label and 2 white labels. Stamp sentiments on white labels using Pretty Peacock ink. Add Balmy Blue label to front of belly band with dimensionals. Add white label with front sentiment on top of Balmy Blue label. Decorate with 3 seaweed, a punched whale adhered with dimensionals, and a spout made from whale punch and Pretty Peacock paper. Add sequins as desired. Adhere inside sentiment to inside of card. Enjoy your ‘under the sea’ scene!
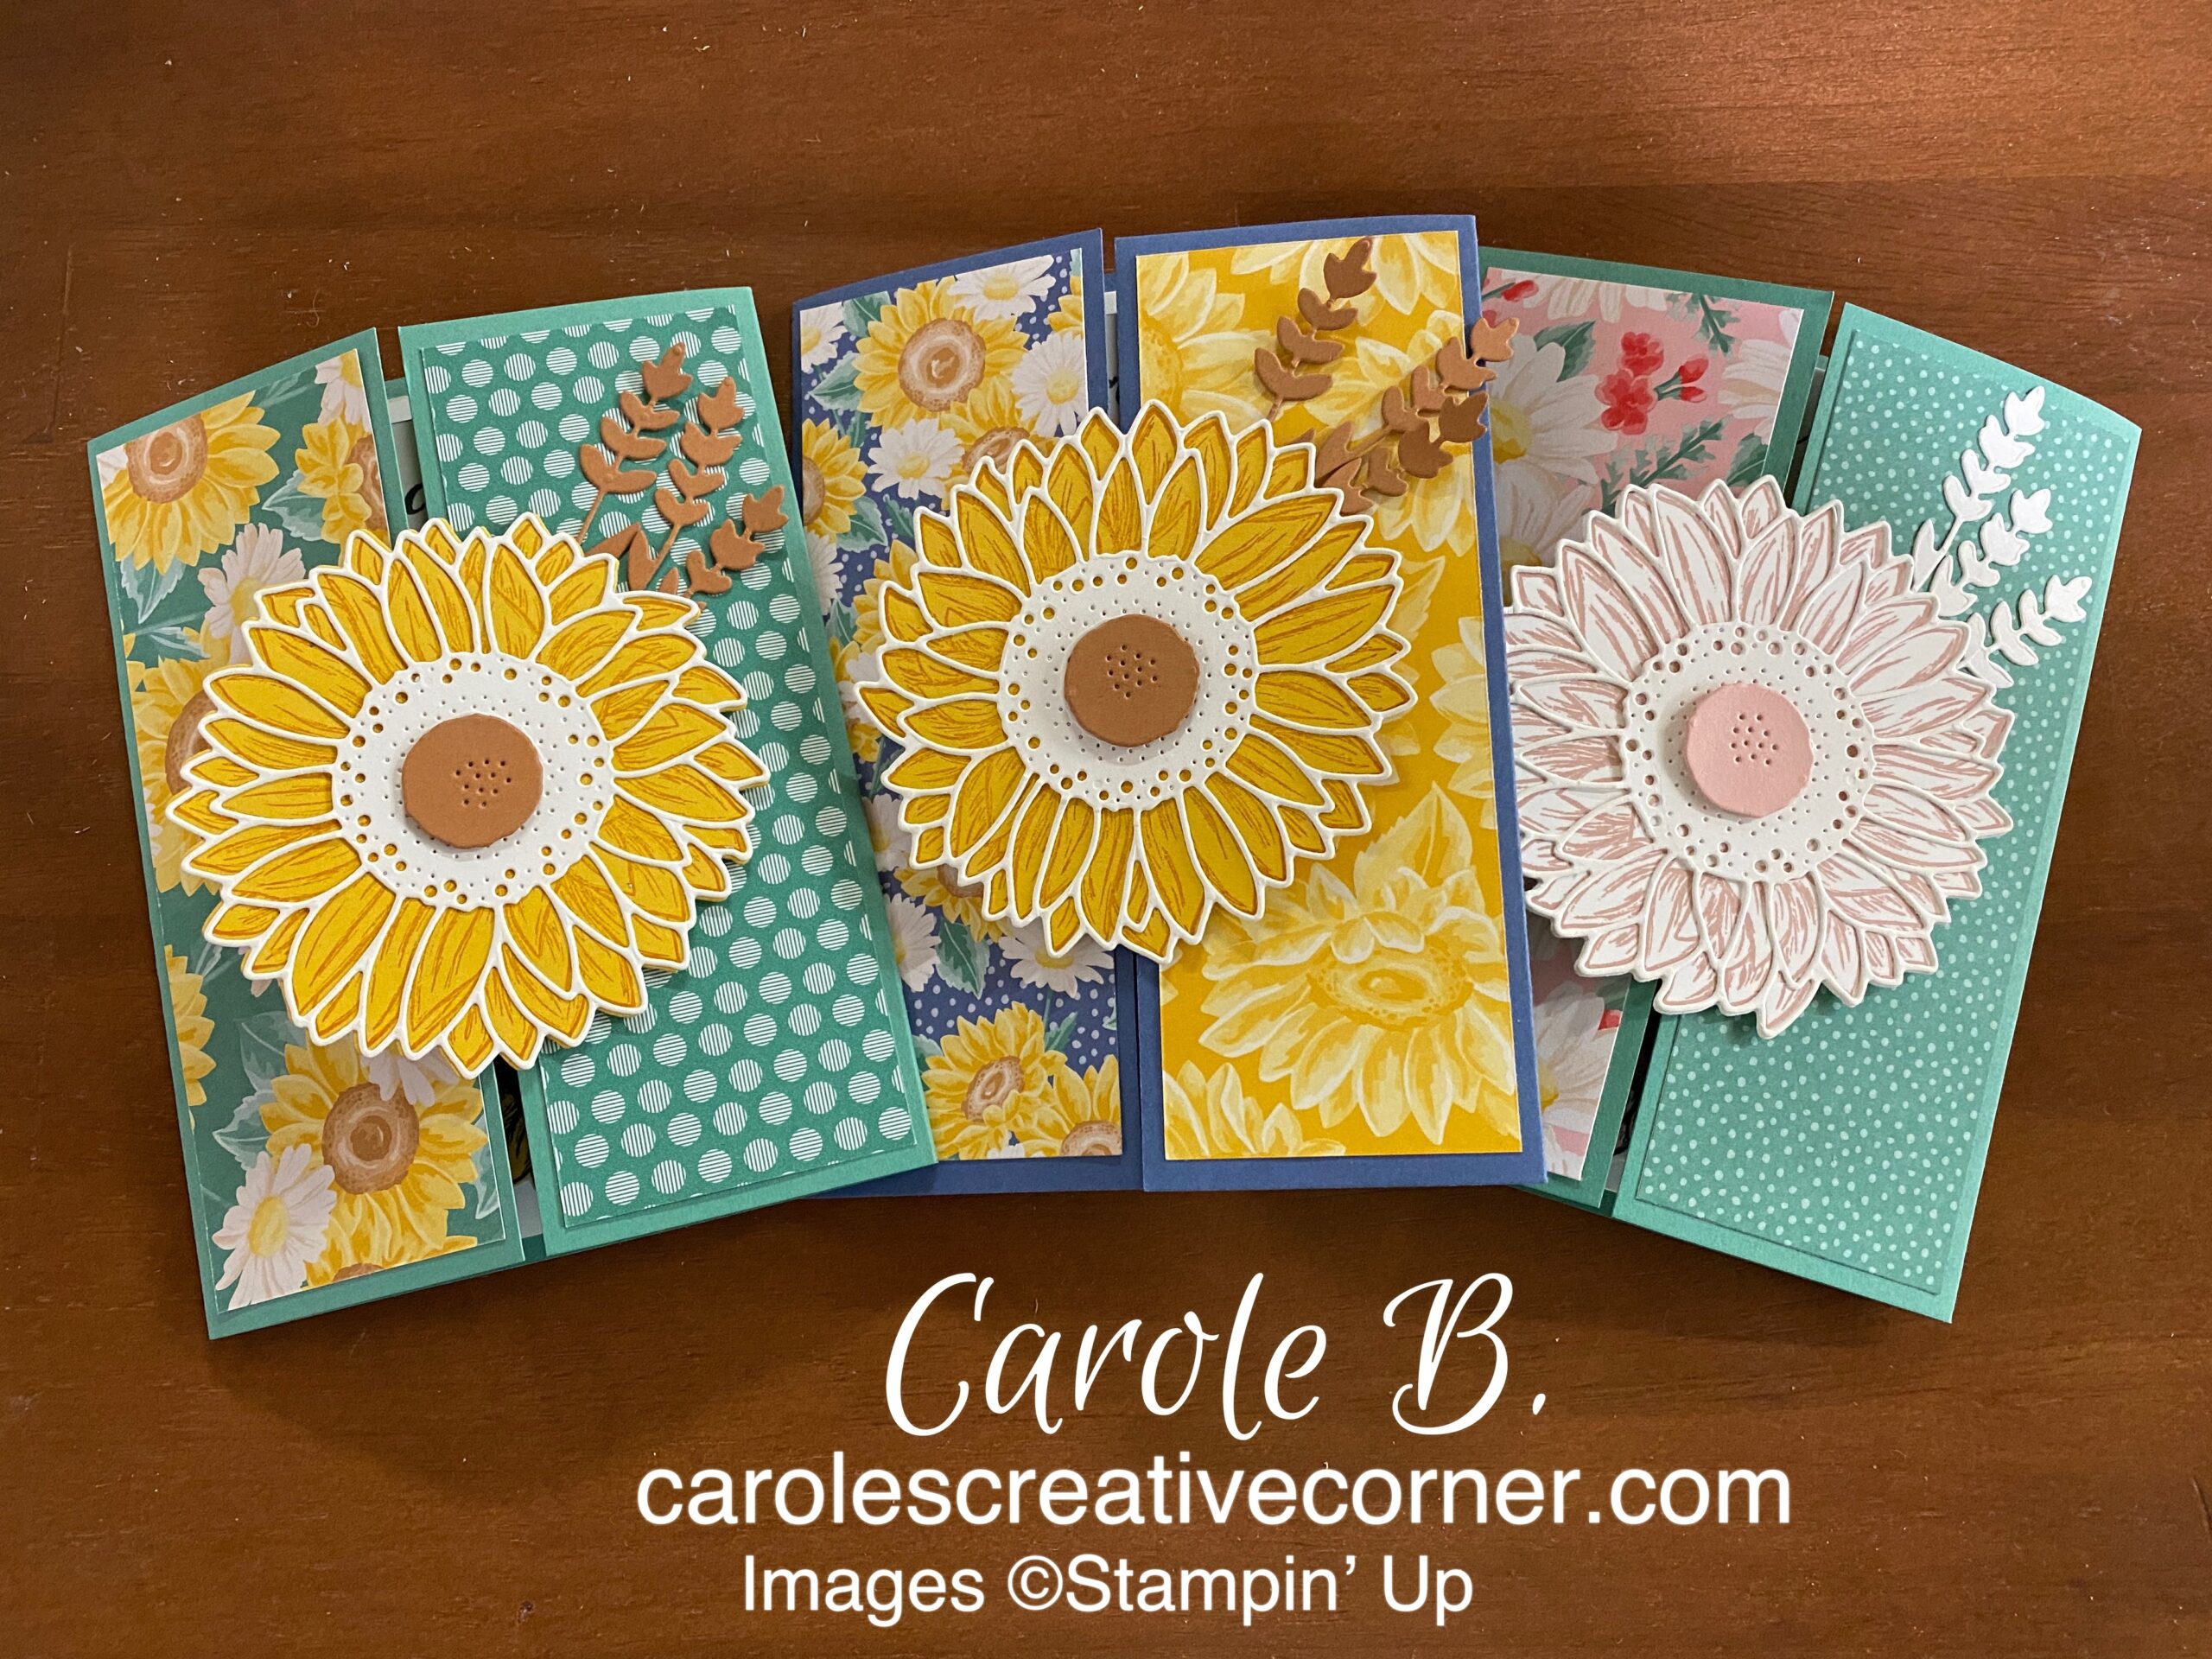
Make a gatefold card using the Stampin’ Up Celebrate Sunflowers bundle with a floating sentiment and a sunflower flower on the inside! A fun surprise for the recipient. This is such a versatile technique for any occassion. Learn how easy it is to make this card with the attached tutorial.
Celebrate Sunflower Floating Gatefold Card
Measurements (using Misty Moonlight example, center card in photo):
Base Cardstock (Misty Moonlight): 8.5″ x 5.5, scored” at 2 1/8″ and 6 3/8″, 1″x4.5″ scored at 1″, 2.5″, & 3.5″ Flowers for Every Season Designer Paper: (2) 2″ x 5.25″ Whisper White cardstock : 4″ x 5.25″, 3.5″x 3.5″ for sunflower outline Bumblebee cardstock: 3.5″x3.5″ for sunflower base Cinnamon Cider cardstock piece for sunflower center and sunflower leaves
Directions for Celebrate Sunflowers:
Fold card base on score lines so that doors form on the front of the card.
Add designer series paper to door fronts.
Put adhesive on the back of the leaves, and fit the leaves behind the sunflower.
Next, stamp the sunflower in Misty Moonlight ink then die cut. Die cut the sunflower outline from white paper and adhere to the front of sunflower base. Tip: Use adhesive sheets on the white card stock for the sunflower outline before die cutting; this makes it easy to apply to sunflower base. Find the 3 curved petals on sunflower for easy alignment (See Figure 1). Die cut sunflower center and adhere sunflower center with a dimensional.
Figure 1. Line up sunflower outline die cut using 3 currved petals as starting point.
Put 3 dimensionals (in a triangle formation) on the right door of front of card near center where sunflower will be applied. Center and apply sunflower to front of card.
Stamp sunflower in Bumblebee ink in the center of the 4.5″x5.25″ white cardstock and adhere to the center panel on the inside of the card.
Fold in the same direction along all the score lines on the 1″x4.5″ arm strips. Fold each end toward center and and apply adhesive (tear and tape is recommended). (See Figure 2)
Figure 2: Apply tear n tape to arm strips
Apply arms to inside of card, where desired. Take off tear and tape adhesive on the end by the longest section of the arm strip. This end will be applied to the inside panel next to the score line. (See Figure 3.) Take tear and tape of the other end and apply to white cardstock. Repeat for second arm.
Figure 3: how to apply arms to inside of card
Stamp sentiment in memento ink and apply to the top of one of the inside arms. Stamp, die cut and color with blends the small sunflower and adhere to the other inside arm.
Today’s project is a sneak peek of new products that will be available starting June 3 with the launch of the 2020-2021 Annual Catalog! It’s a quick & easy card layout featuring the new 2020-2022 In Colors! I couldn’t stop at just one, so I created 5 cards with a similar layout!
Here are closeups of each of the cards with the beautiful new colors:
Misty MoonlightIn Color
Magenta Madness In Color
Just Jade In Color
Bumblebee In Color
Cinnamon Cider In Color
The sentiment comes from the To a Wild Rose stamp set and is stamped with black Momento ink. The flowers used were from To a Wild Rose and the new stamp set coming on June 3rd called Celebrate Sunflowers and cut using the coordinating die set.
The Flowers for Every Season Designer Series Paper coordinates with all 5 new In Colors–isn’t that fabulous? I added 2′ x 5.5″ strip to each of the cards in a coordinating pattern framed by a 2.25 x 5.5″ black cardstock.
Here are a few more examples using different colored flowers (note: the sunflower is die cut from So Saffron card stock):