Tag: cardmaking

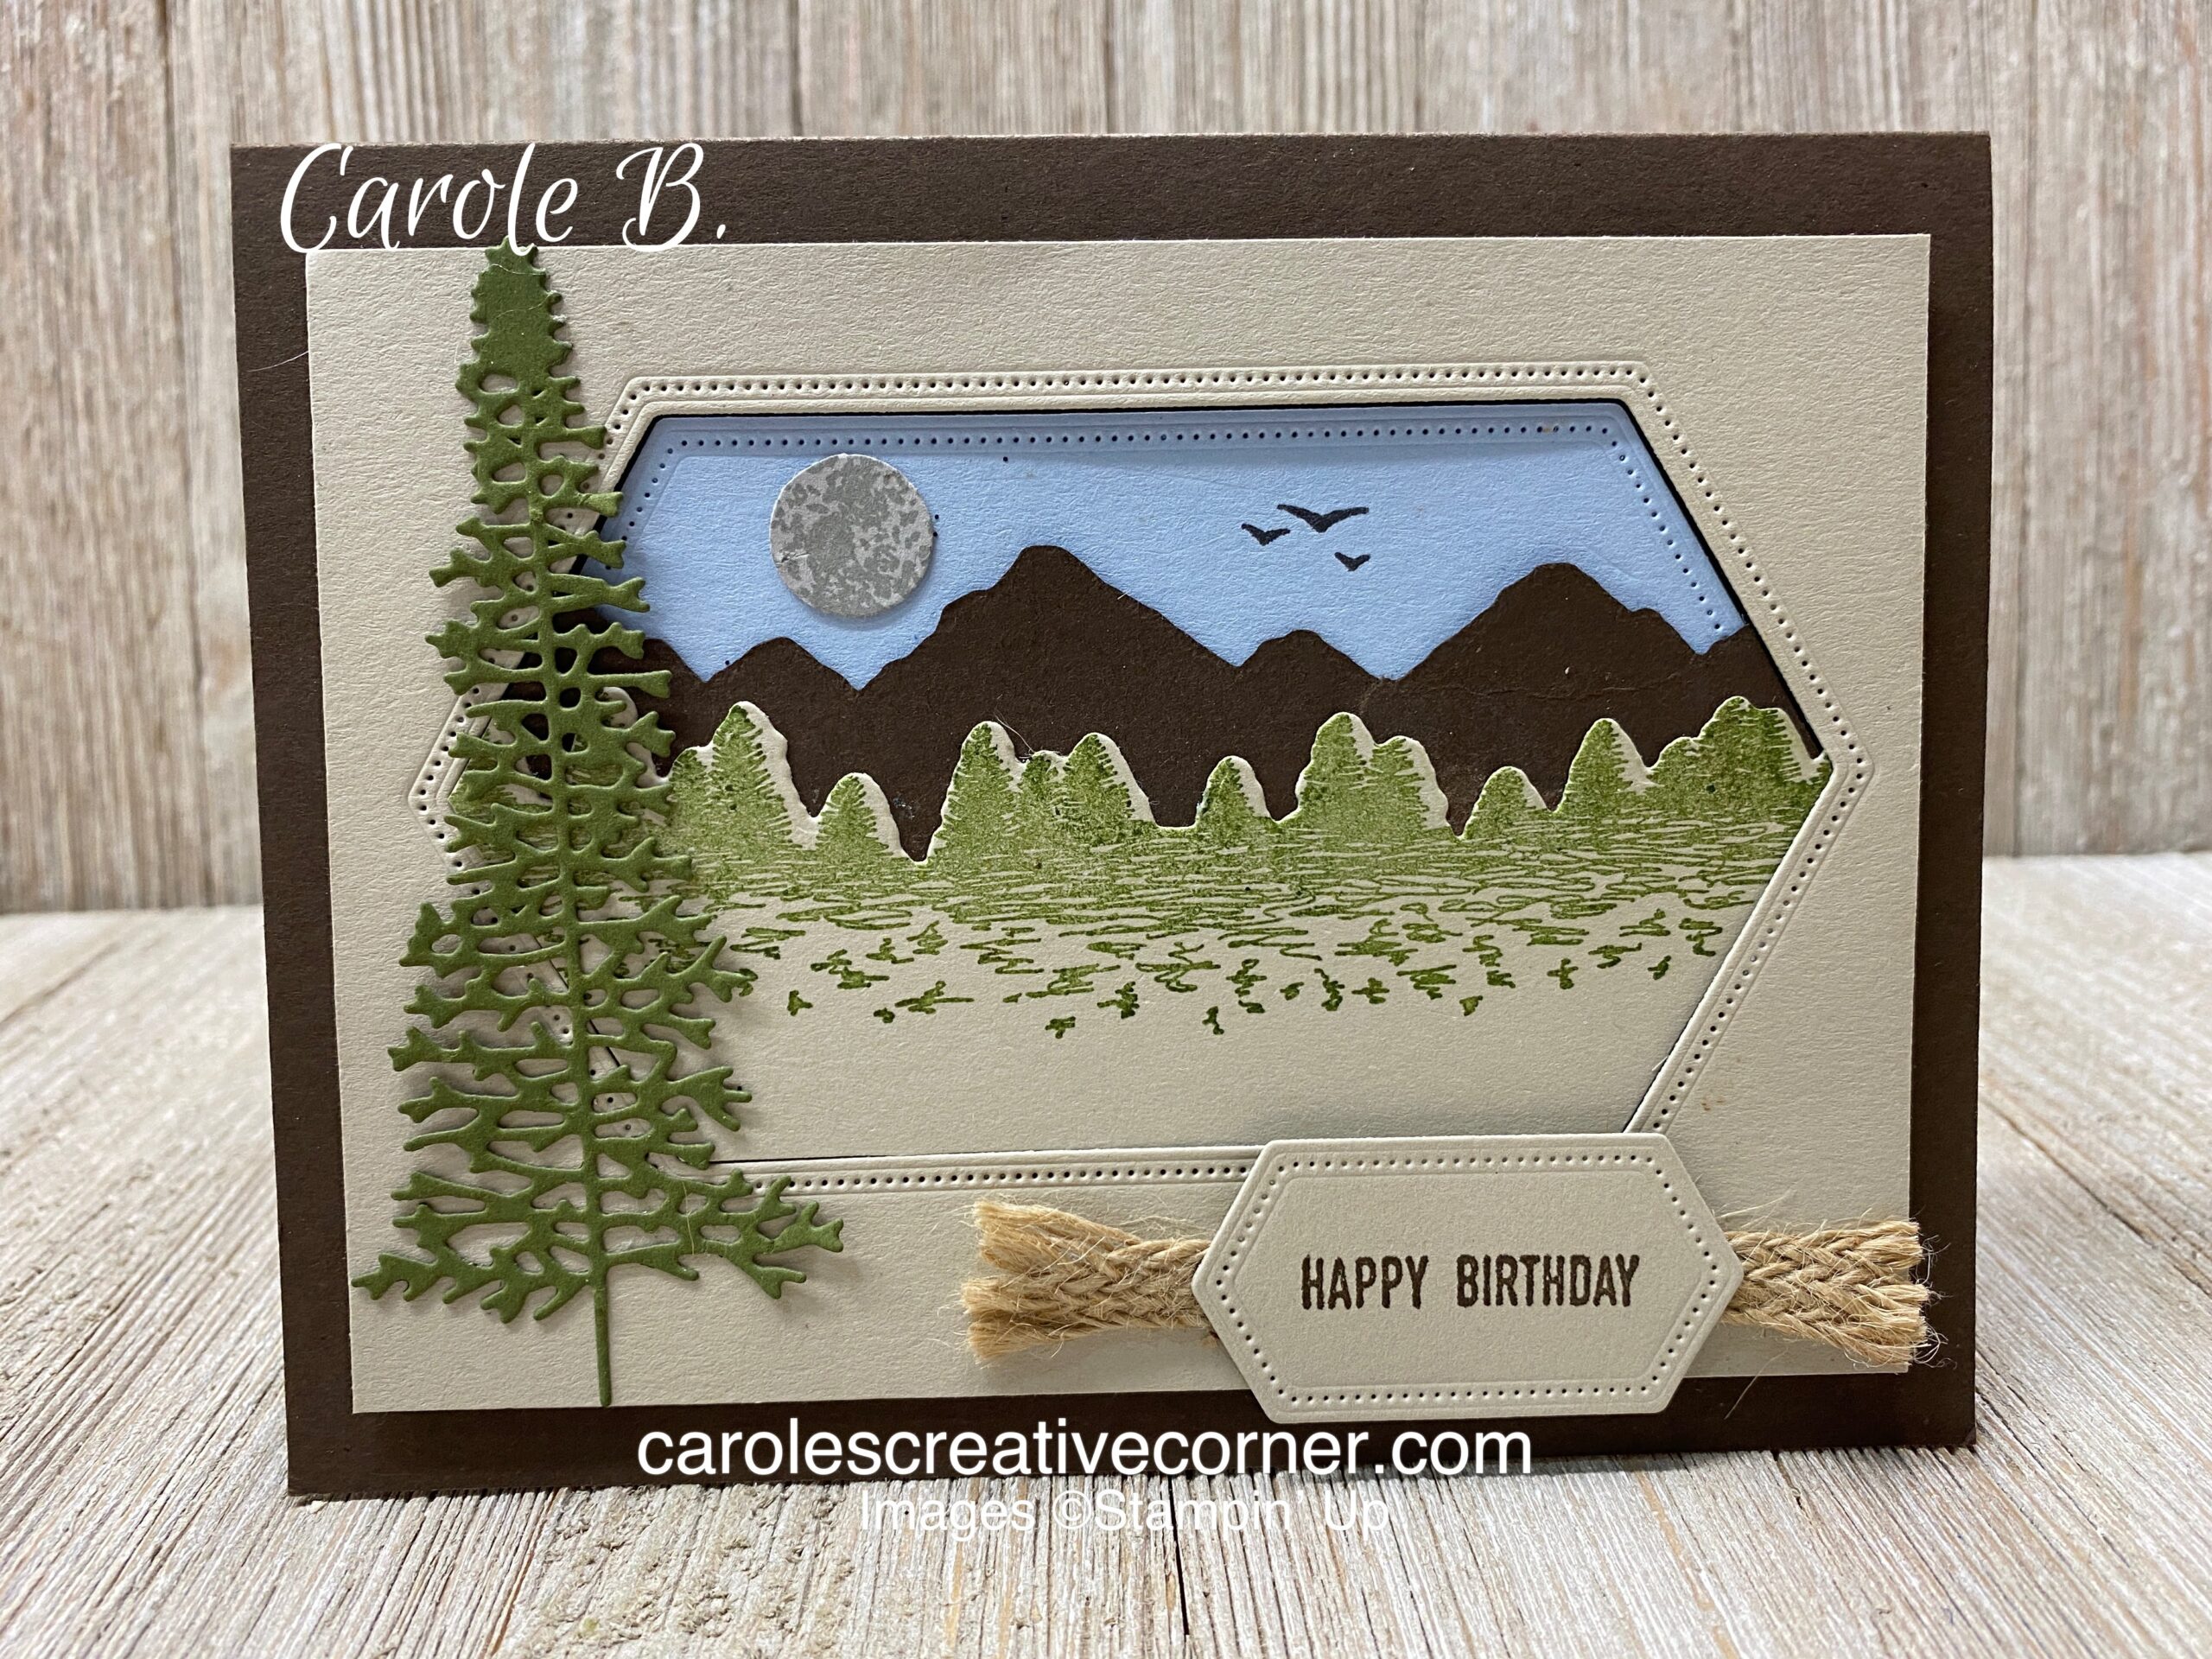
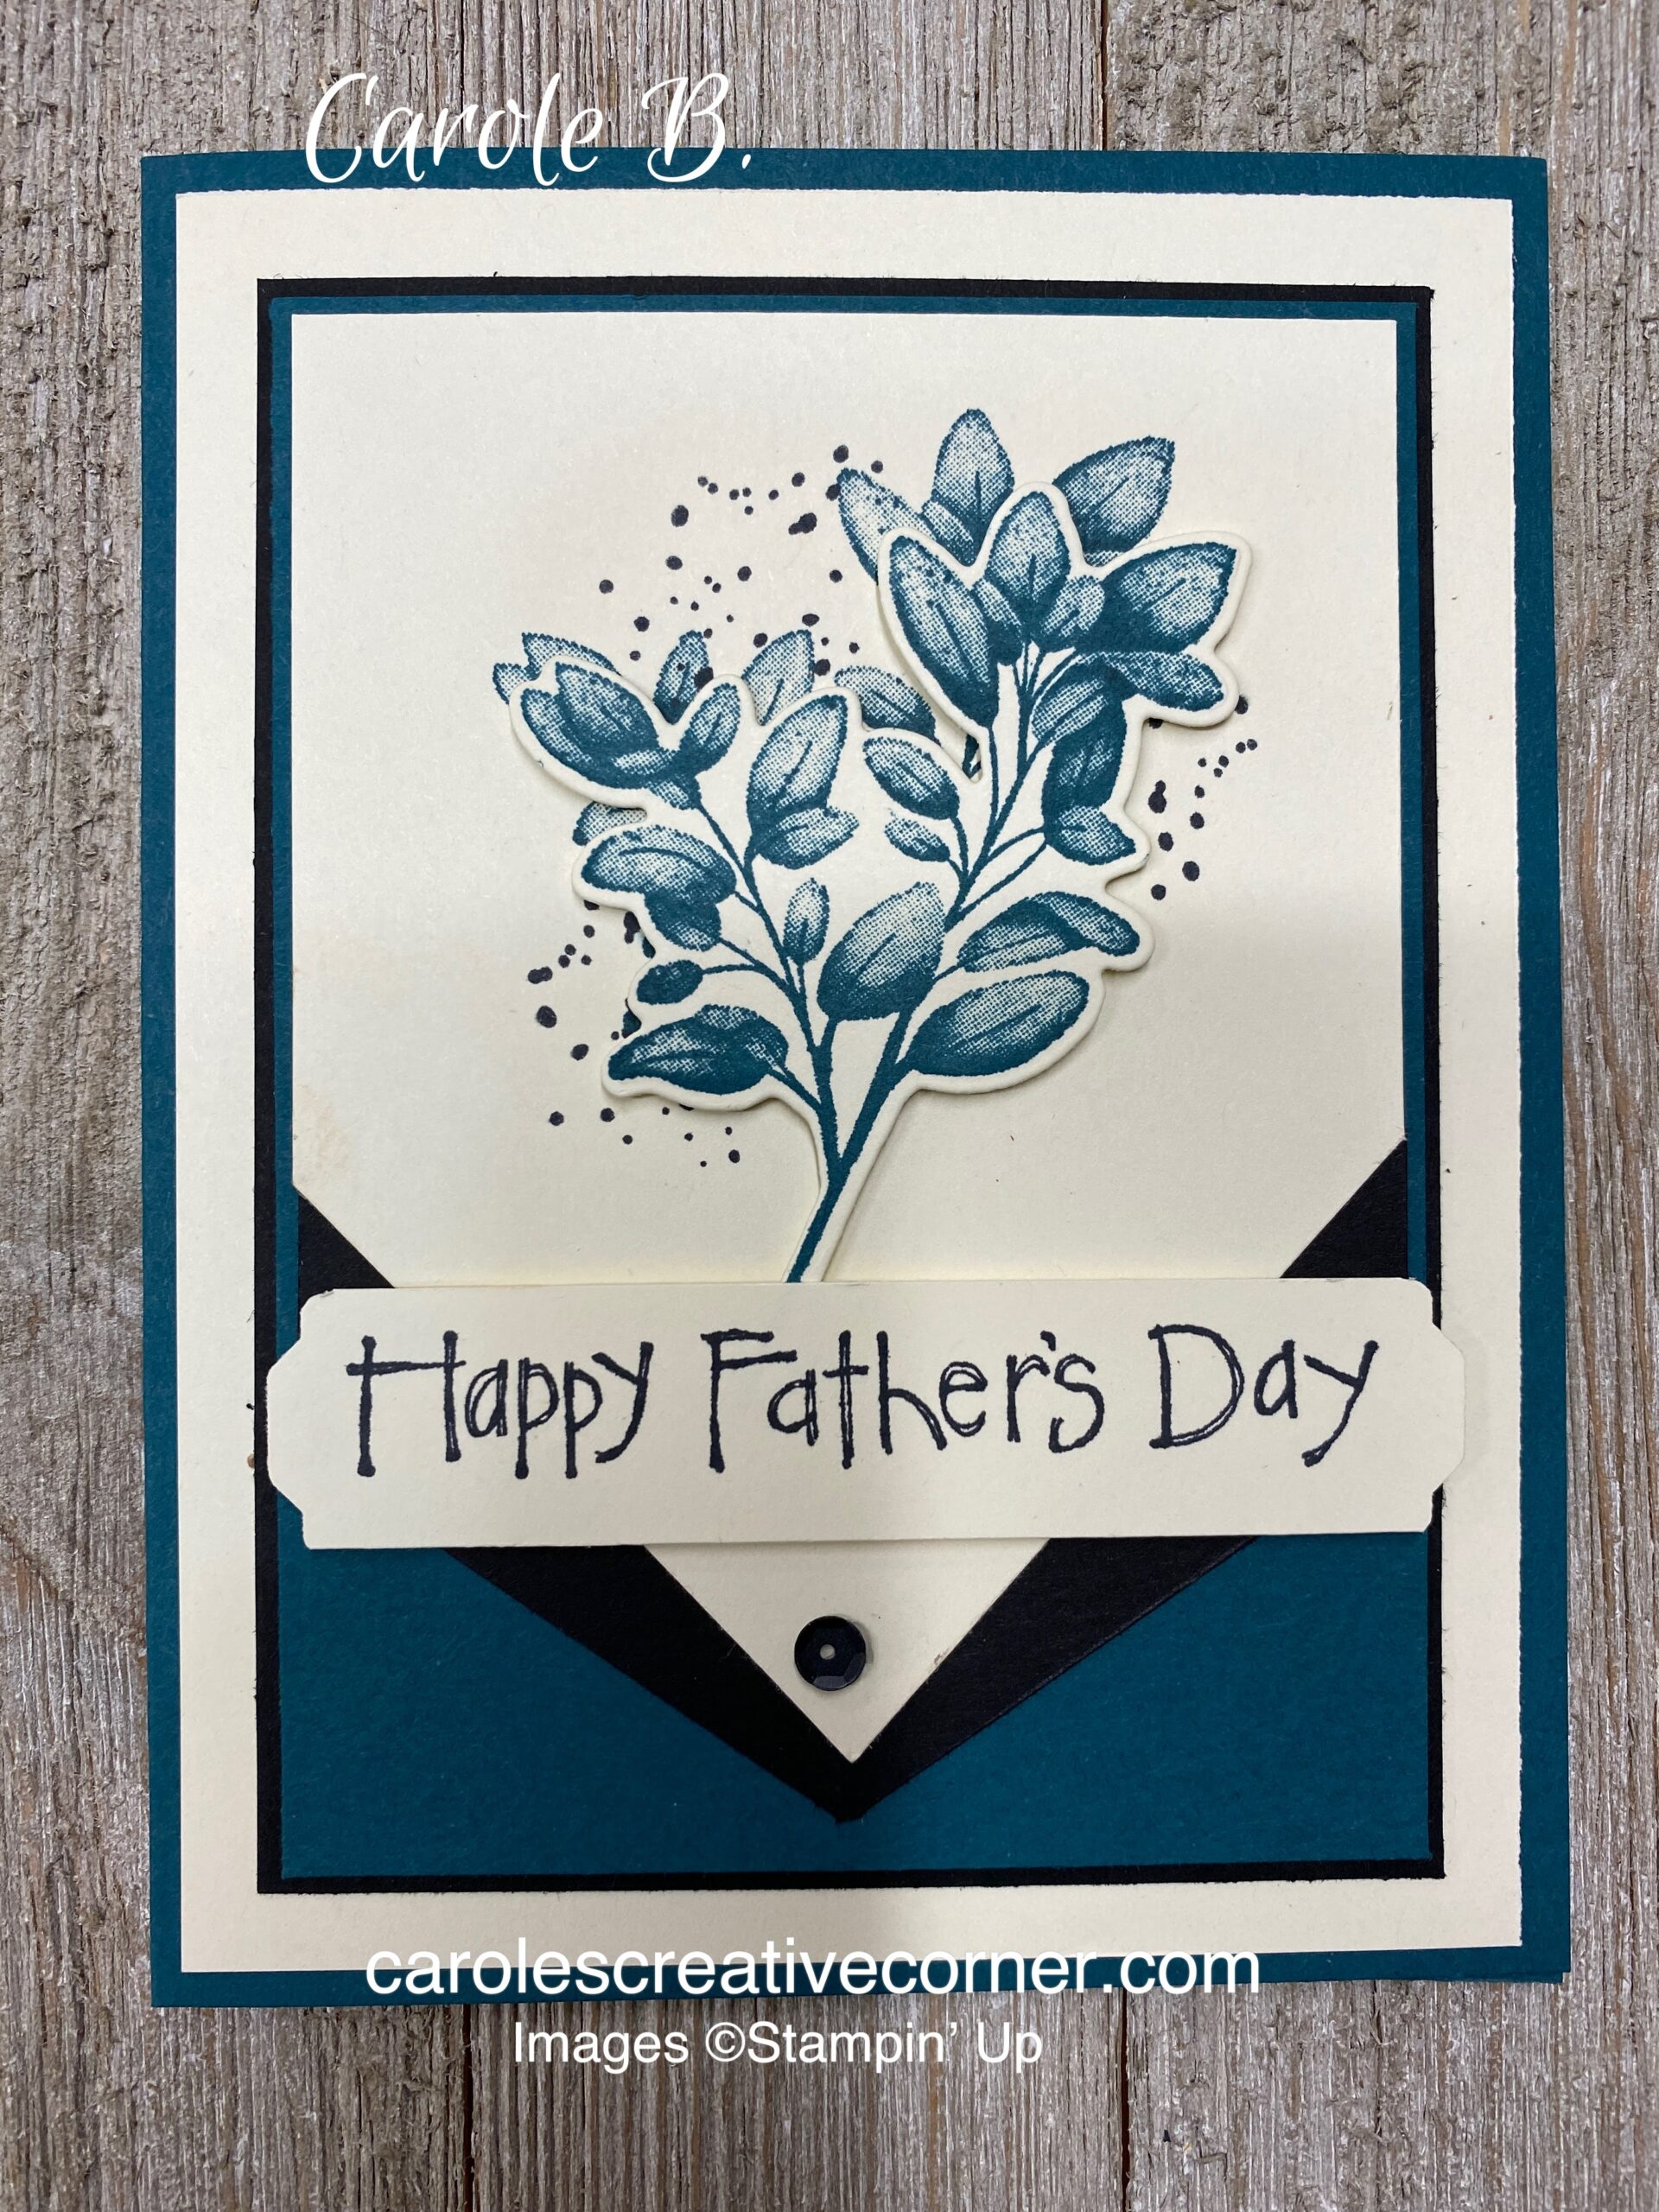
Forever Fern: Stampin Up Masculine/Father’s Day Card

With just a little extra measuring and cutting on your paper trimmer, you can make this striking card layout for any occasion–just change the sentiment. Because this layout is tailored, it makes a great Father’s Day card. The Forever Fern bundle and coordinating dies are a great set for making a Stampin Up masculine card for any occasion…the foilage is so beautiful! Its easy to add branches and leaves as an accent to any card using the coordinating dies. Click Here to check out my Pinterest board for more inspiration using this fabulous set!

Measurements:

  • Very Vanilla Cardstock: (1) 3.25″ x 4.25″; (2) 4″ x 5.25″; (1) 3/4″ x 3 3/8″ strip for sentiment, piece of for stamped branch image
  • Pretty Peacock Cardstock: 5.5″ x 8.5″, scored at 4.25″ on the 8.5″ side; 3 3/8″ x 4 5/8″
  • Basic Black Cardstock: 3.5″ x 4.75″; 2″ x 3.25″

Directions for Stampin Up Masculine Card:

  1. To make a point on the black 2″x 3.25″ cardstock: With a pencil, mark 1″ on each side of the 2″ side of the cardstock. Mark 1 5/8″ in the center of the 3.25″ side. Place paper in paper trimmer at a diagonal in the cutting groove so that it cuts from the 1″ mark to the 1 5/8″ mark. Repeat for the other side.
  2. To make a point on the vanilla 3.25″ x 4.25″ cardstock: With a pencil, mark 1.75″ on the 4.25″ on each side of the 4.25″ side of the cardstock. Mark 1 5/8″ in the center of the 3.25″ side. Place paper in paper trimmer at a diagonal in the cutting groove so that it cuts from the 1.75″ mark to the 1 5/8″ mark. Repeat for other side.
  3. Adhere the black cardstock with the point behind the vanilla with the point so edges are lined up side to side and enough black is showing.
  4. Stamp branch in Pretty Peacock on Vanilla piece with point then add black speckles in Momento ink around branch.
  5. Fold the Pretty Peacock card base and burnish the fold with a bone folder. Add the following layers in order:
    1. Very Vanilla 4″ x 5.25″
    2. Black: 3.5″ x 4.75″
    3. Pretty Peacock: 3 3/8″ x 4 5/8″
    4. Very Vanilla with Point (includes the black cardstock with point adhered from Step 3.)
  6. Stamp branch in Pretty Peacock on Very Vanilla and die cut. Put dimensionals on the back and adhere to front of card.
  7. Stamp sentiment on label strip then punch each end using the Pick a Punch. Mount dimensionals on back of sentiment and add to front of card.
  8. Add a black sequins to vanilla point using glue dot. If you don’t have black sequins, but you have a black blend pen, you can color any sequins to make it black!

Supplies used for Stampin Up Masculine/Father’s Day Card:


Stampin’ Up! Annual Catalog Kickoff Celebration – Extra Host Rewards For YOU!!

The brand new 2020–2021 Stampin’ Up! Annual Catalog is going live on June 3 2020, and Stamipn’ Up! is having a celebration!

Anyone who places an order of $250+ or holds a party with $250+ in sales during the month of June will receive $25 in extra Stampin’ Rewards!!  So that means that you’ll earn $50 in Stampin’ Rewards with any order or party of $250+ that is submitted between June 3 and June 30! Yay!!! Head over to my online store here to place your order!


Stampin’ Up! Pick A Free Bundle Starter Kit Promotion!!

Wow!!!  Stampin’ Up! is offering an AWESOME promotion if you join during the month of June!!  You get to pick a FREE bundle of your choice with your Starter Kit Purchase!!

Here are the details:

  • Joining promotion dates:  June 3–30, 2020
  • New demonstrators who submit their Independent Demonstrator Agreement (IDA) before June 3 or after June 30 will not be eligible for this promotion.
  • When you purchase your Starter Kit for $99, you get to select $125 worth of products of your choice for your Starter Kit PLUS you get to select ONE stamp and punch bundle (p. 168–169) or ONE stamp and die bundle (p. 173-179) from the new 2020–2021 Annual Catalog—in addition to your regular Starter Kit for FREE.  And your Starter Kit always ships for free…double bonus!!

You can see more details about joining and about our team here on my blog here.  You can also see more information about the benefits of becoming a Stampin’ Up! Demonstrator here.

That is such a great deal!!  If you’ve been considering joining, June will be a great time to jump in!  Drop me an email [email protected]


If you need any stamping supplies, I’d be very happy to be your Demonstrator.  Just click on the Shop Online button on the right side of the screen to go directly to my online store or drop me an email at [email protected] if you have any questions.  Happy Stamping!

  • Visit my online store here.
  • Shop the Clearance Rack here.
  • Shop My Personal Sales here.
  • Don’t forget to follow me on Instagram, Pinterest, YouTube, Facebook. Links at top and bottom of this blog!

Stampin Up Mountain Air: Handmade Card

Do you love the mountains? I sure do…I enjoy using this set to create a beautiful handmade card with a mountain setting! It makes a great masculine card or a great card for anyone who loves the mountains! What mountains does this card remind you of? I remember a trip with my Mom to Silverton, CO via the Silverton train to the mountains. It was our last trip together in 2011 and it is a treasured memory. She loved the mountains. She would have enjoyed making a card like this or receiving it!

Measurements:

  • Sahara Sand Cardstock: (1) 3.75″ x 5″; (1) 2″ x 5″ (treeline); (1) 4.25″ x 5″ (inside); 1″ x 1.75″ for label
  • Early Espresso Cardstock: 5.5″ x 8.5″ scored at 4.25″ along 8.5″ side; 2″ x 5″ (mountains)
  • Mossy Meadow Cardstock: 1.75″ x 4″ (trees)
  • Seaside Spray Cardstock: 2.75″ x 4.75″ (blue background)
  • Smoky Slate Cardstock: piece for 5/8″ circle punch
  • Twine: 3″

Directions for Mountain Air Handmade Card:

  1. Die cut using the 2nd largest nested die from the 3.75″x5″ Sahara Sand cardstock; you will not use the inside nested die.
  2. Die cut using the 2nd largest nested die from Seaside Spray cardstock; you will be using the inside die, not the outside.
  3. Die cut a label using the 2nd to smallest nested die from Sahara Sand cardstock. Stamp sentiment on label using Early Expresso ink.
  4. Die cut a tree from Mossy Meadow cardstock.
  5. Die cut large mountains from the Early Espresso Brown cardstock.
  6. Stamp trees using Mossy Meadow ink and then use tree line die cut to cut out top of trees.
  7. Stamp moon using Smoky Slate ink and punch out a 5/8′ circle from moon.
Figure 1: Scene Layers
  1. Assemble scene on Seaside Spray Nested Label. Center brown mountains and adhere to label; there will extra cardstock hanging over label. Center trees on top of mountains and adhere. Trim off excess cardstock around the label.
  2. Place moon above mountains and stamp birds in Early Espresso ink above mountains.
  3. Assemble front of card: Place dimensionals on the back of the Sahara Sand 3.75″ x 5″ cardstock, on the outside corners and also close to the inside edge of the nested label cutout….behind the stitching preferred so it doesn’t show on the front of your card. Adhere to center of Expresso Brown card base.
  4. Adhere Seaside Spray label inside the Sahara Sand nested label cutout.
  5. Adhere Mossy Meadow tree die cut to left edge of front of card.
  6. Adhere twine trim to front of card. Cut 2 dimensionals (mini black dimensionals, preferred) in half and put 4 halves on the back of the sentiment label, wide enough apart that the dimensionals straddle the twine.
Figure 2

Supplies for Stampin Up Mountain Air Handmade Card:

Stampin’ Up! Annual Catalog Kickoff Celebration – Extra Host Rewards For YOU!!

The brand new 2020–2021 Stampin’ Up! Annual Catalog is going live on June 3 2020, and Stamipn’ Up! is having a celebration!

Anyone who places an order of $250+ or holds a party with $250+ in sales during the month of June will receive $25 in extra Stampin’ Rewards!!  So that means that you’ll earn $50 in Stampin’ Rewards with any order or party of $250+ that is submitted between June 3 and June 30! Yay!!! Head over to my online store here to place your order!


Stampin’ Up! Pick A Free Bundle Starter Kit Promotion!!

Wow!!!  Stampin’ Up! is offering an AWESOME promotion if you join during the month of June!!  You get to pick a FREE bundle of your choice with your Starter Kit Purchase!!

Here are the details:

  • Joining promotion dates:  June 3–30, 2020
  • New demonstrators who submit their Independent Demonstrator Agreement (IDA) before June 3 or after June 30 will not be eligible for this promotion.
  • When you purchase your Starter Kit for $99, you get to select $125 worth of products of your choice for your Starter Kit PLUS you get to select ONE stamp and punch bundle (p. 168–169) or ONE stamp and die bundle (p. 173-179) from the new 2020–2021 Annual Catalog—in addition to your regular Starter Kit for FREE.  And your Starter Kit always ships for free…double bonus!!

You can see more details about joining and about our team here on my blog here.  You can also see more information about the benefits of becoming a Stampin’ Up! Demonstrator here.

That is such a great deal!!  If you’ve been considering joining, June will be a great time to jump in!  Drop me an email [email protected]


If you need any stamping supplies, I’d be very happy to be your Demonstrator.  Just click on the Shop Online button on the right side of the screen to go directly to my online store or drop me an email at [email protected] if you have any questions.  Happy Stamping!

  • Visit my online store here.
  • Shop the Clearance Rack here.
  • Shop My Personal Sales here.
  • Don’t forget to follow me on Instagram, Pinterest, YouTube, Facebook. Links at top and bottom of this blog!

Ornate Garden Suite: Thank You Card

I’m excited that Stampin’ Up released the Ornate Garden Suite early so we could use it for Spring, Easter, and Mother’s Days cards or any occasion for that matter! This card uses the Ornate Style stamp set and Ornate Layers Dies to create a simple but pretty card using just stamps, ink and dies! This card uses only the small, single flower from the Ornate Style stamp set–imagine what can be done with the larger flower image! I will be showing more of this Suite here and on my other social media links!

Ornate Style Stamp Set and Ornate Layers Dies

The first step is to die cut the whisper white frame and terracotta tile rectangle from the Ornate Layers die set as shown in Figure 1. Other die cuts include an Whisper White oval and a Terracotta layering stitched oval for the sentiment.

Figure 1

The rest of the steps are straight forward. Layer the white lace rectangle onto a Terracotta card base. Use the Detailed Trio punch to round the corners on the Ornate Garden Specialty Designer Series patterned paper then layer onto the white rectangle. Next layer the Terracotta rectangle on top of the patterned paper. Layer the ovals together and stamp the sentiment and the small flower from the Ornate Style stamp set on the white oval. Color in the flower with blends and then apply the oval to the card using dimensionals. Tie a bow and add to the card.

Give to your favorite person to brighten their day!

Measurements for Ornate Garden card:

  • Terracotta Tile card stock: (1) 8.5″x 5.5″ scored at 4.25″ on the 8.5″ side; piece for stitched rectangle and stitched oval
  • Whisper White card stock: (1) 4.25′ x 5.5″; piece for oval; (1) 4″ x 5.25″ for inside
  • Ornate Garden Specialty Paper: (1) 4.75″ x 3.25″

Supplies:

This card base was inspirational when Easter rolled around. The bunny and the squirrel from Fabled Friends was looking for a home and this card base was perfect! They look like they are sitting in a field of flowers!

Fabled Friend bunny
Fabled Friends squirrel
Fabled Friends sqirrel

Positive Thoughts: Blending Technique Sympathy Card

This card uses a blending technique, which adds depth to this beautiful card, using Stampin’ Up’s Positive Thoughts stamp set and Nature’s Thoughts dies. See how easy this card is to make with just paper, ink and dies!

Take a piece of very vanilla card stock and stamp the leaf in the corner. Next, dip a makeup/foundation brush into the blushing bride ink pad and then swirl it on the paper, starting from the corner out to the edges and center. This gives it a nice ombre effect. Continue this process until you have the color and amount of coverage you want. When you see the finished result, it appears as if the image and ink color was embedded in the paper! Once the background is done, stamp the blackberry bliss flowers. Note: the second flower was not re-inked, giving it different shade.

Making the background

Using the rectangle die from the Nature’s Thought die set, center over the vanilla cardstock and die cut.

Die cut rectangle from center

Mount the vanilla frame on a blackberry bliss card base. Then mount the rectangular vanilla piece on a piece of blackberry bliss card stock and adhere to center of card with dimensionals. Now it’s time to decorate!

Put the blackberry lace along the bottom of the inner vanilla piece. Add a blackberry bliss center to the blushing bride die cut flower and adhere it to the card with dimensionals. Then tuck the blushing bride leaves under the flower, and lastly, adhere the die cut butterfly.

Make your sentiment and then punch the right edge with the Banner Triple Punch. Place it on the card just above the lace accent and slightly tucked under the flower!

Voila! Love these two colors together! Positive Thoughts stamp set is a great all-occasion card; any sentiment will work here!

Measurements for Positive Thoughts card:

Vanilla Card Stock: 4 x 5.25″; scraps for flower; 3/4″ x 2.5″ for sentiment
Blackberry Bliss Card Stock: (1) 8.5″ x 5.5″, scored at 4.25″ on the 8.5″ side; (1) 4.5″ x 3″ , scraps for butterfly
Blushing Bride Card Stock: scraps for leaves

Supplies:

Stampin Up Timeless Tulips: Step Fold Card

Tulips are a symbol of spring and cards made with Stampin’ Up Timeless Tulips and the Tulip Builder Punch are full of joy and love of Spring!  This card is well suited for Easter, Mother’s Day and anytime you need a card to brighten someone’s day!    

stamping timelesstulips stampinup handmadecards rubberstamping stepfoldcard
Timeless Tulip Step Fold Card

Measurements for Timeless Tulips:

Whisper White card stock: 5.25”x4.25”, white scrap for tag
Daffodil Delight card stock: 2.5” x 5.25”, scored at 0.5”, 1.5” on 5.25” side
Pear Pizzazz card stock: 4.25”x10.25”, scored at ½”x 1.5” x 3.75” x 4 ¾” on the 10.25” side.
Whisper White Bakers Twine: 14”
DSP: Pleased as Punch Green sheets: (1) 3/4”x4”; (1) 2.25”x3.75”; (1) ¾”x2.25”
DSP: Pleased as Punch Rain: 4”x3.25”
DSP: Please as Punch Stripes: 4” x 2”

Directions

Place tear & tape on the ½’ scored section of the Pear Pizzazz and the Daffodil Delight card stock. Crease all the score lines on the Pear Pizzazz and Daffodil Delight card stock in same direction with a bone folder, keeping the tear & tape on the outside of the folds, i.e. it should not be on the inside of the box that it forms.
Adhere the striped paper and the green strip on the Pear Pizzazz card stock in the 2 sections next to the tear & tape. Flip over the Pear Pizzazz cardstock and adhere the rain paper to the largest section at the top (figure 1)

Figure 1

Tie the twine around the 2.25” side of the 2.25”x 3.75” green sheet about 1/3” from the bottom. Next, adhere this green piece to the largest section of the Daffodil Delight card stock on the side with the tear & tape. Adhere the smallest piece of green paper onto the Daffodil Delight card stock (see Figure 2).

Figure 2

Adhere the Daffodil Delight card stock to the striped paper, with patterned paper facing away from back of card.
Stamp the greeting and adhere to the top of the largest section of the Daffodil Delight card stock (Figure 3)

Figure 3

Decorate the front with punched and stamped tulips and leaves; use dimensionals on the center tulip.

Place 1 leaf and 1 tulip on each side of card
Figure 4 – Add center tulip with dimenstionals

Important Step:

It is time to take off the tear & tape and adhere ends to card base. First, fold the Pear Pizzazz card stock between the bottom of the card (i.e. the fold between the bottom of back of the card and the bottom of the card, i.e. the section with no card stock). Second, fold in the section between the top of the stripe paper and the section with the green paper card stock (see Figure 5). Take off the tear & tape, keeping the folds in place and lay flat against back of card to adhere.

The next step is to adhere the Daffodil Delight cardstock to back of card. Keeping the card folded as you did for the Pear Pizzazz piece, fold the Daffodil Delight card stock between the two green pattern papers and take off the tear & tape and adhere to back of card. You card should be laying flat when you are adhering these pieces.

Figure 5

Stamp the white card stock with sentiment and adhere to back of card.

Supplies for Timeless Tulips Card:

Happy Birthday To You: Birthday Card

This birthday card is so easy to make using the Happy Birthday to You stamp set and coordinating dies. When you give it to someone, you will make them feel special!

Measurements:

  • Card base: Pool Party (fold on left hand side) 8.5”x5.5”, scored on 8.5” side at 4.25”; (1) 0.75”x4.25” piece for sentiment
  • White CS: (2) 4”x5.25””, (1) piece to die cut 2 cakes
  • Soft Suede CS: (1) 3.75”x4.75”
  • Linen Thread: (2) 8” pieces
  • Scalloped Lace Trim: 4.25”

Directions:

Picture 1

Stamp 2 cakes in Expresso Brown ink on extra paper (Picture 1) and die cut one cake and then die cut only the flowers from the second cake. 
Sponge daub the die cut flowers with pool party ink and color the leaves with green watercolor pencil. Next, blend the color on the leaves with blender pen (Picture 2). Color lines on cake with gray watercolor pencil.

Picture 2

Emboss white card stock (4”x5.25”) with Coastal Weave embossing folder. 
Die cut the stitched rectangle from Soft Suede card stock and then emboss with Subtles embossing folder.

Picture 3

Use the Banner Triple punch to cut the ends of sentiment strip—only punch tip of the ends;  don’t insert strip to the end of the punch.  See Picture 3.  Next stamp sentiment and then adhere the lace to back and bottom of sentiment strip.

Picture 4

Layer the white and Soft Suede layers to card front with tear & tape.  Adhere cake to card front with adhesive.  Next, put dimensionals on back of flower die cut and place on top of first cake. Decorate flowers with pearl centers
Place sentiment strip on card with dimensionals (Picture 4)
Adhere twine bow with glue dot.
Stamp inside of card. Give to the special person for that special occasion!

Supplies for Happy Birthday to You Card: